
Wireless/Redundant Edge Services xl Module Management and Configuration Guide WS.01.03 or greater

2-38
Configuring the ProCurve Wireless Services xl Module
Radio Port Adoption
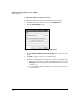
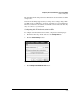
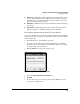
Figure 2-22. Add Radio Screen
8. In the Radio Index field, enter a number to identify this RP.
9. In the MAC Address field, enter the MAC address for the RP.
10. Select the radio type—either 802.11a or 802.11bg.
11. Click OK. The RP’s radios are added to the Network Setup > Radio screen,
but it takes a few seconds for the green checkmark to appear in the
Adopted field.
802.1X Authentication for RPs
To prevent rogue RPs from being adopted, you can also configure 802.1X
authentication for RPs. The ProCurve RPs 210, 220, and 230 include an 802.1X
client for such authentication. Using MD5 authentication, the client automat-
ically sends the RP’s credentials when the RP connects to a network device.
The switch to which the RP connects forwards the credentials to an authen-
tication server and, if the credentials are correct, allows the RP to join the
network.
The authentication server may store a VLAN setting for the RP, which it sends
to the switch after the RP authenticates. Such dynamic configuration of the
Radio Port VLAN can replace auto-provisioning on the wireless services-
enabled switch or manual configuration on an infrastructure switch. (See
“Communicating with RPs: Radio Port VLANs” on page 1-4 for more informa-
tion about configuring Radio Port VLANs.)