
Wireless/Redundant Edge Services xl Module Management and Configuration Guide WS.01.03 or greater


3-24
Wireless Local Area Networks (WLANs)
Configuration Options: Normal Versus Advanced Mode
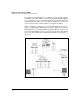
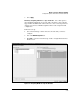
3. In the Network Setup > WLAN Setup screen, select the WLANs and click
Enable.
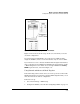
4. Click Global Settings.
5. Check the box for Advanced Configuration and click OK.
6. If necessary, tailor the radio adoption default configurations:
a. Select Network Setup > Radio Adoption Defaults > WLAN Assign-
ment.
b. Edit the WLAN assignment, as described in “Manually Assigning
WLANs to the Radio Adoption Default Configuration” on page 3-15.
For example, you might select a different WLAN from the Primary
WLAN drop-down menu.
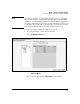
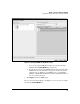
7. If necessary, tailor a specific radio’s configuration (the radio must already
be adopted):
a. Select Network Setup > Radio > WLAN Assignment.
b. Select the radio and click Edit.
c. Edit the WLAN assignment, as described in “Manually Assigning
WLANs to a Specific Radio” on page 3-19. For example, you can
prevent an RP in a public space from supporting a WLAN by removing
the check from the Assign box for that WLAN.
Changing from Advanced Mode to Normal Mode
Configuration
Before disabling advanced mode configuration, you must verify that all WLAN
assignments are compatible with normal mode. Check that:
■ WLANs 1, 5, 9, and 13 (if enabled) are assigned to BSSID 1
■ WLANs 2, 6, 10, and 14 (if enabled) are assigned to BSSID 2
■ WLANs 3, 7, 11, and 15 (if enabled) are assigned to BSSID 3
■ WLANs 4, 8, 12, and 16 (if enabled) are assigned to BSSID 4
If necessary, reconfigure the WLAN assignments as described in “Enabling
WLANs Using Advanced Mode Configuration” on page 3-13. You must also
remove all WLANs with indexes 17 and higher from the BSSIDs.
Note WLANs 17 through 32 are not available in normal mode. If you want the module
to continue supporting one of these WLANs, then you must configure the
corresponding SSID and settings on a WLAN with an index number between
1 and 16.