
Wireless/Redundant Edge Services xl Module Management and Configuration Guide WS.01.03 or greater


4-6
Redundancy Groups
High Availability for Wireless Services
It is possible, however, to select active mode for both the primary module and
the redundant module (although this is not the preferred configuration). The
two modules can then load balance the available RPs.
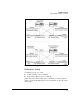
By default, load balancing is based on each module’s load value. When an RP
is detected, the module with the lowest load value adopts that RP. If both
modules have the same load value, the module with the lowest media access
control (MAC) address adopts the RP.
Basing adoption on the load value is not always the best way to manage RPs,
however. For example, fast roaming is not supported between RPs that are
adopted by different modules. To minimize roaming issues, you may want to
ensure that two RPs in the same area are adopted by the same module.
You can use adoption preference IDs to determine which RPs each module
adopts. You can set an adoption preference ID for both the module and the
RPs. If you want a module to adopt an RP, the module’s adoption preference
ID should match the RP’s adoption preference ID. You can set the adoption
preference ID for RPs in:
■ the radio adoption default configuration
■ the configuration for a particular RP
If you use adoption preference IDs, however, RP load balancing is not precise
because it is an all-or-nothing situation. That is, if both modules are operating,
they each adopt radios based on adoption preference IDs, no longer taking
load balance into account. If one module experiences heavy traffic and the
other module experiences almost none, the two modules do not redistribute
the RPs.
Selecting active mode for both modules in a redundancy group still provides
high availability. If one module fails, the other will adopt the failed module’s
radio ports.
Configure an Adoption Preference for the Module
To set an adoption preference for the module itself, complete the following
steps:
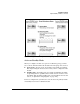
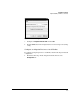
1. Click Network Setup > Radio and select the Configuration tab.
2. Click the Global Settings button.