
Wireless/Redundant Edge Services xl Module Management and Configuration Guide WS.01.03 or greater


5-24
Radio Port Configuration
Configuring Radio Settings
To allow wireless stations to sleep longer between transmissions, you can
increase the number of beacons between DTIMs. This helps to preserve
battery life for the wireless station. However, spacing DTIMs further apart
increases the chance that a station may miss the DTIM, which can cause
increased jitter and delay. To support streaming multicast audio and video or
other jitter-sensitive applications, you can decrease the number of beacons
between DTIMs.
The default DTIM period is 2 beacons.
To set the default number of beacons between DTIMs that radios in your
network broadcast, follow these directions:
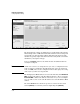
1. Select Network Setup > Radio Adoption Defaults > Configuration, select
the radio type, and click Edit.
2. Enter the number of beacons between DTIMs in the DTIM Period field.
3. Click OK.
Setting the Self Healing Offset. In a wireless network that implements
neighbor recovery, an RP radio may increase its power to compensate for a
failed RP. In this case, by default, power is increased to the country's regula-
tory maximum. However, when RPs are situated close to each other or when
they use external antennas, transmitting at this power may cause interference.
To prevent such interference, set a self healing offset, which is subtracted from
the radio’s maximum power to produce a new maximum for the RP radio
responding to a failed neighbor. (For more information on neighbor recovery,
see Chapter 6: Wireless Network Management.)
To set the default Self Healing Offset for radios in a network that uses neighbor
recovery, follow these directions:
1. Select Network Setup > Radio Adoption Defaults > Configuration, select
the radio type, and click Edit.
Like the radio’s normal power setting, the self healing offset is configured
in terms of dBm. The default value is 0. For additional information on
determining an appropriate offset value, see the documentation shipped
with the RP.
2. Click OK.