
HP ProCurve 802.11a Access Point Kit 160wl Quick Installation Guide

HP ProCurve 802.11a Access Point Kit 160wl
Quick Installation Guide
1 Verify Kit Contents
1. HP ProCurve 802.11a AP Kit 160wl (5 GHz) with antenna adapter
(HP 802.11a 160wl)
2. HP ProCurve AP 520wl Software Upgrade CD-ROM
3. Documentation:
a. Quick Installation Guide (this document)
b. Read Me First for the HP ProCurve 802.11a AP Card 160wl
c. Support/Warranty Information booklet
d. Regulatory and Radio Approvals booklet
Additional Items Required
— Desktop PC or laptop with a CD-ROM drive
— Windows 95 or newer
— MS IE 5.5 or Netscape 6.0 or better web browser - it may be necessary to
disable the browser proxy server in order to access the AP interface
— HP ProCurve Wireless Access Point 520wl (HP AP 520wl)
2 Install Software and Documentation
1. Insert the installation CD into your computer CD-ROM drive and install the
software, documentation, and help files from the CD. If the installation
wizard does not auto-run, access your CD-ROM drive and run setup.exe.
The ScanTool icon and the TFTP Server Install icon are installed on your
desktop.
The rest of the files, including the Access Point software file (*.bin), are
installed in the following directory and subdirectories of it:
C:\Program Files\HP\WL520_AP\.
For the 802.11a 160wl kit, the software that you load on the AP must be
version 2.1.0 or later. An appropriate version of the software is included on
the CD that came with the 160wl kit. Newer versions of the software may be
available and can be found on the HP ProCurve web site:
http://www.hp.com/go/hpprocurve.
2. Run the TFTP server or click on the TFTP Server Install icon to install the
server. Then, configure the TFTP server as follows:
a. From the TFTP server File menu, click Configure.
b. Click the tab TFTP Root Directory and make sure that the directory
named is the same as where the Access Point software is located
(C:\Program Files\HP\WL520_AP\).
c. Click the Security tab and make sure the Transmit and Receive files
button is selected.
3. Use ScanTool to find the IP address of the HP AP 520wl.
4. Open your web browser and type in the IP address of the HP AP 520wl as
the URL.
5. On the HP AP 520wl login page, leave the user name field empty, enter your
network password, and click OK. The default password is public.
6. Click on the Command button, then select the Download tab.
7. Fill in the information needed for the TFTP server transfer and click OK.
The Server IP address is the address for your PC; the File Name is
hp520wl_210.bin; the File Type is Img (image).
8. Once the new image is loaded, you can reboot the HP AP 520wl by clicking
on the Reboot tab, or simply unplug the HP AP 520wl and proceed to the
next step, installing the HP 802.11a 160wl kit.
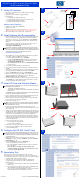
3 Install AP Card and Antenna Adapter
Using the HP 802.11a 160wl AP kit, you can set up an HP 520wl AP using
the following card combinations:
— one HP 802.11a 160wl AP kit in slot A
— one HP 802.11a 160wl AP kit in slot A and one HP 802.11b 150wl AP
Card in slot B
To eliminate strain on the antenna adapter cable, HP recommends that the
HP 802.11a 160wl kit be installed only in slot A.
1. Remove the HP AP 520wl from your network by unplugging the power and
Ethernet cables from the unit (not shown in illustrations).
2. Remove the HP AP 520wl from its mounting location - keep the mounting
bracket with the unit (not shown in illustrations).
3. Remove the outer plastic cover.
Make sure you have at least one card slot available. The power or Ethernet
cable tie wrap may need to be cut and the cable repositioned to allow the
antenna adapter to fit correctly.
4. Position the antenna adapter with the AP Card facing the slot in the
HP AP 520wl and insert the HP 802.11a 160wl AP Card all the way into card
slot A until it stops.
5. Angle the antenna adapter slightly forward, pinch the end tabs inward, and
carefully slide the antenna adapter onto the mounting bracket. The end tabs
fit inside the sides of the mounting bracket and the two middle tabs fit into
slots in the base of the mounting bracket, as shown in the illustration.
6. Continue to press the bar of the antenna into the mounting bracket while
rotating the antenna downwards and clip two small tabs on the outside edge
of the adapter into the small cutouts on the base of the mounting bracket
(not shown in illustrations).
7. Position the antenna for best reception:
— at a 90
o
angle for flat surface mounts
— at a 180
o
angle for wall mounts
8. Re-install the cover and mount the HP AP 520wl back in place.
9. Connect the power and Ethernet cables to the HP AP 520wl.
(not shown in illustrations).
4 Configure the HP 802.11a AP Card
The following is the minimal configuration change you should make on the
HP 802.11a AP Card. For the other configuration items, you can use the
default values for now. See the User Guide for information about the other
configuration options.
1. Return to the Access Point web browser interface and click on the
Configure button. Then, click on the Interfaces tab and enter a Network
Name (SSID) for the card.
2. Click on the Security tab, and then the Encryption tab.
a. Enable encryption for the 802.11a AP card.
b. Type in the alphanumeric WEP encryption key and select which key to
use for encryption.
Make sure that you configure the clients with the same
encryption information. Otherwise, the clients may not be able
to associate with the HP AP 520wl.
5 Association Test
(These steps are not shown in the illustrations. Please refer to the
documentation that came with your wireless PC Card for more information.)
1. Install an 802.11a wireless PC Card in a laptop or other computer, including
the drivers and the client management software.
2. Configure the PC card to match the network name (SSID) and the
encryption information of the HP 802.11a AP card installed in the
HP AP 520wl, then:
a. Verify that your client management software shows association with the
HP AP 520wl.
b. Verify connectivity to the wireless client. If you are using DHCP, verify
that an IP address gets assigned to the wireless client.
You can test the connectivity additionally by executing a “Ping” from the
client to the HP AP 520wl or any IP address on network.
1
Support is as close
as the World Wide Web!
http://www.hp.com/go/hpprocurve
Follow the link that leads you to technical support, software, and the information
library. Our web site has everything you need in one place, around the clock, seven
days a week:
● Software and drivers (see “When Downloading Files”, below)
● Troubleshooting information
● Product and technology information
● Support contacts
Be sure to talk to your reseller about the support services they offer for your HP
networking products.
If you don’t have World Wide Web access, these sources provide software, drivers, and
technical information.
CD-ROM
Every managed HP Procurve product comes with a CD-ROM that includes manage-
ment software, MIBs, documentation, and other useful technical information.
HP FTP Library Service
When Downloading Files
Files are typically named to correspond to the HP product number of the product
they’re intended for. If the file you download has a file extension of “.exe”, it is a
compressed file. For example, the product HP J3200A may have a file j3200a.exe that
is extracted by typing j3200a
[Enter].
ftp ftp.hp.com
Name: anonymous
Password: john@mycompany.com
ftp> bin
ftp> cd /pub/networking/software
ftp> get filename
ftp> quit
Use your FTP software to ftp to HP’s site.
Log in as “anonymous”.
Enter your email address as your password.
Enter bin as the file transfer type.
Go to the directory that has the files.
Transfer the file you want to your computer.
Quit the connection.
Your HP Reseller can help, too!
Other HP Electronic Support Services
1
1
2
3
1
Read Me First
for the HP ProCurve Wireless Products
This Read Me First provides information for the following products:
● HP ProCurve Wireless Access Point 520wl (J8133A)
● HP ProCurve Range Extender Antenna 100wl (J8134A)
● HP ProCurve 802.11b AP Card 150wl 11CH (J8135A)
● HP ProCurve 802.11b AP Card 150wl 13CH (J8136A)
● HP ProCurve 802.11b AP Card 150wl 14CH (J8137A)
These HP ProCurve products are re-branded versions of existing HP products, which
in some cases are HP-post-merger re-branded products from Compaq.
Contents of this Read Me First
The following information is provided in this Read Me First:
● Product Naming in the Documentation – page2.
Provides a table of comparative product names under the various brands.
● Documentation Errata and Notes – page3.
Provides information on parts of the product documentation that do not
apply to the HP ProCurve version of each of the wireless products, or they
need revision in order to apply.
● Safety Statements – page9.
Provides safety statements for the HP ProCurve wireless products in several
languages. These statements override any safety statements that you may
see in the HP ProCurve wireless product documentation.
● European Market Declaration of Conformity – page16.
This regulatory form overrides any other version of the declaration that you
may see in the wireless product documentation.
HP ProCurve 802.11a Access Point Kit 160wl
Quick Installation Guide
1
Verify Kit Contents
1. HP ProCurve 802.11a AP Kit 160wl (5 GHz) with antenna adapter
(HP802.11a 160w l)
2. HP ProCurve AP 520wl Software Upgrade CD-ROM
3. Documentation:
a. Quick Installation Guide (this document)
b. Read Me First for the HP ProCurve 802.11a AP Card 160wl
c. Support/Warranty Information booklet
d. Regulatory/Radio Approvals booklet
Additional Items Required
— Desktop PC or laptop with a CD-ROM drive
— Windows 95 or newer
— MS IE 5.5 or Netscape 6 .0 or better web browser - it may be necessary to
disable the browser proxy server in order to access the AP interface
— HP ProCurve Wireless Access Point 520wl (HPAP 520wl)
2
Install Software and Documentation
1. Insert the installation CD into your computer CD-ROM drive and install the
software, documentation, and help files from the CD. If the installation
wizard does not auto-run, access your CD-ROM drive and run setup.exe.
The ScanTool icon and the TFTP Server Install icon are installed on your
desktop.
The rest of the files, including the Access Point software file (*.bin), are
installed in the following directory and subdirectories of it:
C:\Program Files\HP\WL520_AP\.
Make sure that you install the latest software available. For the 802.11a
card, this must be version 2.1.0 or later. The latest software is available on
the HP Procurve web site: http://www.hp.com/go/hpprocurve.
2. Run the TFTP server or click on the TFTP Server Install icon to install the
server. Then, configure the TFTP server as follows:
a. From the TFTP server File menu, click Configure.
b. Click the tab TFTP Root Directory and make sure that the directory
named is the same as where the Access Point software is located
(C:\Program Files\HP\WL520_AP\).
c. Click the Security tab and make sure the Transmit and Receive files
button is selected.
3. Use ScanTool to find the IP address of the HPAP 520wl.
4. Open your web browser and type in the IP address of the HP AP 520wl as
the URL.
5. On the HPAP 520wl login page, leave th e user name field empty, enter your
network password, and click OK. The default password is public.
6. Click on the Command button, then select the Download tab.
7. Fill in the information needed for the TFTP server transfer and click OK.
The Server IP address is the address for your PC; the File Name is
hp520wl_210.bin; the File Type is Img (image).
8. Once the new image is loaded, you can reboot the HP AP 520wl by clicking
on the Reboot tab, or simply unplug the HPA P 520wl and proceed to the
next step, installing the HP 802.11a 160wl kit.
3
Install AP Card and Antenna Adapter
Using the HP802.11a 160wl AP kit, you can set up an HP 520wl AP using
the following card combinations:
— one HP 802.11a 160wl AP kit in slot A
— one HP 802.11a 160wl AP kit in slot A and one HP 802.11b 150wl AP
Card in slot B
1. Remove the HPAP 520wl from your network by unplugging the power and
Ethernet cables from the unit (not shown in illustrations).
2. Remove the HPAP 520wl fr om its mounting location - keep the mounting
bracket with the unit (not shown in illustrations).
3. Remove the outer plastic cover.
Make sure you have at least one card slot available. The power or Ether net
cable tie wrap may need to be cut and the cable repositioned to allow the
antenna adapter to fit correctly.
4. Position the antenna adapter with the AP Card facing the slot in the
HPAP 520wl and insert the HP 802.11a 16 0wl AP Card all the way into card
slot A until it stops.
5. Angle the antenna adapter slightly forward, pinch the end tabs inward, and
carefully slide the antenna adapter onto the mounting bracket. The end tabs
fit inside the sides of the mounting bracket and the two middle tabs fit into
slots in the base of the mounting bracket, as shown in the illustration.
6. Continue to press the bar of the antenna into the mounting bracket while
rotating the antenna downwards and clip two small tabs on the out side edge
of the adapter into the small cutouts on the base of the mounting bracket
(not shown in illustrations).
7. Position the antenna for best reception:
—at a 90
o
angle for flat surface mounts
— at a 180
o
angle for wall mounts
8. Re-install the cover and mount the HP AP 520wl back in place.
9. Connect the power and Ethernet cables to the HPAP520wl.
(not shown in illustrations).
4
Configure the HP 802.11a AP Card
The following is the minimal configuration change you should make on the
HP 802.11a AP Card. For the other configuration items, you can use the
default values for now. See the User Guide for information about the other
configuration options.
Return to the Access Point web browser interface and Click on the Configure
button, and select the Interfaces tab, and select a Network Name (SSID) for the
card.
5
Association Test
(These steps are not shown in the illustrations. Please refer to the
documentation that came with your wireless PC Card for more information.)
1. Install an 802.11a wireless PC Card in a laptop or other computer, including
the drivers and the client management software.
2. Configure the card to match the network name (SSID) of the HP 802.11a AP
Card installed in the HPAP 520wl unit, then:
a. Verify that your client management software shows association with the
HPAP 520wl.
b. Verify connectivity to the wireless client. If you are using DHCP, verify
that an IP address gets assigned to the wireless client.
You can test the connectivity additionally by executing a “Ping” from the
client to the HPAP 520wl or any IP address on network.
1
Support is as close
as the World Wide Web!
http://www.hp.com/go/hpprocurve
Follow the link that leads you to technical support, software, and the information
library. Our web site has everything you need in one place, around the clock, seven
days a week:
●
Software and drivers (see “When Downloading Files”, below)
●
Troubleshooting information
●
Product and technology information
●
Support contacts
Be sure to talk to your reseller about the support services they offer for your HP
networking products.
If you don’t have World Wide Web access, these sources provide software, drivers, and
technical information.
CD-ROM
Every managed HP Procurve product comes with a CD-ROM that includes manage-
ment software, MIBs, documentation, and other useful technical information.
HP FTP Library Service
When Downloading Files
Files are typically named to correspond to the HP product number of the product
they’re intended for. If the file you download has a file extension of “.exe”, it is a
compressed file. For example, the product HP J3200A may have a file j3200a.exe that
is extracted by typing j3200a
[Enter]
.
ftp ftp.hp.com
Name: anonymous
Password: john@mycompany.com
ftp> bin
ftp> cd /pub/networking/software
ftp> get filename
ftp> quit
Use your FTP software to ftp to HP’s site.
Log in as “anonymous”.
Enter your email address as your password.
Enter bin as the file transfer type.
Go to the directory that has the files.
Transfer the file you want to your computer.
Quit the connection.
Your HP Reseller can help, too!
Other HP Electronic Support Services
1
1
2
3
1
Read Me First
for the HP ProCurve Wireless Products
This Read Me First provides information for the following products:
●
HP ProCurve Wireless Access Point 520wl (J8133A)
●
HP ProCurve Range Extender Antenna 100wl 34A)
●
HP ProCurve 802.11b AP Card 150wl 11CH (J8135A)
●
HP ProCurve 802.11b AP Card 150wl 13CH (J8136A)
●
HP ProCurve 802.11b AP Card 150wl 14CH (J8137A)
These HP ProCurve products are re-branded versions of existing HP products, which
in some cases are HP-post-merger re-branded products from Compaq.
Contents of this Read Me First
The following information is provided in this Read Me First:
●
Product Naming in the Documentation – page2.
Provides a table of comparative product names under the various brands.
●
Documentation Errata and Notes – page3.
Provides information on parts of the product documentation that do not
apply to the HP ProCurve version of each of the wireless products, or they
need revision in order to apply.
●
Safety Statements – page9.
Provides safety statements for the HP ProCurve wireless products in several
languages. These statements override any safety statements that you may
see in the HP ProCurve wireless product documentation.
●
European Market Declaration of Conformity – page16.
This regulatory form overrides any other version of the declaration that you
may see in the wireless product documentation.
HP ProCurve 802.11a Access Point Kit 160wl
Quick Installation Guide
1
Verify Kit Contents
1.HP802.11a 160wl 5 GHz PC card with antenna adapter
2.CD-ROM with software and documentation
3.Quick Installation Guide (this document)
4.Read Me First
5.Support/Warranty booklet
Additional Items Required
—Desktop PC or laptop with a CD-ROM drive
—Windows 95 or newer
—MS IE 5.5 or Netscape 6.0 or better web browser - disable the proxy server
(do not use a proxy server to access the Internet)
—HPProCurve Wireless Access Point 520wl
2
Install Antenna Adapter
You can install one HP802.11a 160wl
(
5GHz) AP Card with antenna adapter
in each HP520wlAP unit, or you can use one HP 802.11b 150wl (2.4GHz) AP
Card and e HP802.11a 160wl PC Card with antenna adapter.
1.Remove the HP520wlAP device from your network by unpluging the power and
Ethernet cables from the unit (not shown in illustrations).
2.Remove the unit from its mounting location - keep the mounting bracket with
the HP520wlAP device (not shown in illustrations).
3.Remove the outer plastic cover.
Make sure you have at least one card slot available. The power or Ethernet cable
tie wrap may need to be cut and the cable repositionned to allow the antenna
adapter to fit correctly.
4.Position the antenna adapter with the ard facing the slot in the HP520wlAP
unit and insert the HP802.11a 160wl AP Card into the available card slot.
5.Angle the antenna adapter slightly forward, pinch the end tabs inward, and
carefully slide the antenna adapter onto the mounting bracket. The end tabs fit
inside the sides of the mounting bracket and the two middle tabs fit into slots in the
base of the mounting bracket, as shown in the illustrations.
6.Continue to press the bar of the antenna into the mounting bracket while rotating
the antenna downwards and clip two small tabs on the outside edge of the adapter
into the small cutouts on the base of the mounting bracket (not shown in
illustrations).
7.Position the antenna for best reception:
—at a 90
�
angle for flat surface mounts
—at a 180
�
angle for wall mounts
8.Re-install the cover and mount the HP520wlAP device back in place.
9.Connect the power and Ethernet cables to the HP520wlAP unit.
(not shown in illustrations).
3
Install Software and Documentation
1.Insert the CD into your computer CD-ROM drive and install the software and
documentation.
The ScanTool icon is installed on your desktop.
Copy the Help files to the directory C:\Program Files\HP520wlAP\Help.
Make sure that you install the lastest software available. For the 802.11a card,
this needs to be at least version 2.1. The lastest version of the software is
available on the HP Procurve web site: http://www.hp.com/go/hpprocurve.
2.Copy the AP image (*.bin) to your TFTP server directory.
3.Use ScanTool to find the IP address of the HP520wlAP Access Point unit.
4.Open your web browser and type in the IP address of the Access Point.
5.Leave the user name field empty, enter your password, and click
OK
.
6.Click on the
Command
button, then select the
Download
tab.
7.Fill in the information needed for the TFTP server transfer and click
OK
.
8.Once the new image is loaded, reboot the AccessPoint.
4
Configure the HP 802.11a AP Card
1.Click on the Configure button, and select the Interfaces tab. Configure the
following parameters for the 802.11a AP Card:
a.Select a Network Name (SSID) for the card.
b.Auto Channel Select (enabled by default).
If Auto Channel Select (ACS) is disabled, select a Frequency Channel for the
HP 802.1a AP Card (the available choices are listed in the pull-down menu).
c.Select the Transmit Rate – by default, this value is set to Auto Fallback which
allows the Access Point to determine the best rate – we suggest that you leave
this on the default setting.
2.Click on the Network tab, and select the Encryption tab.
a.Enable encryption for the 802.11a AP Card.
b.Type in an alphanumeric WEP encryption key and select which key to use for
encryption.
5
Association Test
(These steps are not shown in the illustrations. Please refer to the documentation that
came with your wireless PC Card for more information.)
1.Install an 802.11a wireless PC Card in a laptop or other computer, including the
drivers and the Client Manager application.
2.Configure the card to match the network name (SSID) and encryption key of the
wireless interface card installed in the HP520wlAP unit, then:
a.Verify that your Client Manager application shows association with the
HP520wlAP device.
b.Verify that an IP address gets assigned to the wireless client.
c.“Ping” any IP address on network.
1
1
2
3
2
8
4
6
7
3
5
5
3
7
1
2
6
4
DRAFT © 2001-2003 Hewlett-Packard Company
2
7
1
3
6
2
3
8
4
6
7
3
5
5
4
5990-3092 © 2001-2003 Hewlett-Packard Company
2
7
1
3
6
2
3
8
4
6
7
3
5
5
4
5990-3092 © 2001-2003 Hewlett-Packard Company
(J81
on
AP C
P/N