
ProLiant BL p-Class GbE Interconnect Switch Web-based Interface Reference Guide


Configuring the GbE Interconnect Switch using the Web-based Interface
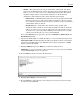
2. Click Save Changes. The Save Configuration window is displayed.
3. Click Save Configuration to save all the changes made in the current session to the
NVRAM memory of the GbE Interconnect Switch. A message box is displayed when the
save is completed.
4. Click OK. After the GbE Interconnect Switch configuration settings have been saved to
NVRAM, they become the default settings for the GbE Interconnect Switch. These
settings are used every time the GbE Interconnect Switch is rebooted.
IMPORTANT: After saving your final configuration, HP highly recommends that you save the GbE
Interconnect Switch configuration image to TFTP server storage. Refer to the section, “Uploading a
Configuration File to TFTP Server.”
Managing User Accounts
After logging on to the GbE Interconnect Switch for the first time, you must set up at least
one user account with Root privileges. You can set up a maximum of eight users on a GbE
Interconnect Switch.
There are three levels of user access rights: Root, User+, and User. Some menu selections
available to users with Root privileges may not be available to those with User+ and User
privileges.
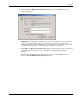
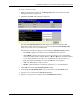
The following table summarizes the user access rights.
Table 2-1: User Access Rights
Privilege Root User+ User
Configuration Yes Read-only Read-only
Network Monitoring Yes Read-only Read-only
Community Strings and Trap Stations Yes Read-only Read-only
Update Firmware and Configuration Files Yes No No
System Utilities Yes Ping-only Ping-only
Factory Reset Yes No No
Reboot Switch Yes Yes No
Add/Update/Delete User Accounts Yes No No
View User Accounts Yes No No
2-2 HP ProLiant BL p-Class GbE Interconnect Switch Web-based Interface Reference Guide