
ProLiant BL p-Class GbE Interconnect Switch Web-based Interface Reference Guide

Configuring the GbE Interconnect Switch using the Web-based Interface
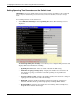
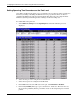
— Cost to Root—Displays the summation of all path costs between the current bridge
and the root bridge via the root port.
— Root Port—Displays the port on the current bridge that has the best path to reach the
designated root bridge.
— Root Priority (Sec)—Displays the priority of the current designated root bridge.
— Bridge Max Age (6–40 Sec)—Type the maximum age. The range is 6 to 40 seconds.
When the maximum age is reached, if a Bridge Protocol Data Unit (BPDU) has still
not been received from the Root Bridge, your GbE Interconnect Switch will start
sending its own BPDU to all other switches for permission to become the Root
Bridge. If your GbE Interconnect Switch has the lowest bridge identifier, it will
become the Root Bridge.
— Bridge Hello Time (1–10 Sec)—Type the hello time. The range is 1 to 10 seconds.
This time is the interval between two transmissions of BPDU packets sent by the
Root Bridge to tell all other switches that it is indeed the Root Bridge. If you set a
hello time for your GbE Interconnect Switch and it is not the Root Bridge, the default
hello time will be used until your GbE Interconnect Switch becomes the Root Bridge.
— Bridge Forward Delay (4–30 Sec)—Type the forward delay time. The range is 4 to
30 seconds. This interval is the time any port on the GbE Interconnect Switch spends
in the listening state while moving from the blocking state to the forwarding state.
— Bridge Priority (0–65535 Sec)—Type the bridge priority. A priority for the GbE
Interconnect Switch can be set from 0 to 65,535. Zero indicates the highest priority.
The priority number is used in the voting process between switches on the network to
determine which switch will be the root switch. A low number indicates a high
priority, and a higher probability that this GbE Interconnect Switch will be elected as
the root GbE Interconnect Switch.
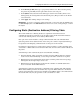
2. Click Apply after making changes to the settings.
IMPORTANT: To save the configuration settings permanently, you must enter them into NVRAM using
the Save Changes option on the Maintenance menu. Refer to the section, “Saving Changes,” earlier in
this chapter.
HP ProLiant BL p-Class GbE Interconnect Switch Web-based Interface Reference Guide 2-21