
ProLiant BL p-Class GbE Interconnect Switch Web-based Interface Reference Guide


Configuring the GbE Interconnect Switch using the Web-based Interface
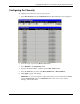
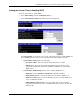
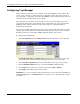
The Time Zone and DST screen allows you to set the time zone and daylight saving
time information. The screen is divided into the following three sections:
— Time Zone and DST Settings allows you to configure the following:
— Daylight Saving Time State—Select Disabled, Repeating, or Annual to set if
and how daylight saving time will be determined. Repeating allows you to set
specific days of the week and month, for example the first Sunday in April
through the fourth Sunday in October. Annual allow you to set specific dates for
the year, for example April 3 through October 27.
— Daylight Saving Time Offset in Minutes— Select the number of minutes that
the daylight saving time is offset from the current time. Valid values are 00 to 60.
— Time Zone Offset: from GMT in +/- HH:MM—Select the number of hours
before or after Greenwich Mean Time (GMT) that your time zone represents.
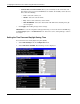
— DST Repeating Settings allows you to configure when the daylight saving time
offset will take effect and when its effect will be cancelled. These values only take
effect if the DST status is set to Repeating.
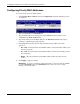
To set when the repeating offset will take effect, complete the following:
— From: Which Day—Select from First, Second, Third, and Fourth.
— From: Day of Week—Select the day of the week.
— From: Month—Select the month.
— From: Time in HH MM—Select the time in hh mm format.
To set when the offset will be cancelled, complete the following:
— To: Which Day—Select from First, Second, Third, and Fourth.
— To: Day of Week—Select the day of the week.
— To: Month—Select the month.
— To: Time in HH MM—Select the time in hh mm format.
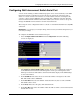
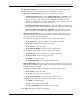
— DST Annual Settings allows you to configure when the daylight saving time offset
will take effect and when its effect will be cancelled. These values only take effect if
the DST status is set to Annual.
Complete the following fields for when the annual offset will take effect:
— From: Month—Select the month.
— From: Day—Select the day of the month.
— From: Time in HH MM—Select the time in hh mm format.
Complete the following fields for when the offset will be cancelled:
— To: Month—Select the month.
— To: Day—Select the day of the month.
— To: Time in HH MM—Select the time in hh mm format.
3. Click Apply after making changes to the settings.
HP ProLiant BL p-Class GbE Interconnect Switch Web-based Interface Reference Guide 2-43