
ProLiant BL p-Class GbE Interconnect Switch Web-based Interface Reference Guide

Configuring the GbE Interconnect Switch using the Web-based Interface
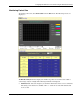
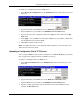
5. Click Apply to save the TFTP server IP address, TFTP server port number, and file name
into the GbE Interconnect Switch RAM.
6. Click Start to initiate the file transfer.
IMPORTANT: To save the configuration settings permanently, you must enter them into NVRAM
using the Save Changes option on the Maintenance menu. Refer to the section, “Saving
Changes,” earlier in this chapter. If you do not save configurations to NVRAM, the configurations
you are uploading to a TFTP server will not be saved correctly.
Uploading Switch History Log
The GbE Interconnect Switch management agent can upload its history log file to a TFTP
server.
IMPORTANT: An empty history file on the TFTP server must exist on the server before the GbE
Interconnect Switch can upload its history file.
To upload the switch history log:
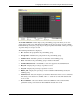
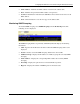
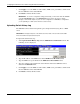
1. Select Upload Switch History Log from the TFTP Services Maintenance menu. The
following screen is displayed.
2. Type the IP address of the TFTP Server in the TFTP Server IP Address field.
3. Type the TFTP server port number in the TFTP Server Port Number field.
4. Type the complete path and file name of the firmware file for the GbE Interconnect
Switch in the File Name field.
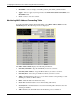
5. Click Apply to save the TFTP server IP address, TFTP server port number, and file name
into the GbE Interconnect Switch RAM.
6. Click Start to initiate the file transfer.
2-66 HP ProLiant BL p-Class GbE Interconnect Switch Web-based Interface Reference Guide