
HP ProLiant BL e-Class Integrated Administrator User Guide


Setting Up the System
Modifying the System Contact Information
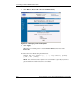
To modify the system contact information using the Web-based user interface:
1. Click the Enclosure tab.
2. Click SNMP Configuration in the left panel.
3. Set the cursor in the System Contact field and type the appropriate information.
4. Click Apply.
To modify the system contact information using the CLI, enter:
SET SNMP CONTACT <contact>
The <contact> field must be 0-20 characters long and supports all the alphanumeric
characters, the underscore, the dash, and spaces with quotes.
Adding Trap Targets
To add a trap target using the Web-based user interface:
1. Click the Enclosure tab.
2. Click SNMP Configuration in the left panel.
3. Type the IP address in the appropriate field of the SNMP area.
4. Click Add.
5. Click Apply.
To add a trap target using the CLI, enter:
ADD SNMP TRAPRECEIVER <IP address>
The <IP address> must be in the form ###.###.###.###, where ### ranges from 0 to
255.
The Integrated Administrator only supports v1 traps and directs the traps to SNMP
port 162 by default. A maximum of eight IP addresses can be added to receive SNMP
traps.
5-28 HP ProLiant BL e-Class Integrated Administrator User Guide
HP CONFIDENTIAL
Writer: Amy Clute File Name: f-ch5 Setting Up the System.doc
Codename: Halo Part Number: 249070-004 Last Saved On: 6/16/03 9:30 AM