
HP ProLiant BL2x220c G7 Server Blade Maintenance and Service Guide


Removal and replacement procedures 50
be used by qualified service personnel. This value should always match the
serial number sticker located on the chassis.
Warning: The serial number should ONLY be modified by qualified personnel.
This value should always match the serial number located on the chassis.
5. Press the Enter key to clear the warning.
6. Enter the serial number and press the Enter key.
7. Select Product ID. The following warning appears:
Warning: The Product ID should ONLY be modified by qualified personnel. This
value should always match the Product ID on the chassis.
8. Enter the product ID and press the Enter key.
9. Press the Esc key to close the menu.
10. Press the Esc key to exit RBSU.
11. Press the F10 key to confirm exiting RBSU. The server blade automatically reboots.
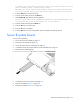
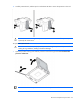
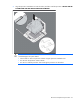
Server blade release lever
WARNING: To reduce the risk of personal injury from hot surfaces, allow the drives and the
internal system components to cool before touching them.
To remove the component:
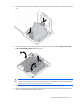
1. Power down the server blade (on page 21).
2. Remove the server blade (on page 22).
3. Access the internal server components (on page 23).
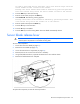
4. Remove the three T-10 screws from the server A assembly.
5. Using a flat-blade screwdriver, separate the release lever cover and the chassis.
6. Remove the failed release lever and plate.
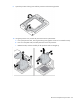
To replace the component, reverse the removal procedure.