
PCI Express Riser Board Installation Instructions ProLiant DL100 Series Generation 2 Servers


6. Remove the PCI Express riser board from its
protective packaging.
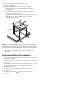
7. Install the PCI Express riser board on the assembly:
a. Align the riser board on the full-length bracket side of
the assembly.
b. Secure the riser board to the assembly using the three
screws you removed in step 5.
c. Align the assembly with the system board expansion slots.
d. Tighten the two captive thumbscrews to secure the
assembly to the chassis.
NOTE: When a standard height/full-length expansion board is installed on
the PCI Express riser board slot, make sure that the corner of the expansion
board is engaged to the PCI retainer bracket located on the system board.
8. Perform the post-installation procedures described in the
next section.
Post-installation Procedures
1. Be sure all components are installed according to the described
step-by-step instructions.
2. Check to make sure you have not left loose tools or parts inside
the server.
3. Reinstall any expansion board(s), peripheral(s), board cover(s),
and system cable(s) that have previously been removed.
4. Reinstall the top cover.
5. Connect all external cables and the AC power cord to
the system.
6. Press the power button
on the front panel to turn on
the server.