
CD-ROM/DVD Drive Install Instructions for HP ProLiant DL100 Series Generation 2 Servers

CD-ROM/DVD Drive
Installation Instructions
for HP ProLiant DL100 Series
Generation 2 Servers
Read instructions completely before beginning
installation procedure.
© Copyright 2005 Hewlett-Packard Development Company, L.P.
The information contained herein is subject to change without notice. The only
warranties for HP products and services are set forth in the express warranty
statements accompanying such products and services. Nothing herein should be
construed as constituting an additional warranty. HP shall not be liable for
technical or editorial errors or omissions contained herein.
Intel is a registered trademark of Intel Corporation or its subsidiaries in the United
States and other countries.
CD-ROM/DVD Drive Installation Instructions
First Edition (March 2005)
Part Number 389881-001
Optional CD-ROM/DVD Drive
The optical media device bay supports the installation of a
slim-type CD-ROM or DVD-ROM drive. Go to the HP website
at
http://www.hp.com/ and refer to the options list for this server
model for a list of supported optical media drives.
Server Configuration Guidelines
Observe the following important guidelines before performing
the installation procedures described in this document.
NOTE: The procedures described in this document assume that the
server is out of the rack and is positioned on a flat, stable surface.
IMPORTANT: Observe the pre- and post-installation procedures
described in later sections when performing any configuration procedure.
CAUTION: Follow the ESD precautions listed in Chapter 2 of the
Maintenance and Service Guide of your ProLiant server when
handling any hardware component. You can download a copy of
this guide from the HP website at http://www.hp.com/.
WARNING: Failure to properly turn off the server before you
open the server or before you start removing/installing
hardware components may cause serious damage as well as
bodily harm.
WARNING: To reduce the risk of personal injury from hot
surfaces, allow the chassis and any installed hardware
component to cool before touching them.
NOTE: This document applies to several server models in the HP
ProLiant DL100 Generation 2 server series. The illustrative figures used
here may not be an exact match to the user’s actual ProLiant server.
Pre-installation Procedures
1. Turn off the server and all the peripherals connected to it.
2. Unplug all cables from the power outlets to avoid exposure to
high energy levels that may cause burns when parts are
short-circuited by metal objects such as tools or jewelry.
If necessary, label each one to expedite reassembly.
3. Disconnect telecommunication cables to avoid exposure to
shock hazard from ringing voltages.
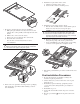
Installing an Optional CD-ROM or
DVD Drive
1. Perform the pre-installation procedures described in the
previous section.
2. Detach the top cover from the chassis:
a. Loosen the captive thumbscrew on the rear panel.
b. Slide the cover approximately 1.25 cm (0.5 in) toward the
rear of the unit, then lift the cover to detach it from the
chassis.
Place the top cover in a safe place for reinstallation later.