XenServer Virtual Machine Installation Guide 4.1.0 Published March 2008 1.
XenServer Virtual Machine Installation Guide XenServer Virtual Machine Installation Guide: Release 4.1.0 Published March 2008 Copyright © 2008 Citrix Systems, Inc. Xen®, Citrix®, XenServer™, XenCenter™ and logos are either registered trademarks or trademarks of Citrix Systems, Inc. in the United States and/or other countries. Other company or product names are for informational purposes only and may be trademarks of their respective owners.
XenServer Virtual Machine Installation Guide 3
Table of Contents 1. About this document .................................................................................................... 1 1.1. Overview .......................................................................................................... 1 1.2. How this Guide relates to other documentation ................................................... 1 2. Creating VMs .............................................................................................................. 2 2.1.
XenServer Virtual Machine Installation Guide 4.9.9. Oracle Enterprise Linux 5 ..................................................................... 5. Updating VMs ............................................................................................................ 5.1. Updating Windows operating systems .............................................................. 5.2. Updating paravirtualized drivers for Windows VMs ............................................. 5.3.
Chapter 1. About this document 1.1. Overview This document is a guide to creating Virtual Machines with XenServer™, the platform virtualization solution from Citrix™. It describes the various methods of getting VMs up and running on XenServer Hosts for each of the supported operating systems. This section summarizes the rest of the guide so that you can find the information you need.
Chapter 2. Creating VMs This chapter provides an overview of how VMs are created and lists virtual memory and virtual disk size minimums, describes the differences in virtual device support for the members of the XenServer product family. This chapter also discusses physical to virtual conversion (P2V), cloning templates, and importing previously-exported VMs. 2.1. Overview VMs are created from templates.
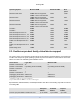
Creating VMs Operating System Minimum RAM Maximum RAM Disk space Windows Vista 32-bit 512MB minimum supported, 768MB or more recommended 32GB 16GB Windows 2003 128MB minimum supported; 256MB or more recommended 32GB 2GB Windows XP SP2 128MB minimum supported; 256MB or more recommended 32GB 1.5GB Windows 2000 SP4 128MB minimum supported; 256MB or more recommended 32GB 2GB CentOS 4 256MB 16GB 800MB CentOS 5 512MB 16GB 800MB Red Hat Enterprise Linux 3.6 64MB 32GB 1.
Creating VMs Enterprise Edition Standard Edition Express Edition Number of concurrent VMs 50 50 4 Support for VLANs yes yes no Support for shared storage yes no no Support for server pools yes no no Support for additional QoS control yes no no If you attempt to create a fifth VM with a Express Edition license, for example, an error message will appear suggesting that you can upgrade your license.
Creating VMs Select OK to proceed. 3. The installer does some hardware detection and initialization, then presents a screen with four choices. Select Convert an existing OS on this machine to a VM (P2V) and choose OK to proceed. 4. A "Welcome to XenServer P2V" screen with a descriptive message is displayed next. Click OK to proceed and follow the on-screen prompts.
Creating VMs If you P2V an existing server, it's best to P2V a test instance of the server, and run it in parallel with the existing physical server until you are satisfied that everything works properly in the virtual environment before re-purposing the existing physical machine. Next, plan how to arrange the desired VMs on the XenServer Hosts.
Creating VMs Note Note that an exported VM that originated on one XenServer Host might or might not be able to be resumed on a different XenServer Host. For example, if a Windows VM created on a XenServer Host with an Intel VT-enabled CPU is exported, then imported to a XenServer Host with an AMDV CPU, it will not start. 2.6.1. Exporting a VM An existing VM can be exported via XenCenter or via the CLI. This section describes using the CLI.
Creating VMs xe vm-import -h -u -pw \ filename= sr-uuid= You can also preserve the MAC address of the original VM by adding the optional preserve set to true: xe vm-import -h -u -pw \ filename= preserve=true 2. The import process will probably take some time. When finished, the command prompt returns the UUID of the newly-imported VM.
Chapter 3. Installing Windows VMs XenServer allows you to install Windows 2000 SP4, Windows Server 2003 (32-/64- bit), or Windows XP SP2 into a VM. Installing Windows VMs on XenServer Host requires hardware virtualization support (Intel VT or AMD-V). Installing a Windows VM can be broken down into two main steps: • installing the Windows operating system • installing the paravirtualized device drivers Windows VMs are installed by cloning an appropriate template from either XenCenter or the CLI.
Installing Windows VMs If making a Windows SMB/CIFS share available to the XenServer host, either use XenCenter to make it available, or connect to the host console and type in: xe-mount-iso-sr unc_path -t smbfs -o username=myname/myworkgroup The unc_path argument should have back-slashes replaces by forward-slashes. -t cifs can be used for CIFS instead of SMB.
Installing Windows VMs Warning Be extremely careful with copying ISOs directly onto the control domain filesystem, as it has limited space available. A network share is a much safer mechanism for storing large numbers of ISO images. If the control domain does fill up, unpredictable behavior will result. 3.2.
Installing Windows VMs 4. In the Remote Desktop section of this dialog box, check the checkbox labeled Allow users to connect remotely to this computer (Windows XP) or Enable Remote Desktop on this computer (Windows 2003 Server). 5. If you want to select any non-administrator users that can connect to this Windows VM, click the Select Remote Users... button and provide the usernames. (Users with Administrator privileges on the Windows domain can connect by default.) 3.4.
Installing Windows VMs 3.5. Release Notes There are many versions and variations of Windows with different levels of support for the features provided by XenServer. This section lists notes and errata for the known differences. 3.5.1. General Windows Issues • When installing Windows virtual machines, users should start off with fewer than four disks. Once the VM and XenServer tools have been installed, users can then add additional virtual disks.
Chapter 4. Installing Linux VMs XenServer supports the installation of many Linux distributions into paravirtualized VMs. There are four installation mechanisms at present: complete distributions provided as built-in templates, Physical-to-Virtual (P2V) conversion of an existing native instance (see Section 2.4, “Physical to Virtual Conversion (P2V)”), using the vendor media in the server's physlca DVD/CD drive, and using the vendor media to perform a network installation.
Installing Linux VMs 4.1. Installation of a built-in distribution This is the simplest way of installing a VM. The template provided with XenServer can be used to directly create a VM running version 3.1 (Sarge) or 4.0 (Etch) of the Debian Linux distribution without need for vendor installation media and without performing a P2V conversion of an existing physical server. The VMs are instantiated by using the vm-install from the CLI, or by cloning the template using XenCenter.
Installing Linux VMs xe vm-install template="" new-name-label= This returns the UUID of the new VM. 4. Get the UUID of the new VM's root disk: xe vbd-list vm-uuid= params=uuid --minimal 5. Using the UUID returned, set the root disk to be not be bootable: xe vbd-param-set uuid= bootable=true 6.
Installing Linux VMs 12. Open a text console to the VM with XenCenter or an SSH terminal and follow the steps to perform the OS installation. Note The console in XenCenter does not support VNC during the OS installation. However, it is possible to perform a graphical installation rather than the text-based installation if you connect an external VNC client to the new VM. You must also set a couple of additional other-config parameters for the VM before starting it.
Installing Linux VMs This returns the UUID of the new VM. 2. Find the UUID of the network that you want to connect to. For example, if it's the one attached to xenbr0: xe network-list bridge=xenbr0 --minimal 3. Create a VIF to connect the new VM to this network: xe vif-create vm-uuid= network-uuid= mac=random device=0 4. Set the install-repository key of the other-config parameter to the path of your network repository. For example, we'll use http://server/RedHat/5.
Installing Linux VMs with real IP addresses already in use in your network. The default range of IP addresses is 192.168.128.1 to 192.168.128.254, and the default netmask is 255.255.255.0. Procedure 4.3. To change the guest installer network values 1. Open a text console on the XenServer Host or install the CLI for remote use. 2. Find the guest installer network: xe network-list The command will return the list of networks available to the XenServer Host.
Installing Linux VMs It is important to install this agent and keep it up-to-date (see Chapter 5, Updating VMs) as you upgrade your XenServer host. Procedure 4.4. To install the guest agent 1. The files required are present on the built-in xs-tools.iso CD image, or alternatively by using the “Install Tools” option in XenCenter. 2. Mount the image into the guest via: mount /dev/xvdd /mnt 3. Execute the installation script as the root user: /mnt/Linux/install.sh 4.
Installing Linux VMs 4.6.3. MAC address In some cases, the MAC address of a cloned VM's virtual network interface is recorded in the network configuration files. After the VM is cloned, the new cloned VM has a different MAC address. Therefore, when started, the network does not come up automatically. Some Linux distributions use udev rules to remember the MAC address of each network interface, and persist a name for that interface.
Installing Linux VMs Note Before setting up your Red Hat VMs for VNC, be sure that you have installed the Linux guest agent. See Section 4.5, “Installing the Linux guest agent” for details. In order to configure VNC on Red Hat VMs, you need to modify the GDM configuration. The GDM configuration is held in a file whose location varies depending on the version of Red Hat Linux you are using.
Installing Linux VMs 0=VNC • If you are using Red Hat Linux 5 or greater, you will need to add the above line just below the [servers] section and before the [server-VNC] section. 4. Save and close the file. Restart GDM for your change in configuration to take effect, by running /usr/sbin/gdm-restart. Note that, for Red Hat Linux, runlevel 5 is used for graphical startup.
Installing Linux VMs where the value of the -geometry parameter can be any valid screen width and height. 4. Save and close the file. 4.8.2. Setting up SLES-based VMs for VNC Note Before setting up your SUSE Linux Enterprise Server VMs for VNC, be sure that you have installed the Linux guest agent. See Section 4.5, “Installing the Linux guest agent” for details. SLES has support for enabling “Remote Administration” as a configuration option in YaST.
Installing Linux VMs 7. The original top-level menu of YaST appears. Tab to the Quit button and press Enter. 4.8.2.3. Modifying the xinetd configuration After enabling Remote Administration, you need to modify a configuration file if you want to allow XenCenter to connect, or else use a third party VNC client. 1. Open the file /etc/xinetd.d/vnc in your preferred text editor. The file contains sections like the following: service vnc1 { socket_type protocol wait user server server_args type port } 2.
Installing Linux VMs # yast 2. Use the arrow keys to select Security and Users in the left menu, then Tab to the right menu and use the arrow keys to select Firewall. Press Enter. 3. In the Firewall screen, Tab to the Firewall Configuration: Settings section. Use the arrow keys to select the Allowed Services in the left menu. 4. Tab to the Firewall Configuration: Allowed Services fields on the right. Use the arrow keys to select the Advanced...
Installing Linux VMs 4.8.3. Setting up Debian-based VMs for VNC The built-in Debian Sarge and Etch templates come pre-configured with VNC setup and ready use. However, the default VNC configuration in Debian does not permit the root administration user to log in by default. To log in by VNC, you can either: • Log in to the text console and create a new, unprivileged user via the adduser command. This is the recommended course of action.
Installing Linux VMs To prepare a Debian guest for cloning (see Section 4.6.3, “MAC address”), Ethernet name persistence must be disabled. For Debian Sarge VMs, name persistence is controlled through /etc/udev/persistent-net-generator.rules in the udev package. It can be disabled by removing the following symlink to that file by: rm -f /etc/udev/rules.d/z45_persistent-net-generator.rules 4.9.2. Red Hat Enterprise Linux 3 XenServer includes a custom port of the RHEL3.
Installing Linux VMs • Disks sometimes do not attach correctly on boot (Red Hat Bugzilla 247265) • Live migration can occasionally crash the kernel under low memory conditions (Red Hat Bugzilla 249867) • Guest kernel can occasionally hang due to other xenstore activity (Red Hat Bugzilla 250381) • If you attempt to install RHEL 4.x on a VM that has more than 2 virtual CPUs (which RHEL 4.x does not support), an error message incorrectly reports the number of CPUs detected.
Installing Linux VMs 4.9.5. CentOS 4 Please refer to Section 4.9.3, “Red Hat Enterprise Linux 4” for the list of CentOS 4 release notes. Unlike RHEL4, CentOS includes a third-party updates mechanism known as yum. The xe-guest-utilities RPM will install a XenServer entry for yum, allowing you to pick up kernel updates provided by Citrix via the standard update mechanism as they become available. 4.9.6. CentOS 5 Please refer to Section 4.9.
Chapter 5. Updating VMs This chapter discusses updating VMs with new Linux kernel revisions, updating Windows operating systems, applying Windows Service Packs, and updates to XenServer paravirtualized drivers and VM utilities. Upgrades to VMs are typically required when moving to a new version of XenServer. The following are current issues involving upgrading VMs running on XenServer to this version: • XenMotion of Windows VMs is not supported until the paravirtualized drivers are upgraded.
Updating VMs 5.3. Updating Linux kernels and guest utilities The Linux guest utilities can be updated by re-running the Linux/install.sh script from the built-in xstools.iso CD image (see Section 4.5, “Installing the Linux guest agent”). From time to time, Citrix also supplies updated Linux kernels for supported distributions. Supported distributions are: • Red Hat Enterprise Linux 5.x • CentOS 5.x • Red Hat Enterprise Linux 4.x • CentOS 4.x • Red Hat Enterprise Linux 3.
Appendix A. Creating ISO images XenServer can use ISO images of CD-ROM or DVD-ROM disks as installation media and data sources for Windows or Linux VMs. This section describes how to make ISOs from CD/DVD media. Procedure A.1. On a Linux computer 1. Put the CD- or DVD-ROM disk into the drive. The disk should not be mounted. To check, type the command: mount If the disk is mounted, unmount the disk. Refer to your operating system documentation for assistance if required. 2.
Appendix B. Setting Up a Red Hat Installation Server This chapter explains how to set up a server as an installation server for Red Hat Linux. For a server to act as a Red Hat Linux network installation server, you need space on your server to copy the entire contents of each CD onto your server. This is typically the number of CDs or ISO images times 650MB. Ensure that the space you intend to use is formatted with your chosen filesystem and is mounted. You can check this space with the command: df -h B.1.
Setting Up a Red Hat Installation Server exportfs -r This configures the most basic read-only export to all hosts on our network. If you want to include more advanced options in your export, such as exporting to certain hosts only, or on a certain subnet only, see the man page for the exports file at exports (5). • NFS needs to be installed and running To check, type the command: showmount -e hostname Entering the showmount command without the hostname parameter will check the local system.
Appendix C. Troubleshooting VM problems If you experience odd behavior, application crashes, or have other issues, this chapter is meant to help you solve the problem if possible and, failing that, describes where the application logs are located and other information that can help your XenServer Solution Provider and Citrix track and resolve the issue. Troubleshooting of installation issues is covered in the XenServer Installation Guide.
Troubleshooting VM problems For Windows VMs, the core dump behavior cannot be controlled through the actions-after-crash parameter. By default Windows crash dumps are put into %SystemRoot% \Minidump in the Windows VM itself. You can configure the VMs dump level by going into My Computer --> Properties --> Advanced --> Startup and Recovery. C.2.
Index Linux, Windows, Intel VT (Intel hardware virtualization), 7, ISO image creating, Making available to XenServer Hosts, 9 Creating ISO image files of installation disks, A L AMD-V (AMD hardware virtualization), 7, Limitations on virtual devices, 3 Limits, virtual disk space, 2 Limits, virtual memory, 2 Linux Creating VMs, guest agent, 19 runlevels, 27 time handling, in VMs, 21 C Cloning VMs, 6, 20 Configuring VNC firewall settings, RHEL, 23 firewall settings, SLES, 25 for Debian VMs, 27 for Red
Index T Remote Desktop, 11 SMB/CIFS share, mounting ISO from, 9 sysprep, 12 Template definition of, Linux VMs, 2, pre-configured (Debian), 2 Windows, Windows VMs, 2, Time handling, in Linux VMs time handling, in VMs, 21 Troubleshooting Linux VM boot problems, 37 Linux VM general problems, 36 Windows VM general problems, 36 X XenServer product family, differences, 3 V Virtual devices, limitations on, 3 Virtual disk size limits, 2 Virtual memory limits, 2 Virtualizing physical servers, general guidelin