HP Scripting Toolkit for Windows User Guide Abstract This document provides information about the Scripting Toolkit for Windows utilities and how best to use the Scripting Toolkit for Windows to configure HP ProLiant servers and BladeSystem infrastructure in a Windows environment. This document is intended for IT experts with experience in scripting operating system installations and configuring HP ProLiant server hardware.
Notices © Copyright 2005, 2012 Hewlett-Packard Development Company, L.P. The information contained herein is subject to change without notice. The only warranties for HP products and services are set forth in the express warranty statements accompanying such products and services. Nothing herein should be construed as constituting an additional warranty. HP shall not be liable for technical or editorial errors or omissions contained herein. Confidential computer software.
Contents 1 Introduction...............................................................................................6 Scripting Toolkit for Windows.....................................................................................................6 Microsoft Windows Preinstallation Environment.............................................................................6 Minimum requirements..............................................................................................................
IFHW command-line syntax.................................................................................................21 IFHW command-line arguments...........................................................................................21 IFHW return codes.............................................................................................................21 IFHW command line examples............................................................................................
LogicalDriveSSPState.................................................................................................38 ParityGroups............................................................................................................39 PreferredPath...........................................................................................................39 RAID.......................................................................................................................39 Sectors.............
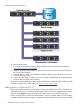
1 Introduction Scripting Toolkit for Windows The Scripting Toolkit for Windows is a server deployment product that delivers an unattended automated installation for high-volume HP ProLiant server and BladeSystem infrastructure deployments. This document describes how to best use the Scripting Toolkit to configure HP ProLiant servers and BladeSystem infrastructure. It also contains information about the Scripting Toolkit utilities and how to use them in an unattended environment.
2 Deployment using the Scripting Toolkit for Windows Deployment overview The Scripting Toolkit includes a set of utilities for configuring and deploying servers in a customized, predictable, and unattended manner. These utilities enable you to duplicate the configuration of a source server on target servers with minimal user interaction. IMPORTANT: HP ProLiant 100-Series servers previous to Gen8 do not support all Scripting Toolkit commands, and those that are supported might not work as expected.
Creating a network share To create a network share: 1. Download the appropriate Scripting Toolkit SoftPaq from the Scripting Toolkit website at http://www.hp.com/go/ProLiantSTK. 2. Install the Scripting Toolkit SoftPaq on a common server that resides on the same network as the servers to be deployed. 3. Share the folder in which you installed the Scripting Toolkit. Be sure that the account you use has read and write access. 4.
is installed and the STK IO driver (hpsstkio.sys) is copied to the windows\system32\ drivers directory. To add drivers offline: 1. Mount the base image to a local directory by using dism. For example: dism /Mount-Wim /WimFile:C:\winpe_x86\winpe.wim /index:1 MountDir:C:\STK.TMP 2. Add the .inf file to the base image by using the dism /Add-Driver command. For example: dism /image:C:\SSSTK.TMP /Add-Driver /driver:C:\ssstk\drivers\example.inf 3. For each additional device driver repeat steps 1 and 2.
3. For each additional device driver repeat steps 1 and 2. When you finish customizing the image, prepare the image for deployment by using the peimg /prep command. NOTE: If the appropriate iLO driver is not installed, some utilities do not work correctly. For more information, see the README.txt file located with the drivers. To add drivers online: 1. Use the drvload tool, drvload.exe inf_path, where inf_path is the path to a device driver INF file. drvload x:\drivers\example.inf 2.
Configuring the target server and installing the operating system 1. 2. Boot the media (CD/DVD, USB drive key, or PXE) that contains the customized Windows PE image on the target server. Run CONREP to configure the target server with the captured settings: a. Change to the directory where CONREP resides. b. Apply the captured configuration to the target server: conrep -l -fs:\data\filename 3. Run HPACUSCRIPTING to configure the storage of the target server with the captured settings: a.
3 Advanced topics Overview The advanced topics addressed in this section cover some of the most common deployment tasks that can be automated using the Scripting Toolkit. IMPORTANT: The script files and script segments in this section are provided only as examples. You must modify the scripts for your environment. When creating or modifying your own scripts, the pause command is a valuable tool to help you determine that each step of the script is functioning as desired.
.\ACU\bin\hpacuscripting.exe -i .\ArraySettings\SA6iArray.ini :NEXT2 \ifhw .\hpdiscovery.xml allboards.xml PCI:"Smart Array 5312" if errorlevel 1 GOTO NEXT3 .\ACU\bin\hpacuscripting.exe -i .\ArraySettings\SA5312Array.ini :NEXT3 Querying the HPDISCOVERY file to determine the presence of a card family IFHW and HWQUERY can perform queries based on partial name information, enabling you to verify the presence of a whole family of cards by using a partial query such as Smart Array. NEXT1: ifhw .\hpdiscovery.
System\ifhw hpdiscovery.xml System\allboards.xml HWQ:SystemName eq "ProLiant DL380 G2" if errorlevel 1 goto NEXT1 REM ---REM This section performs the System ROM Flash. Online Flash components REM are kept in a directory called Roms REM ---Roms\cp004648.
NEXT3: REM ---REM DONE REM ---REBOOTREQUIRED: System\reboot PXE HWNOTFOUND: End: For more information about Online ROM Flash Smart Components, see the HP Online ROM Flash User Guide on the HP Software and Driver Downloads website at http://www.hp.com/support. Erasing array configurations Before beginning the deployment process, you might want to erase the current array configuration. The commands in the following examples can be run as part of a script or alone. To erase the array configuration: 1.
4 Scripting Toolkit utilities Syntax conventions Syntax refers to the way a command and parameters must be entered. Unless specified otherwise, enter commands, parameters, and switches in all uppercase or all lowercase letters. Sample syntax line: SAMPLE[/R|-R][DRIVE:][PATH]FILENAME[...] Command element Meaning SAMPLE Specifies the name of the command. [ ] Indicates a component of the command line. Enter only the information within the brackets, not the brackets themselves.
The Scripting Toolkit utilities include: • REBOOT • SETBOOTORDER (Limited functionality for HP ProLiant 100 series servers) • STATEMGR (Utility is not supported on 100 series servers) • RBSURESET • HPDISCOVERY • IFHW • HWQUERY • CONREP • HPRCU • HPACUSCRIPTING • HPLPCFG • LO100CFG (Utility only supports HP ProLiant 100 series servers) • HPQLAREP • HPONCFG (Not supported on HP ProLiant 100 series servers using the Oxx ROM family) Using REBOOT The REBOOT utility enables the user to
Using SETBOOTORDER SETBOOTORDER enables you to set the order in which devices are booted, including diskette drives, CD-ROM or DVD drives, hard drives, PXE, and USB devices. This utility sets the boot order only for devices that exist for a server. The devices can be set to boot in any order. SETBOOTORDER cannot be used to set the storage controller order. You must use the CONREP utility.
STATEMGR command-line arguments Command-line argument Description /R or –R This argument reads the state of the environment variable defined by [EVNAME]. The value of the environment variable is returned as a return code. /W or -W This argument writes the state defined by [VALUE] to an environment variable defined by [EVNAME]. EVNAME This argument creates an environment variable used to represent the state to manage. The variable can be any word that is eight characters or fewer.
RBSURESET return codes Value Meaning 0 The BIOS settings have been successfully reset to the factory default. 1 The BIOS settings have not been reset. Using HPDISCOVERY HPDISCOVERY provides an inventory of the server being configured and must run on each deployed server.
HPDISCOVERY return codes Value Meaning 0 The command was completed successfully. A usage message might appear. 1..255 An error has occurred. See error message for details. HPDISCOVERY command line examples NOTE: Before running HPDISCOVERY, you must install WMI. For more information on installing extra packages in Windows PE, see the Windows PE documentation. Command line argument Description hpdiscovery /f x:\hpdiscovery.xml This command generates the hpdiscovery.xml file in the x:\ location.
IFHW command line examples Command-line argument Description ifhw hpdiscovery.xml allboards.
Expression input Result HWQ:SystemName eq "ProLiant DL380 G2" and "PCI:Smart Array 5i" and HWQ:ROMDate eq "11/12/2004" True if the system is a ProLiant DL380 G2 with a Smart Array 5i Controller present and a ROM date of 11/12/2004 "PCI:Smart Array 5i" or "PCI:Smart Array 6i" True if the system contains a Smart Array 5i Controller or a Smart Array 6i Controller Using HWQUERY HWQUERY is used from a script, in conjunction with other utilities, to control the deployment.
Command-line argument Description MY_SYS_RAM=768 hwquery hpdiscovery.xml allboards.xml "TEST=Smart Array" For a hpdiscovery.xml file that indicates a Smart Array 5i Controller is present, HWQUERY produces the following: TEST=Smart Array 5i Controller hwquery hpdiscovery.xml allboards.xml MYRAM=TotalRAM MYROMDATE=ROMDate For a hpdiscovery.xml file that contains 768 and 11/15/2002, HWQUERY produces the following: MYRAM=768 MYROMDATE=11/15/2002 hwquery hpdiscovery.
CONREP command line arguments Command-line argument Description -s This argument saves the system configuration to a file. -l This argument loads the system configuration from a file and writes it to the target server. -xfilename This argument defines the name and location of the XML hardware definition file. The default file is conrep.xml. -ffilename This argument defines the name and location of the system configuration data file. The default file is conrep.dat.
CONREP -s (Store to Data file) Example usage for HP ProLiant servers not using the Oxx ROM family To extract the BIOS settings from an SL160z G6 server and save the configuration to an sl160zconrep.dat data file: conrep -s -xconrepSL160zg6_20090728.xml -fsl160zconrep.dat conrep 3.00 - Scripting Toolkit Configuration Replication Program Copyright (c) 2007-2012 Hewlett-Packard Development Company, L.P.
00 00 78 c1 PAGE 2801 03 02 04 ff ff ff
80 86 25 a3 00 00 fa 41 0e 11 ff ff 00
Command line argument Description -f{file.xml} Name of the input or output file. If not specified, the XML configuration defaults to hprcu.xml. -h This argument displays program usage. -t Outputs the help and warning text for each feature. Only valid with the -s option. HPRCU return codes Command line argument Description 0 The command was completed successfully. 1 The server is not supported by this utility. 2 The input XML file is missing or is in an invalid format.
For more information, see the Configuring Arrays on HP Smart Array Controllers Reference Guide on the HP website at http://www.hp.com/support/CASAC_RG_en. Users familiar with the previous versions of ACU Scripting must now install the ACU CLI application to obtain the scripting executable. The new ACU scripting executable (hpacuscripting) replaces the former executable (cpqacuxe) in all scripts.
Creating an ACU script file To create a valid ACU script file, use one of the following methods: • Modify the sample custom input script (page 31). • Create a Capture file for capturing a configuration (page 30). You can create a capture file from any server that has ACU loaded, and then modify the values of options in the file as necessary for the target system. This method is useful for applying a standard configuration to several servers that have similar storage resources.
PreferredPathMode = Auto|Manual ; COMMENT: the following five entries are used to optimize the controller performance for video MNPDelay = 0|1|2|...|60 ; units are minutes, zero indicates disabled IRPEnable = Yes|No DPOEnable = Yes|No ElevatorSortEnable = Yes|No QueueDepth = 2|4|8|16|32|Auto Array = A|B|C|D|E|F|G|...Z|a|b|c|d|e|f OnlineSpare = None | N | Port:ID,Port:ID... | Box:Bay,Box:Bay... | Port:Box:Bay,Port:Box:Bay,... ; COMMENT: These values are available only in Custom method mode.
The options for each category are listed in the following table and described in more detail in the remainder of this section. Category Options Description Control Action Use these options to define the overall behavior of ACU when it processes scripts and creates configurations. Control options can occur only once in a script file and must be listed first.
Action mode You must specify an Action mode: • In Configure mode, you can create new arrays, but you cannot modify existing arrays. The controller must be connected to unassigned physical drives for this mode to be available. • In Reconfigure mode, you can modify existing arrays. For example, you can set up an array expansion, a logical drive extension, or a migration. These procedures do not destroy data, unless you specifically want the data to be deleted.
ChassisName Enter the user-defined character string that identifies the controller. You can use any of the following characters in the string: a–z, A–Z, 0–9, !, @, #, *, (, ), ,, -, _, +, :, ., /, [space] You do not need to use quotation marks around the string, but doing so allows the string to begin with a space character. However, the string cannot end with a space character.
Read:write ratio RA4x00 with 16MB cache RA4x00 with 48MB cache All other controllers with battery-backed write cache All other controllers without battery-backed write cache 70:30 + + – – 60:40 + + – – 50:50 + + + – 40:60 – + – – 30:70 – + – – 25:75 – + + – 0:50* + – – – 0:75* – + – – 0:100 – – + – * The cache ratio percentages do not total 100 in these cases because the additional 16-MB or 48-MB cache modules are not used.
Array category The Array category has the following options: • “Array” (page 37) • “Drive” (page 37) • “DriveType” (page 37) • “OnlineSpare” (page 38) Array Enter a letter or pair of letters to identify the array you are creating or reconfiguring, and observe these additional limitations: • In Configure mode, ACU creates a new array.
OnlineSpare The value for this option determines whether the array specified previously in the script will be configured with spare drives. Method mode Possible values Default value Custom To specify exactly which drives to use as spares, In Configure action mode: None. use the applicable convention (port:ID, box:bay, In Reconfigure action mode, ACU ignores any or port:box:bay).
The following defaults apply: • For new logical drives, the default value is Disabled. • For existing logical drives, the default value is the current logical drive setting. ParityGroups When you create a RAID 50 or RAID 60 configuration, you must also set the number of parity groups. You can use any integer value greater than 1 for this setting, with the restriction that the total number of physical drives in the array must be exactly divisible by the number of parity groups.
array, as long as the operating system supports logical drive extension. You cannot reduce the size of the logical drive. CAUTION: Back up all data before extending a logical drive. SSPAdaptersWithAccess Enter values here to identify the SSP adapters that you want to have access to a logical drive. The values are processed only if either SSPState or LogicalDriveSSPState is set to Enable. Otherwise, the values are ignored.
The string can consist of the following: • A maximum of 16 characters • Embedded space characters but cannot end with a space character • Any of the following characters: a–z, A–Z, 0–9, !, @, #, *, (, ), -, _, +, :, ., /, and [space] HBA_WW_ID This option specifies which HBA, based on its assigned WWN, is modified by the configuration changes. HostMode This option specifies the HostMode for a selected HBA. Setting the Host Mode optimizes the storage array for the selected operating system.
Error code Error message Comment or clarification between operations. Limit the number of such configuration changes in the script. 42 1091 Controller does not support SSP. — 1093 Controller requires physical drives to set license keys. — 1102 Slot information is not available. You cannot run a script in Input mode on internal controllers that do not have slot information online. Systems running Microsoft Windows must have the System Management Driver loaded.
Error code Error message Comment or clarification 2831 Cannot change array spare. This error message appears if you try to change the number of spares in an array when the configuration does not support the addition or subtraction of spares. 2832 Invalid physical drive. A specified physical drive is not a valid physical drive, or it cannot be placed in the array. 2833 Invalid spare. A specified spare is not a valid spare drive, or it cannot be placed in the array as a spare.
Error code Error message Comment or clarification 2851 Invalid RAID Array ID. The scripted RAID Array ID is invalid. Use characters from the set a–z, A–Z, 0–9, !, @, #, *, (, ), ,, -, _, +, :, ., /, and [space]. The ID cannot end with a space character or exceed the maximum number of characters allowed by the controller. 2852 Invalid SSP state. — 2853 Cannot change SSP settings. — 2854 Invalid SSP adapter ID. — 2855 Controller does not support logical drive SSP states.
Error code Error message Comment or clarification 2882 Invalid value for MNPDelay. Valid range is 0 (disabled) to 60 minutes. — 2883 Invalid controller configuration value. Expecting Yes or No. — 2884 Invalid value for QueueDepth. Valid range — is from 2 to 32, or Auto. Using HPLPCFG You must edit the text file to insert the WWID of the boot volume and the LUN number that the WWID boots from.
Value Meaning 5 There was no adapter or Emulex HBA found on this host. 6 There was an error retrieving the I/O address. 7 The WWID was invalid because of one of the following: • An invalid value for WWID and BootDeviceWWID, and not a hex value • The WWID specified for HBA in the .ini file does not match any HBAs found on the host (for the /l option only) 8 The LUN was invalid.
LO100CFG command-line arguments Command-line argument Description -x This argument displays example XML to perform configuration. -v This argument outputs the current copyright and version information and then exits. -s This argument captures the current status and outputs it to the console. -h The argument lists basic command line arguments and supported XML tags. -i "file.xml" This argument loads and runs the given XML configuration file. -o "file.
PAGE 49HPQLAREP return codes Value Meaning 0 The command was completed successfully. 1 There was an invalid command line option. 2 There was a file open error. 3 There was an NVRAM checksum error. 4 There was an NVRAM data error. 5 There was no adapter found on this host. 6 There was an error retrieving the I/O address. 7 The WWID was invalid. 8 The LUN setting was invalid. 9 The EFI Enable Selective LUN setting was invalid. 10 The BIOS Enable setting was invalid.
You must then invoke the tool to load the contents of hba.ini input to the HBA NVRAM: hpqlarep /l hba.ini. Using HPONCFG HP offers support for the iLO features available on HP ProLiant servers with the HPONCFG utility. HPONCFG is an online configuration tool used to set up and reconfigure iLO without requiring a reboot of the server operating system. The utility runs in a command-line mode and must be executed from an operating system command line.
HPONCFG return codes Value Meaning 0 The script was sent successfully to the device. 1 The script could not be sent to the device. If the script itself fails, errors are reported in the log file created by HPONCFG. HPONCFG command file contents HPONCFG can be used to perform the following tasks: • Obtain an entire configuration • Obtain a specific configuration • Set a configuration Obtaining an entire configuration HPONCFG can be used to obtain an entire configuration from iLO.
PAGE 53 Setting a configuration A specific configuration can be sent to the iLO by using the command format: HPONCFG /f add_user.xml /l log.txt In this example, the input file has the following contents: PAGE 545 Troubleshooting Troubleshooting table 54 Issue Troubleshooting Data loss in STK Improper use of the Scripting Toolkit utilities and modification of the CONREP data files can result in loss of critical data. Because of the potential data-loss risk, only experienced individuals should use the Scripting Toolkit utilities. Before using the Scripting Toolkit, all necessary precautions must be taken to ensure that mission-critical systems remain online if a failure occurs.
6 Support and other resources Information to collect before contacting HP Be sure to have the following information available before you contact HP: • Software product name • Hardware product model number • Operating system type and version • Applicable error message • Third-party hardware or software • Technical support registration number (if applicable) How to contact HP Use the following methods to contact HP technical support: • See the Contact HP worldwide website: http://www.hp.
Typographic conventions Table 1 Document conventions Convention Element Blue text: Table 1 (page 56) Cross-reference links and e-mail addresses Blue, underlined text: http://www.hp.
environment through HP Insight Online, and is also the recommended version for HP Proactive Care Service. • HP Insight Remote Support Advanced supports medium-sized to large environments with up to 3,500 devices. It can be installed on a Windows ProLiant hosting device or a Windows ESXi Virtual Machine and requires HP Systems Insight Manager. Optionally, customers using HP Operations Manager or SAP Solution Manager to manage their environment can easily integrate these platforms to create a single view.
7 Documentation feedback HP is committed to providing documentation that meets your needs. To help us improve the documentation, send any errors, suggestions, or comments to Documentation Feedback (docsfeedback@hp.com). Include the document title and part number, version number, or the URL when submitting your feedback.
Acronyms and abbreviations ACU Array Configuration Utility ADG Advanced Data Guarding (also known as RAID 6) API application program interface BIOS Basic Input/Output System CONREP Configuration Replication utility CPQACUXE Array Configuration Utility XE CPQLOCFG Lights-Out Configuration Utility DHCP Dynamic Host Configuration Protocol DOS disk operating system GUI graphical user interface HBA host bus adapter HPDISCOVERY HP Discovery Utility HPONCFG HP Lights-Out Online Configurati
WOL Wake-on LAN WWID World Wide ID WWN World Wide Name WWPN worldwide port name XML extensible markup language 60 Acronyms and abbreviations
Index A acronyms and abbreviations, 59 ACU script file, 31 array configurations erasing, 15 C clearing a configuration, 35 configuration capturing, 30 target server, 11 configurations capturing, 10 CONREP, 24 arguments, 25 command file contents, 27 command-line syntax, 24 data file sample HP ProLiant 100 series, 26 Load from Data file example, 26 return codes, 25 screen output, 25 Store to Data file example, 26 conventions document, 56 text symbols, 56 D deployment overview, 7 deployment procedure, 7 dete
command-line syntax, 46 return codes, 47 logical drive capacity extension, 39 video performance optimization, 36 W M MaxBoot setting, 39 N network share creating, 8 O online help, 16 Online ROM Flash Component Utility, 13 operating system installation, 11 operators and terms, 22 R RBSURESET, 19 arguments, 19 command-line syntax, 19 return codes, 20 REBOOT, 17 arguments, 17 command-line examples, 17 command-line syntax, 17 return codes, 17 ROM updating, 13 S Scripting Toolkit utilities, 16 SETBOOTORDE