HP Proliant DL380p Gen8 Carrier-Grade Server Read Before Install Carrier-Grade Instructions ** HP Part Number: 709203-001a Published: November 2012 Edition: 2
© Copyright 2010, 2012 Hewlett-Packard Development Company, L.P. The information contained herein is subject to change without notice. The only warranties for HP products and services are set forth in the express warranty statements accompanying such products and services. Nothing herein should be construed as constituting an additional warranty. HP shall not be liable for technical or editorial errors or omissions contained herein. NEBS™ is a trademark of Telecordia Technologies Incorporated.
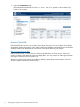
Contents 1 2 3 4 Converting to Carrier-Grade........................................................................4 NEBS Conversion Cage Kit Contents.............................................................5 Installing the NEBS Conversion Cage Kit.......................................................6 Changing the Settings on the System Maintenance Switch...............................7 Verifying the System Maintenance Switch Setting...................................................................
1 Converting to Carrier-Grade This document provides conversion instructions and product-specific information for the carrier-grade version of the HP ProLiant DL380p Gen8 Server.
2 NEBS Conversion Cage Kit Contents • NEBS PCI riser cage • Riser Board Screws (2) • PCI card screws (3) • System board tray screw • Warranty document • RTF card 5
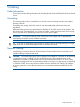
3 Installing the NEBS Conversion Cage Kit WARNING! To prevent personal injury from hazardous energy, remove watches, rings, or other metal objects. Preventing Electrostatic Discharge To prevent damage to the system, you must take precautions when setting up the system or the handling of parts. A discharge of static electricity from a finger or other conductor might damage system boards or other static sensitive devices. This type of damage can reduce the life expectancy of the device.
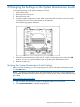
4 Changing the Settings on the System Maintenance Switch To change the settings on the system maintenance switch: 1. Power off the server. 2. Remove power to the server. 3. Remove the top cover. 4. Locate the system maintenance switch. When viewed from the front of the server, the switch is located at the rear of the system board on the right side. See the following graphic illustration: 5. 6. Select the system maintenance switch, the ID is SW2, and change position #10 to the ON position.
3. Select the Temperatures tab. If the temperature thresholds of sensor 01–Inlet Ambient appear as shown below, the switch is set correctly. Incorrect Thresholds If the thresholds do not show up correctly, ensure the #10 position was set correctly. If incorrectly set, reset the system maintenance switch SW2 to the factory defaults as described in the HP Proliant DL380p Gen8 Server Maintenance and Service Guide at the following HP website: http://www.hp.
5 Cabling Cable Information This section provides cabling information for installing the HP ProLiant DL380p Gen8 Carrier-Grade Server. Grounding This carrier-grade product is intended for use in both common bonding networks and isolated bonding networks. Grounding must comply with local, national, and other applicable government codes and regulations. Dedicated safety grounds are implemented on both the AC and DC versions of this product.
6 Power Supply and Cable Information Replacing the Fans and Power Supply If a cooling fan or power supply fails, you must replace it. Replacement usually takes no longer than five (5) minutes. For instructions on replacing these components, see the HP Proliant DL380p Gen8 Server Maintenance and Service Guide on the HP website: http://www.hp.com/go/hpsc Enter a product name, or select Servers, and then selectProliant /tc series servers. Select your product, and then click Manuals under Knowledge Base.
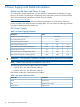
AC Power Supply Table 3 AC Power Supply Specifications Description Value HP 750W AC CS Platinum Plus Power Supply Kit 656363-B21 Input Voltage Range (V rms) 100–240 Frequency Range (Nominal) (Hz) 50/60 Nominal Input Voltage (Vrms) 100 120 200 208 220 230 240 Maximum Rated Output Wattage Rating (W) 750 750 750 750 750 750 750 Nominal Input Current (A rms) 8.5 7.0 4.1 3.9 3.7 3.6 3.
7 Installing the ProLiant DL380p Gen8 Server into a Seismic Rack For information on the installation of the ProLiant DL380p Gen8 server using the commercial rack mount kit, see the HP website: http://www.hp.com/go/hpsc Enter a product name, or select Servers, and then select Proliant /tc series servers. Select your product, and then click Manuals under Knowledge Base. You may need to click through more than one page of manuals to find a specific one.