
HP ProLiant DL380p Gen8 Server Maintenance and Service Guide


Removal and replacement procedures 59
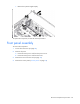
5.
Remove the serial label pull tab (if it is an 8 LFF, 8 SFF, or 16 SFF configuration), and retain it for the new
front panel assembly.
6. Remove the air baffle ("Air baffle" on page 35).
7. Remove all drives ("Hot-plug drive" on page 40).
8. If installed, remove the optical drive ("Optical drive" on page 49).
9. Remove the fan cage ("Fan cage" on page 54).
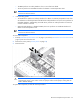
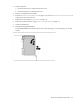
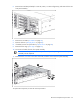
10. Disconnect all cables from the front panel assembly.
IMPORTANT: If any cables in the front panel assembly need replacing, the entire front panel
assembly must be replaced.
11. Remove the four T-10 Torx screws from each side, and then remove the front panel assembly.
To replace the component, reverse the removal procedure.