HP Intelligent Provisioning User Guide Abstract This document details how to access and use the HP Intelligent Provisioning software, including tasks such as installing OSs, updating firmware, software, and drivers, and to performing some diagnostic tests. Intelligent provisioning is included in the optimized HP ProLiant server support software from the HP Service Pack for ProLiant (SPP). This document is intended for administrators experienced in HP ProLiant server configuration.
© Copyright 2012, 2014 Hewlett-Packard Development Company, L.P. Confidential computer software. Valid license from HP required for possession, use or copying. Consistent with FAR 12.211 and 12.212, Commercial Computer Software, Computer Software Documentation, and Technical Data for Commercial Items are licensed to the U.S. Government under vendor's standard commercial license. The information contained herein is subject to change without notice.
Contents 1 Introduction...............................................................................................5 2 Using Intelligent Provisioning........................................................................6 Overview................................................................................................................................6 Navigating Intelligent Provisioning.........................................................................................
Editing iLO Management Settings....................................................................................56 Modifying Network Settings...........................................................................................59 Editing User Administration.............................................................................................65 Resetting iLO................................................................................................................
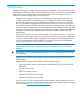
1 Introduction Intelligent Provisioning is a single-server deployment tool embedded in HP ProLiant Gen8 servers that replaces the SmartStart CDs and Smart Update Firmware DVD used with previous generations of HP ProLiant servers. Intelligent Provisioning simplifies HP ProLiant server setup, providing a reliable and consistent way to deploy HP ProLiant servers.
2 Using Intelligent Provisioning Overview To access Intelligent Provisioning, power on or reboot the server and press F10 when prompted during the server POST. When accessing Intelligent Provisioning, one of the following happens: • If this is your first time to use Intelligent Provisioning, onscreen prompts guide you through initial configuration and registration tasks. (“Completing initial configuration and registration tasks” (page 8).
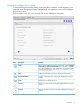
Navigating Intelligent Provisioning To navigate through and modify settings in this menu-driven interface, use the navigation icons displayed at the top right-hand corner and bottom left- and right-hand corners of the Intelligent Provisioning window. These navigation icons are screen sensitive and are not displayed on all screens. Item Icon name Function Home Returns to the Intelligent Provisioning home page, with the Configure and Install and Perform Maintenance menus.
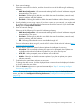
Completing initial configuration and registration tasks When using Intelligent Provisioning for the first time, follow the onscreen prompts to perform the following tasks: 1. Setting Preferences (“Step 1: Setting Intelligent Provisioning preferences” (page 8)) 2. Activating Intelligent Provisioning (“Step 2: Activating Intelligent Provisioning” (page 10)) 3.
3. Enter network settings. Select the active NIC from the list, and then choose from one of the following IP addressing schemes: 4. 5. • DHCP Auto-Configuration—HP recommends selecting DHCP to have IP addresses assigned automatically to your server. • IPv4 Static—Selecting IPv4 adds four new fields: the static IPv4 address, network mask, gateway address, and DNS address. • IPv6 Static—Selecting IPv6 adds two fields: the static IP address and the Gateway address.
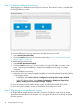
Step 2: Activating Intelligent Provisioning When logging on to Intelligent Provisioning for the first time, the Activation screen is viewable after the Setting Preferences screen. To activate Intelligent Provisioning and make it available during server POST: 1. Select Activate (Recommended). 2. Click the Continue right arrow to proceed automatically to “Step 3: Registering for Insight Remote Support” (page 10). To disable Intelligent Provisioning: 1. Select Disable (Not Recommended). 2.
Insight Remote Support Overview HP has developed a service and support experience that helps you reduce risk. It integrates an online, personalized dashboard (HP Insight Online), a support portal and mobile application (HP Support Center Mobile), and 24x7 remote support (HP Insight Remote Support) for the consolidated infrastructure.
Data collected by Insight Remote Support By registering for Insight Remote Support, you agree to send registration, service events, configuration, and Active Health System data to HP. All data collected and sent to HP will be used to provide remote support and quality improvement. The collected data is managed according to the HP privacy statement, available at http://www.hp.com/go/privacy.
Prerequisites Before registering, verify that the following prerequisites are met: • A supported version of Intelligent Provisioning is installed. Version 1.60 or later is required for Direct Connect Remote Support registration. Version 1.20 or later is required for Central Connect Remote Support registration. For information about updating Intelligent Provisioning, see “Firmware Update” (page 36). • iLO is configured as follows: ◦ A supported version of the iLO firmware is installed. Version 1.
Figure 3 Intelligent Provisioning Direct Connect Remote Support registration 3. Enter your HP Passport credentials in the HP Passport Username and HP Passport Password boxes. IMPORTANT: Enter your HP Passport User ID in the HP Passport Username box. In most cases, your HP Passport User ID is the email address you used during the HP Passport registration process. If you changed your User ID in HPSC, ensure that you enter your User ID and not your e-mail address. 4. 5.
Step 1 of 2: Completed using HP Passport Credentials: . Step 2 of 2: Complete Registration in HP Insight Online (www.hp.com/go/InsightOnline). Please confirm that you have completed the registration process in HP Insight Online. Allow up to 5 minutes for your registration request to be fully processed. 6. 7. Navigate to the Insight Online website at http://www.hp.com/go/InsightOnline, and then log in with your HP Passport credentials.
11. Optional: If you want to receive e-mail alerts about system events, configure AlertMail on the Administration→Management→AlertMail page in iLO. For more information, see the HP iLO 4 User Guide. Registering for Insight Remote Support by using Central Connect Use the following procedure to register an HP ProLiant Gen8 server for Central Connect Remote Support. 1. Verify that the server meets the prerequisites for using Insight Remote Support. For more information, see “Prerequisites” (page 13). 2.
where is the Insight RS Hosting Device IP address or hostname. 5. 6. Click the Continue right arrow to proceed to the Intelligent Provisioning home page (“Overview” (page 6)). For successful Insight Remote Support operation, verify the following after you install the system software: • Optional: AMS is installed on the server and the server operating system is running. HP recommends installing AMS. For more information, see the HP iLO 4 User Guide.
After creating an iLO Federation Group, you can store Intelligent Provisioning server profiles on the network. When a profile has been stored by a Federation Group member on the network at one server, you can install the same profile on any other server in the Federation Group by selecting it from the drop-down menu on the Deployment Settings page. You will not have to bring the profile with you on a USB key to each new server.
Available install methods, source media types, and formats supported for each OS family Each Configure and Install screen provides a guided method of configuring the server, installing an OS, and updating the system software. The following table shows the install methods, source media types, and formats supported for each OS family.
• Reduces temperature, decreasing throttling and A/C costs • Reduces vibration, particularly in environments with high G-force • Frees drive bays for other uses NOTE: SD Boot does not support deployment (“Deployment Settings” (page 38)) installation. Requirements: • iLO 4 1.30 or later • Intelligent Provisioning 1.50 or later • System ROM from the SPP 2013.09.0 or later baseline You can find information about using an SD card with Intelligent Provisioning in “Step 3: OS Information” (page 27).
Step 1: Hardware Settings In the first configuration screen, enter global settings to control power use, software updates, and array configuration. IMPORTANT: If unsupported media devices, including non-HP SD cards (“SD Boot”), are connected at this point, an error appears. To resolve the issue, remove the unsupported media device, and make sure you have network share information available, or a disk or ISO, FTP, or USB drive installed when prompted. 1. Select the power management System Profile to use.
3. Enter array configuration specifications for the server's storage subsystem. Options include: • Keep Current Setting—Uses existing settings to maintain any previously constructed arrays. Use this option when reprovisioning a server. This option is displayed only when valid logical drives are present on the server. For new server installations, this option is not displayed.
IMPORTANT: If unsupported media devices, including SD cards other than HP 32GB SD or microSD Enterprise Mainstream Flash Media, are connected at this point, the following error appears: There are no physical disks attached. To resolve the issue, remove the unsupported media device, and make sure you have network share information available, or a disk or ISO, FTP, or USB drive installed when prompted.
1. Select an OS family. Available supported OS families include: • Microsoft Windows • Red Hat Linux • SUSE Linux Enterprise Server • VMware ESX and ESXi Custom Image • VMware ESXi/vSphere Custom Image If the OS you want to install is not listed, it might not be supported for use with your controller model, or you might need to update HP ProLiant firmware. For information about supported OSs and OS drivers, see the HP Operating Systems and Virtualization Software Support website (http://www.hp.
Linux edition Issue Solution required Red Hat OS files are present in the OS Flat file folder. Red Hat Enterprise Linux 5 When installing Red Hat Enterprise Linux 5, access to the full set of supported packages is missing. Enter an installation number in the Installation Number field of the OS information page. This requirement applies only to Red Hat Enterprise Linux 5.
Linux edition Issue Solution Enterprise Server 11 updatedir kernel SP1 and SP2, the parameter for the SP2 drivers are appropriate OS. located in a directory that the SUSE installer does not see. Red Hat Enterprise The non-RAID AHCI Linux 6, U3 driver attempts to attach to the HP Dynamic Smart Array B120i Controller, preventing logical drive recognition. 3.
Media type Required information/action FTP Enter network connection information, including: • Server Name or IP Address—FTP server name or IP address of the server that hosts the OS contents. FTP support requires anonymous access to the FTP server and does not support connecting to an FTP server through a proxy. IMPORTANT: When entering an FTP path, remove spaces and punctuation. The FTP server directory structure cannot contain spaces or special characters (including punctuation). USB 6.
IMPORTANT: The HP SD or microSD Enterprise Mainstream Flash Media cards are the only SD cards that currently support the SD Boot option. Windows and Linux OS families support the SD Boot option for Recommended installations. 3. Enter the product key. (Not displayed for all OSs) This is the Product Identification (Product ID) number. If you do not enter a product key and one is required, the OS installation pauses indefinitely, prompting you to enter the key.
IMPORTANT: The HP SD and microSD Enterprise Mainstream Flash Media cards are the only SD cards that currently support the SD Boot option. Windows and Linux OS families support the SD Boot option for Recommended installations. See “SD Boot” for more information. 3. Select a partition size. This is the size of the partition to create as the C: drive and in which to install the OS. By default, the value is set to the maximum-allowed size (the size of the logical drive.
IMPORTANT: To populate information in the System Management Homepage for the Windows 2008 family only, install SNMP or WBEM agents.
1. Select which monitoring and management protocols to install. Options include: • AMS • HP WBEM Providers • SNMP Management protocol Description AMS HP recommends installing AMS, so that this service can automatically send pre-failure messages to HP Support. There are no configuration settings for AMS. AMS is a service that collects OS configuration information about events and provides this information to the iLO Active Health System log.
VMware Configuration information for Customized Installation If you selected a VMware OS and a Customized installation method on the OS Selection screen (“Step 2: OS Selection” (page 22)), additional screens are displayed for you enter custom operating installation and monitoring management protocol information. 1. Enter a host name (optional). This name must be a minimum of three characters. 2. Enter a root password. For VMware, the initial password defaults to “password”. 3. Specify the network type.
Checking installation parameters During the installation and configuration process, consider the following: • A EULA might be displayed for Windows installations. • The Firmware Update screen might be displayed at this time, depending on the following two system settings: ◦ In the Step 1: Set Preferences screen, System Software Update must have been enabled. ◦ In the Step 1: Hardware Settings screen, Update before OS Install must have been selected.
Performing maintenance The Perform Maintenance menu contains the following maintenance-related tasks: • “Active Health System download” (page 35) • “Firmware Update” (page 36) • “Intelligent Provisioning Preferences” (page 37) • “Deployment Settings” (page 38) • “HP Smart Storage Administrator (HP SSA)” (page 45) • “Insight Diagnostics” (page 47) • “Quick Configs” (page 48) • “iLO configuration” (page 51) • “HP Insight Remote Support” (page 69) • “License Management” (page 71) • “Erase”
Active Health System download Use the Active Health System download screen to download Active Health System telemetry data from the server onto a USB key in the form of an Active Health System log file (hp_serial#_date.ahs). HP support uses the log file for problem resolution. Use this screen to select the duration for which data needs to be extracted and the USB key as destination media. You can select a specific start and end date to limit the duration of data extraction.
2. 3. 4. Contact HP Support, with the log file available for email submission. After getting a Case ID from HP Support, email the log file to HPSupport_Global@hp.com, with the case ID in the subject. For example, . Be sure to attach your AHS log file to your open HP support case. For more information about using AHS, see the How to Generate the Active Health System (AHS) Log website (http://www.hp.com/go/AHSlog).
NOTE: If the Installed Version (displayed on the left side of the window) is newer than the version listed on the right side of the window, do not select the check box and install that component. 3. Select the items to update, and then click Install. The table is redisplayed, with only the selected items listed. 4. 5. To install all of the listed components, click Continue. If you are ready to perform the installation, click Continue at the warning.
When Intelligent Provisioning is run for the first time on a server, this is the first screen that is displayed within Intelligent Provisioning. For more information about the fields in this screen, see “Step 1: Setting Intelligent Provisioning preferences” (page 8). Deployment Settings Deployment Settings allows you to create a server configuration package that you can deploy to one or more HP ProLiant Gen8 servers and Gen8 server blades using a USB key, HP iLO Scripting.
NOTE: Creating a deployment setting from the Assisted Installation option is only supported for Windows installs. When you open Deployment Settings, you can choose to manage an existing Deployment Settings profile or create a new one. • To create a new, custom Deployment Settings profile or modify an existing Deployment Settings profile, click Manage. • To create a new Deployment Settings profile based on one of the provided default profiles, select one of the templates at the bottom of the page.
1. 2. To use the deployment you just created on the server, click Deploy. To use a previously created deployment, insert the USB key containing the deployment: a. Save the deployment from the USB key to the local server. b. In the Select a Deployment window, select the deployment from the list and click Deploy. If the USB key and their stored deployments are not displayed, click Rescan. 3.
in the center of the window. If a USB drive is installed , its name is displayed near the top of the window in the Target USB Key field. • To perform a package-level action on a Deployment Settings package, select one of the displayed packages, and then select an action icon in the middle pane. • To open a specific Deployment Settings package to change individual settings, double-click one of the displayed packages. The following table defines the available actions.
Clicking a category displays the associated data fields. The fields are optional and can be left blank or unchanged. • To record new values, click Save. • To execute the Deployment Settings package on the server, click Deploy. • To go back to the previous page, click Manage. • To exit Deployment Settings screens, click Exit. The following sections define the available Deployment Settings categories.
1. 2. 3. Select a RAID Level. Select a Stripe Size. Select Read and Write Cache ratios. Make sure that these values total 100%. Entering operating system information Use the Operating System screens to enter OS information and installation settings. The included fields are the same as those in the Recommended installation method. Not all source media types are supported for every OS. 1. Select an OS family. 2. Enter the OS media path, which can be a Windows Share or an FTP site on the local network.
If you enable Remote Support, enter the following settings: • Local Remote Support Server—The hostname or IP address of the Insight RS server. In the Insight RS software, the Insight RS server is called the hosting device. • Local Remote Support Server Port—The port number to use. The default port number for Insight RS is 7906. For more information about the Central Connect Remote Support requirements, see “Step 3: Registering for Insight Remote Support” (page 10).
3. Choose whether to enable or disable Intelligent Provisioning on the server being configured with the Deployment Settings package. If Intelligent Provisioning is disabled, it cannot be accessed on the server. During POST, F10 is in red text on the screen, indicating that the F10 key is disabled and Intelligent Provisioning is no longer accessible. To re-enable Intelligent Provisioning: a. Reboot the server and, when prompted, press F9 to access the RBSU or UEFI System Utilities.
Available tasks include: • Controller settings—Configures the supported controller settings. Depending on the controller, these can include setting the array accelerator cache ratio, transform and rebuild priorities, and surface scan delay. • Caching settings—Configures the supported caching settings which can help increase performance by taking advantage of cache memory. Caching also helps protect data integrity when used with a battery or capacitor.
• • Array diagnostics Report—Run reports on selected controllers to display available diagnostic tasks. Reports include SmartSSD Wear Gauge information for supported solid state drives. ◦ View Diagnostic Report—Generate and display a diagnostic report for the selected devices. The report includes SmartSSD Wear Gauge information for supported Solid State Drives, and usage and estimated lifetime information.
HP Insight Diagnostics provides a comprehensive suite of offline system and component tests, providing in-depth testing of critical hardware components for devices such as processors, memory, and hard drives. During offline testing, the user-installed OS is not running. Therefore, software information from the system is not reported.
When initially configuring and provisioning a server through Intelligent Provisioning, this Quick Configs screen is presented in the “Step 1: Hardware Settings” (page 21) screen. If the server does not have HP DIMMs installed, the following Power Profiles might not all be available: • Balanced Power and Performance—Optimum settings to maximize power savings with minimal impact to performance for most OSs and applications.
NOTE: Not all of the options in this table are adjustable on all servers. However, even if you do not have the option of adjusting some of these settings, they will default to the values shown here.
iLO configuration Use the iLO Configuration Utility to view and change iLO settings through Intelligent Provisioning, instead of through the iLO web interface. For more information about iLO, see the HP iLO 4 User Guide. You must configure iLO network settings to register the server with the HP Insight Remote Support registration process. When changing iLO settings, if the display is not as expected or an undefined error message is displayed, press F5 to refresh the screen display.
1. In the Maintenance window, click iLO. The iLO Configuration Utility window appears. 2. Click Summary. The following information is displayed: • iLO Hostname—The DNS name of the iLO subsystem, for example, ilo instead of ilo.example.com. This name can be used only if DHCP and DNS are configured to connect to the iLO subsystem name instead of the IP address.
to a different site or closing the browser also results in an idle connection. The iLO firmware supports a finite number of iLO connections. Misuse of the Infinite timeout option might make iLO inaccessible to other users. Idle connections are recycled after they time out. This setting applies to local and directory users. Directory server timeouts might preempt the iLO setting.
◦ Enabled–Every 3rd Failure—A failed login log entry is recorded after every third failed login attempt. ◦ Enabled–Every 5th Failure—A failed login log entry is recorded after every fifth failed login attempt. ◦ Disabled—No failed login log entry is recorded. Various iLO access settings can be edited from the three tabs on the Access Settings window: Access Options, Service and IPMI/DCMI. To edit access settings on the Access Options tab: 1.
• SNMP Port —The industry-standard (default) SNMP port is 161 for SNMP access. If you customize the SNMP Port value, some SNMP clients might not work correctly with iLO unless those clients support the use of a nonstandard SNMP port. • SNMP Port Trap—The industry-standard (default) SNMP trap port is 162 for SNMP alerts (or traps).
3. Select the check box to enable IPMI/DCMI, or clear the box to disable it. Click Apply. Editing iLO Management Settings Management–SNMP Settings NOTE: Read Community supports the following formats: A community string (for example, public). A community string followed by an IP address or FQDN (for example, public 192.168.0.1). Use this option to specify that SNMP access will be allowed from the specified IP address or FQDN. For iLO 4 1.10 or later, you can enter an IPv4 address or FQDN.
Various iLO management settings can be edited from the three tabs on the Management window: SNMP Settings, SNMP Alerts and Insight Management Integration. To edit management settings on the SNMP Settings tab: 1. In the iLO Configuration Utility window, click Management. The SNMP Settings tab data appears: 2. 3. Click the radio button to select Agentless Management or SNMP Pass-Thru. Enter data in the fields as necessary. Click Apply.
1. 2. In the iLO Configuration Utility window, click Management. The SNMP Settings tab data appears. Click the SNMP Alerts tab. The SNMP Alerts data appears. 3. 4. 5. 6. Click the radio button to select the Trap Source Identifier. Click the drop-down list by each setting to select to enable or disable the setting. If you choose to send an alert, click Send Test Alert. Click Apply.
2. Click the Insight Management Integration tab. The Insight Management Integration tab data appears. 3. Edit the setting(s) that you want. Click Apply. Modifying Network Settings Network Settings — Summary • NIC in use—The current NIC configuration you are using (for example, iLO Dedicated Network Port, or Shared Network Port. • iLO Host Name—The DNS name of the iLO subsystem (for example, iLO instead of ilo.example.com).
connect to the iLO subsystem name instead of the IP address. For more information, see the HP iLO 4 User Guide. ◦ • Domain Name—The iLO domain name. If DHCP is not used, enter a domain name. NIC Settings ◦ Use iLO Dedicated Network Port—If the checkbox is selected, you are indicating that your system uses a NIC with a connector on the back of the server. The NIC handles iLO traffic only. If you leave the checkbox blank, you are indicating that your system is using a shared network port.
1. In the iLO Configuration Utility window, click Network Settings. The General tab data appears. 2. Edit the setting(s) as required. Click Apply. Network Settings–IPv4 • • Enable DHCPv4—Enables iLO to obtain its IP address (and many other settings) from a DHCP server. ◦ Use DHCPv4 Supplied Gateway—Specifies whether iLO uses the DHCP server-supplied gateway. If DHCP is not used, enter a gateway address in the Gateway IPv4 Address box.
• Subnet Mask—The subnet mask of the iLO IP network. If DHCP is used, the subnet mask is supplied automatically. If DHCP is not used, enter a subnet mask for the network. • Gateway IPv4 Address—The iLO gateway IP address. If DHCP is used, the iLO gateway IP address is supplied automatically. If DHCP is not used, enter the iLO gateway IP address. • Static Route #1, Static Route #2, and Static Route #3—The iLO static route destination, mask, and gateway addresses.
4. Edit the setting(s) as necessary. Click Apply. Network Settings–IPv6 • iLO Client Applications use IPv6 first—When both IPv4 and IPv6 service addresses are configured for iLO client applications, this option specifies which protocol iLO tries first when accessing a client application. This setting also applies to lists of addresses received from the name resolver when using FQDNs to configure NTP. ◦ Select this check box if you want iLO to use IPv6 first.
3. Edit the setting(s) as necessary. Click Apply. Network Settings–SNTP • Use DHCPv4 Supplied Time Settings—Specifies whether iLO uses the DHCP server-supplied time. • Use DHCPv6 Supplied Time Settings—Specifies whether iLO uses version 6 of the DHCP server-supplied time. • Propagate NTP Time to Host—Specifies whether ILO uses NTP time instead of the DHCP server-supplied time. • Primary Time Server—If DHCPv4 or DHCPv6 SNTP is not used, enter a time server address in the Primary Time Server box.
3. 4. If you enabled DHCPv4 or DHCPv6 time settings, uncheck the appropriate check box. Edit the setting(s) as necessary. Click Apply. Editing User Administration • User Accounts—Displays available users. ◦ User Name—Appears in the user list on the User Administration page and on the iLO Overview page. It does not have to be the same as the Login Name. The maximum length for a user name is 39 characters. The user name must use printable characters.
To view the User Administration window: Procedure 1 • In the iLO Configuration Utility window, click User Administration. The User Administration window appears. To add a new user: 1. In the iLO Configuration Utility window, click User Administration. The User Administration window appears. 2. Click New. The Add User window appears.
3. 4. Enter the user name. The maximum length for a user name is 39 characters. The user name must use printable characters. Enter the login name. The maximum length for a login name is 39 characters. The login name must use printable characters. IMPORTANT: 5. 6. 7. 8. The Login Name cannot be modified, once it is set. Enter the password. The minimum length for a password is set on the Access Settings page. The maximum length for a password is 39 characters. Re-enter the password to confirm it.
3. 4. 5. 6. Enter the User Name for the user’s account you are editing. Enter the user’s password. Re-enter the password to confirm it. Click the check boxes to modify the user’s permissions. Click Update. To delete a user: 1. In the iLO Configuration Utility window, click User Administration. The User Administration window appears.
2. 3. In the User Accounts drop-down list, select the user you want to delete. Click Delete. Click OK to delete the user, or click Cancel. Resetting iLO Use this screen to reset iLO, or to restore iLO to factory default settings. • Reset iLO—Click to reset iLO. • Reset to Factory Default Settings—Click to restore factory default settings. To reset iLO: 1. In the iLO Configuration Utility window, click Reset. The Reset iLO window appears. 2. Click to select the check box for the option you want.
When initially configuring Intelligent Provisioning for use, this screen is displayed in “Step 3: Registering for Insight Remote Support” (page 10). Unregistering from Insight Remote Support The process to unregister from Insight Remote Support depends on whether you used the Direct Connect or Central Connect registration method. Unregistering from Insight Remote Support Direct Connect configurations Use the following procedure to discontinue monitoring of an HP ProLiant Gen8 server. 1.
3. 4. Navigate to the Perform Maintenance→HP Insight Remote Support page in Intelligent Provisioning. Verify that the server is not registered. Editing the web proxy settings Proxy settings must be maintained to enable an HP ProLiant Gen8 server to continue to send Remote Support data to HP. If the proxy settings change, use the following procedure to edit them: 1. Navigate to the Perform Maintenance screen and select HP Insight Remote Support. The HP Insight Remote Support page appears. 2.
3. 4. Enter the License Key for the iLO Advanced License Pack and/or the HP SmartCache License Pack. • The iLO Advanced License Pack allows remote media access and enhanced diagnostics and runtime functions. • The HP SmartCache License Pack allows the Smart Array Controller to make use of solid state devices to accelerate access to data residing on hard drives. • License Keys are available at: http://www.hp.com/go/proliantkeys Click Apply to activate your licenses.
1. In the Perform Maintenance window, click Erase. The Erase Utility window appears. 2. After making the appropriate selections, click Erase. A Confirm Erase window appears, prompting you to click OK to initiate the Erase procedure, or click Cancel to cancel the Erase. Reinstalling Intelligent Provisioning You can reinstall Intelligent Provisioning instead of using the Firmware Update Utility to ensure you have the latest version. To reinstall Intelligent Provisioning: 1.
3 Advanced topics Using a provided script to create an Intelligent Provisioning update mirror For Windows environments, HP provides a script that can populate the Intelligent Provisioning update mirror repository for you. When creating this mirror, you upload the software and firmware delivered through SPP to a server within your local network.
2. If you want to host the Intelligent Provisioning software on the mirror, download the latest version of Intelligent Provisioning and copy the files to your web server: a. Navigate to the HP website: ftp://ftp.hp.com/pub/softlib2/software1/pubsw-linux/p1048499843 b. c. From the newest folder, download the following files: • Gaius.img.gz • Vid.img.gz • Hp_manifest.zip Copy the files to your web server. # cp gaius.img.gz /srv/www/ipupdate-1.00 # cp vid.img.gz /srv/www/ipupdate-1.
4. If you are hosting the Intelligent Provisioning software on your mirror, update the URLs in the Intelligent Provisioning configuration files to address your web server: a. Create or modify the file ipupdate-1.00/hp_manifest/config.xml and add rules to rewrite the URLs to reference your web server.
Table 1 Regular expression attributes Attribute name SMBIOS attribute product_name SMBIOS product name (dmidecode — string system-product-name) product_serial SMBIOS serial number (smidecode — string system-serial-number) product_uuid SMBIOS uuid (dmidecode — string system-id) bios_family ROM family (dmidecode — string bios-version) For example, to configure a mirror that serves different SPPs for different types of servers, you can add the product_name attribute to the redirect commands in the in
2. Complete each step as presented by the application: a. Click Next at the splash screen. b. Read the End-User License Agreement, and then select Agree and click Next. c. Select Create a bootable USB key from CD/DVD, and then click Next. d. e. Place the USB flash drive in an available USB port. Insert the media in the optical drive or mount the ISO image, and then click Next. Choose the drive letter of the source, choose the drive letter of the target USB flash drive, and click Next. CAUTION: f. g.
4 Troubleshooting Troubleshooting overview • This section describes common installation and operational issues in Intelligent Provisioning, and provides directions for corrective action, where possible. General issues • When a profile containing OS settings is deployed on a server which does not have disks connected, the OS settings are applied and the installation is interrupted without displaying a There are no physical disks attached error message to indicate a problem has occurred.
• format USB flash drive. Suggested action: Instead of using a flash drive, use real media, do a network installation via ISO, or mount virtual media through iLO. • SNMP cannot be installed on HP-branded Windows Server 2008 Combo media using Intelligent Provisioning. SNMP can be installed on HP-branded Windows Server 2008 R2 Combo media, which is supported. Suggested action: Upgrade to Windows Server 2008 R2 or install the operating system manually without Intelligent Provisioning.
Linux-specific issues • When using the Manual installation method SUSE Linux Enterprise Server 11 SP3 with an SD card, the GNU GRUB screen appears, and the OS installation is not completed. Suggested action: Perform the installation outside of Intelligent Provisioning by installing the DUD from HPSC. A future upgrade will support the installation using Intelligent Provisioning.
Customer advisories Additional problem-solving information is available from the following sources: 82 • How to Install/Reinstall Intelligent Provisioning if It Does Not Launch After Pressing F10 During POST: http://h20564.www2.hp.com/portal/site/hpsc/public/kb/docDisplay/? docId=emr_na-c03693433 • Windows Installations May Fail on 3 TB Volumes In Some Configurations: http:// h20564.www2.hp.
5 Support and other resources Contacting HP For worldwide technical support information, see the HP support website: http://www.hp.com/go/HPSC Be sure to have the following information available before you call HP: • Active Health System log: Download and have available an Active Health System log for seven days before the failure was detected. For more information, see the “Active Health System download” (page 35) section.
http://www.hp.com/go/activehealth • HP Systems Insight Manager: http://www.hp.com/go/hpsim • HP Service Pack for ProLiant: http://www.hp.com/go/spp Prerequisites Prerequisites for using this product include: • HP ProLiant Gen8 server • OS must be included in “Introduction” (page 5) Typographic conventions Table 2 Document conventions Convention Element Blue text: Table 2 (page 84) Cross-reference links and e-mail addresses Blue, underlined text: http://www.hp.
service level. Notifications may be sent to your authorized HP Channel Partner for onsite service, if configured and available in your country. For more information, see HP Insight Remote Support and Insight Online Setup Guide for ProLiant Gen8 Servers and BladeSystem c-Class Enclosures on the HP website (http://www.hp.com/go/ enterprise/docs). HP Insight Remote Support is available as part of HP Warranty, HP Care Pack Service, or HP contractual support agreement.
6 Documentation feedback HP is committed to providing documentation that meets your needs. To help us improve the documentation, send any errors, suggestions, or comments to Documentation Feedback (docsfeedback@hp.com). Include the document title and part number, version number, or the URL when submitting your feedback.
Glossary This Glossary provides names and definitions for terms and acronyms commonly used in this document. Agent Software on managed servers used to make changes to the servers. Functions supported include software installation and removal, software and hardware configuration, and server status reporting. AHS HP Active Health System is a technology that provides continuous, proactive health monitoring of over 1600 system parameters.
intelligent provisioning Intelligent Provisioning is a single-server deployment tool embedded in HP ProLiant Gen8 servers that replaces the SmartStart CDs and Smart Update Firmware DVD used with previous generations of HP ProLiant servers. See also embedded deployment features. interconnect module An Ethernet, FC, or FCoE interconnect module designed to work in a blade enclosure. Kickstart file The specific term to use when referring to a Red Hat Enterprise Linux or VMware ESXi installation file.
to manage their systems consistently across multiple platforms and operating systems, providing integrated solutions that optimize your infrastructure for greater operational efficiency. WBEM enables management applications to retrieve system information and request system operations wherever and whenever required. WMI Windows Management Instrumentation (WMI) is the infrastructure for management data and operations on Windows-based operating systems. XML Extensible Markup Language.
Index A M activating Intelligent Provisioning, 10 Active Health System data collection, 12 Active Health System download, 35 AMS, 31 maintenance tasks, 34 C CD, 77 configuring iLO, 51 contacting HP, 83 conventions document, 84 customized installation VMware, 32 Windows, 28 D data collection Active Health System, 12 privacy, 12 Remote Support, 12 system configuration, 12 Deployment Settings, 38 document conventions, 84 prerequisites, 84 documentation providing feedback on, 86 DVD, 77 E Erase Utility, 7
W WBEM, 31 websites, 83 91