
Implementing SR-IOV on HP ProLiant Servers with VMware vSphere 5.1


Technical white paper | Implementing SR-IOV on HP ProLiant Servers with VMware vSphere
9
Prepare
To prepare for enabling the SR-IOV feature, make sure that your server and components are supported with vSphere 5.1
and SR-IOV:
• Ensure that the server and network adapter support SR-IOV; refer to the sections “SR-IOV-compliant ProLiant servers”
and “SR-IOV-compliant network adapters.”
• Ensure that the server has a DVD drive (either installed or attached to the server receiving the installation). If you will be
using iLO virtual media with either a HP ProLiant DL or ML server, an iLO Advanced Pack license key must be applied.
• Download the HP Customized ESXi Image for vSphere 5.1 and the corresponding SPP image as recommended in the
VMware FW and Software Recipe available at vibsdepot.hp.com.
• Perform network and storage configuration as required (such as, cabling, VLAN configuration, and storage array access).
• A management station with VMware vSphere Client or vSphere Web Client access is required to access the server after
ESXi installation.
Install and enable
This section describes the steps to manually install and enable SR-IOV, for automated installations see the “Deploying
across multiple systems” section in this paper.
Perform the following installation and enablement steps:
1. Install and configure the storage device (for example, USB, SD, local HDD) that will host the ESXi 5.1 installation.
2. Install the SR-IOV-compliant network adapter into the server.
3. Update the system ROM and component firmware using the SPP image.
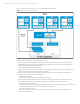
4. Enable the system ROM and network adapter settings for SR-IOV using the HP ROM-Based Setup Utility (RBSU). To
enable the PCIe network adapter and SR-IOV in the system ROM, perform the following:
A. Load the RBSU by pressing F9 during POST when prompted.
Note
The selection names that display for your server may vary slightly.
B. Select the following options to enable the PCIe network adapter:
System Options Processor Options: Enable Intel® Virtualization Technology and Intel® VT-d
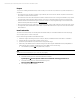
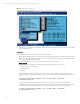
C. Select the following options to enable SR-IOV (see Figure 3):
Advanced Options SR-IOV: Enable SR-IOV
D. Save changes, and then exit RBSU.