HP Factory-Installed Operating System Software for Microsoft® Windows 2000 Server User Guide October 2003 (Seventh Edition) Part Number 280154-007 HP CONFIDENTIAL Writer: Michele Richardson File Name: 280154-007.
© Copyright 2002, 2003 Hewlett-Packard Development Company, L.P. Confidential computer software. Valid license from HP required for possession, use or copying. Consistent with FAR 12.211 and 12.212, Commercial Computer Software, Computer Software Documentation, and Technical Data for Commercial Items are licensed to the U.S. Government under vendor’s standard commercial license. The information contained herein is subject to change without notice.
Contents Introduction ................................................................................................... 5 Gathering Information................................................................................... 7 Certificate of Authenticity.................................................................................................. 7 Completing the Installation of the Factory-Installed Operating System .. 9 Multi-Language Operating System ............................................
Event Log Errors............................................................................................................... 26 Backing Up the Server ...................................................................................................... 26 Using ProLiant Support Software..................................................................................... 26 Configuring Network Protocols........................................................................................
IMPORTANT: This guide provides instructions to complete the installation of a factory-installed operating system. If your operating system has been factory-installed, do not boot the server from the HP SmartStart CD when powering up the server for the first time. The SmartStart CD should only be used to reinstall the operating system. Introduction This guide provides instructions for completing the installation of the factory-installed Microsoft® Windows® 2000 Server software operating system.
• Capable of out-of-the-box management of the server by the installation of the HP Survey Utility and HP Management Agents for Servers. The Management Agents monitor server performance and configuration as well as the performance of the operating system. The Management Agents help prevent problems before users are affected by issuing alerts when faults occur. The Management Agents are installed during the setup process.
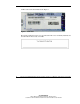
Gathering Information For details on information required during the software installation, refer to the operating system documentation provided with the server. For complete hardware installation information, refer to the server documentation. Certificate of Authenticity IMPORTANT: Note where the Certificate of Authenticity (COA) label is located on the server and record the product key for future reference.
A Microsoft COA label is illustrated in Figure 1. Figure 1: COA label Record the product key in the space provided when the server is initially installed and the COA label is most easily accessible. 8 HP Factory-Installed Operating System Software for Microsoft Windows 2000 Server User Guide HP CONFIDENTIAL Writer: Michele Richardson File Name: 280154-007.
Completing the Installation of the Factory-Installed Operating System IMPORTANT: Before powering up the server and configuring the operating system software, connect the server hardware as described in the server user guide. Do not install additional hardware devices until after the software installation is complete. This section provides information to complete the installation of the factory-installed operating system.
Operating System Installation To complete the installation of the factory-installed operating system and configure the server: 1. Power up the server, if not already powered up. 2. Press the appropriate key to continue at the HP Welcome screen. The server software license screen appears. 3. Read all software license agreements provided with the server. 4.
Operating System Partition Sizing During the installation of the operating system, you are prompted to determine the size of the operating system partition. 1. At the OS Partition Sizing screen, select one of the following options: — Default—Sets the operating system partition size to the factory default — Custom—Enables you to specify a custom value up to the maximum size of the drive — Maximum—Sets the operating system partition size to the maximum size of the drive 2. Click OK.
Signed Drivers for Windows 2000 During the installation of the operating system, caution messages might appear concerning unsigned software drivers. The caution message states “Digital Signature is Not Found” as drivers are about to be installed. When prompted, click Yes to accept the drivers and continue the installation. If you are prompted to reboot the server, click No. After the operating system installation is complete, download digitally signed drivers from http://www.hp.com/support/files.
The setup process begins. Allow the entire setup process to complete, including any requested restarts, before interrupting this process or powering down the server. After the initial setup is complete, the server can be configured to your individual needs. IMPORTANT: Because of some driver installation needs, the system might complete the driver installation after the first required logon. Do not perform any actions on the Configure Your Server screen.
Dynamic Disk Upgrade The operating system is set to be installed on a minimum partition size of 6-GB. On an array controller, the logical drive size is set to the maximum size of the drive. Three to 7 MB of space are available on the logical drive of array controllers to support a dynamic disk upgrade. NOTE: The dynamic disk upgrade is optional. For information about dynamic disk upgrades, refer to the operating system documentation.
Changing the Administrator Password To change the Administrator password: 1. Click Start>Programs>Administrative Tools>Computer Management. 2. Expand the System Tools directory, and then expand the Local Users and Groups directory. 3. Click the Users folder. 4. Right-click Administrator, which appears on the right side of the window, and select Set Password. 5. Enter the new password in the New Password field, then re-enter it in the Confirm Password field.
Altering Regional Settings Alter the regional settings if the server is not operating under the default regional settings. The regional settings control the keyboard language and set the local format for sorting and displaying time, date, numbers, and currency for a specified region. To alter the regional settings: 1. Click Start>Settings>Control Panel>Regional Options. 2. Select the General tab at the Regional Options window. 3. Select the correct locale from the dropdown list. 4.
3. If you require remote access to the Foundation Agents, set your password and determine your trust mode: a. Right-click hp Management Agents for Windows 2000/Server 2003. b. Select Configure from the dropdown list. c. Scroll to the Administrator Password section, and enter your password. d. Re-enter your password. e. At the Insight Manager 7 Trust Relationship screen, select the appropriate trust mode of your choice. Mode choices are All, Name, or Certificate.
Changing Licensing Mode To change the server licensing mode from per-seat to per-server: 1. Click Start>Settings>Control Panel>Licensing. The Choose Licensing Mode window appears. 2. Click Per Server. A warning message appears, stating You have requested a change that violates the license agreement. The license for this product only allows for a one-time change from a Per Seat to a Per Server configuration. Do you want to cancel this request? 3. Click No to change the licensing mode to per-server.
Installing Internet Information Service To install Microsoft Internet Information Service: 1. Click Start>Settings>Control Panel>Add/Remove Programs. 2. Click Add/Remove Windows Components to launch the Windows Components Wizard. 3. Select Internet Information Services>Next to begin the installation. 4. Click Finish to complete the installation, and then close the Add/Remove Programs window. 5. Double-click the link on the desktop to install the Microsoft Security Toolkit Utility.
Error Messages After the Lights-Out Management driver is installed, the following errors can occur: • In the Device Manager screen, two entries appear for the ATI Video Controller. One of these entries has a yellow exclamation mark indicating that no driver is installed. • In the Event Viewer, the following message appears: Unable to map address range for graphics card These errors result from the Lights-Out Management device and the server using the same video controller.
Configuring Array Controllers If an array controller has been purchased with the server, run the Array Configuration Utility XE (ACU-XE) to set up the remaining physical drives for use. IMPORTANT: Internet Explorer is required to run ACU-XE. Internet Explorer is used to interface with the array controller. The utility can be run online using the following steps: 1. Click Start>Programs>Compaq System Tools>Compaq Array Configuration Utility XE. 2.
Configuring the Disk Drives The primary logical drive, which contains the operating system, is the only drive on the server that is configured during the operating system installation. Additional space that is not partitioned is also located on the primary drive. This nonpartitioned space and any additional disk drives on the server must be partitioned and formatted before they can be available for use.
10. Click Next to accept the drive letter assigned by default at the Assign Drive Letter or Path screen. The Formatting Partition screen appears. 11. Select the appropriate Allocation Unit Size, then enter the Volume Label or accept the default label. Select either the default NTFS format or the Fat32 file system format. 12. Select Perform a Quick Format or Format, and click Next. 13. Click Finish at the Completing the Create Partition Wizard screen.
Creating an Additional Page File When additional memory or software applications are installed on the server, errors can occur in the event log, indicating that the C drive is nearing capacity. To solve this problem, you can either move applications located on the C drive to another partition or create a page file. Creating the page file on a separate partition to support the amount of memory in the server is the most efficient solution.
8. Enter the following path in the Device Driver Wizard field, then click OK: C:\HPDRVRS The driver search results should display the appropriate device. IMPORTANT: If an incorrect device appears, click Back and reselect the correct device. 9. Click Next to install the driver. 10. Click Finish>Close to return to the Computer Management screen. The tape driver installation is complete. The tape device now appears in the Tape Drive category on the Computer Management screen.
Event Log Errors After the ProLiant Installation Utility is complete, event log error messages related to certain controller drivers might appear. These messages are expected at this time and do not affect the performance of the server or the operating system. Possible messages include: • Driver detected an internal error in its data structures for \Device\Scsi\Cpq32fs21. • Driver detected a controller error on \Device\Scsi\Cpq32fs21.
To run the ProLiant Support Pack for Windows 2000 software: 1. Click Start>Programs>Pre-Install Features>ProLiant Support Pack. 2. Follow the on-screen instructions when the setup program is launched. If this link does not launch the setup program: 1. Click Start>Run. 2. Enter the following path in the text box, then click OK: C:\PSP\SETUP.EXE 3. Follow the on-screen instructions when the setup program launches. Configuring Network Protocols The TCP/IP and SNMP services are automatically installed.
Using Management Agents The Management Agents for Servers are installed during the setup process. For more information about the Management Agents, refer to the HP Insight Management Agents User Guide. This guide is located at http://h18013.www1.hp.com/products/servers/management/agents.html. Troubleshooting If you experience problems with the factory-installed operating system software, refer to the information in the following sections.
The length of Software Support Services might change, depending on local country legal requirements. After the first 90 days, Software Support Services are available for a fee on all operating software and bundled software provided by HP. IMPORTANT: Support applies only to the original HP hardware and software configuration shipped.
Getting Help You can find more information and other help in the following locations. HP Website To access the HP website, log on to the Internet at http://www.hp.com. Telephone Numbers For technical support: 30 • In the United States and Canada, call 1-800-652-6672. For continuous quality improvement, calls may be recorded or monitored. • Outside the United States and Canada, go to the HP website for additional support information at http://www.hp.com.