HP Enterprise SQL Optimizer (HP ESO) 3.0 User Guide Abstract This document describes how to install and use HP's Enterprise SQL Optimizer (HP ESO) software. HP ESO was created for system administrators and HP support personnel responsible for installing, configuring, and managing HP ProLiant servers running Microsoft SQL Server. This document is not a tutorial. HP Part Number: AM426-9013D Published: January 2013 Edition: 1.
© Copyright 2011–2013 Hewlett-Packard Development Company, L.P. Legal notices Confidential computer software. Valid license from HP required for possession, use or copying. Consistent with FAR 12.211 and 12.212, Commercial Computer Software, Computer Software Documentation, and Technical Data for Commercial Items are licensed to the U.S. Government under vendor's standard commercial license. The information contained herein is subject to change without notice.
Contents 1 Introduction...............................................................................................6 Features..................................................................................................................................6 New features in release 3.0.......................................................................................................7 New features in release 2.0 and 2.1.....................................................................................
Analysis Services properties............................................................................................36 Data Dir..................................................................................................................36 Temp Dir.................................................................................................................36 Log Dir....................................................................................................................36 Backup Dir....
4 Support and other resources......................................................................55 Contacting HP .......................................................................................................................55 Before you contact HP........................................................................................................55 HP contact information.......................................................................................................
1 Introduction HP Enterprise SQL Optimizer (HP ESO) is a software tool that greatly simplifies and consolidates the process of tuning HP ProLiant DL980 G7 servers running Microsoft Windows Server and SQL Server 2008, SQL Server 2008 R2, or SQL Server 2012.
New features in release 3.0 HP ESO 3.
◦ – Startup options (trace flags) T1117, T1118, T2371, T2549, and T2562 – Database auto create/update/async statistics Recommendations for optimized storage settings for the following parameters: – Database file autogrowth (autogrow) – Storage layout of database files • Improved response times for page loading, saving, and rollback • Improved graphical user interface (GUI) on all pages, with most significant changes on: • ◦ CPU page — CPU affinity settings of all SQL instances are shown side
2 Installing HP ESO Software requirements The following prerequisite software is required in order for HP ESO to function properly: • HP System Management Homepage (HP SMH), Version 6.0 or later • Any Internet browser supported by HP SMH (refer to your HP SMH documentation for more information) • Microsoft .NET Framework, Version 3.
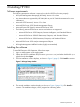
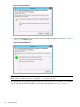
Figure 2 Setup window #1 5. When the installation finishes successfully, as shown by the HP Setup window shown in Figure 3 (page 10), click Close to exit. Figure 3 Setup window #2 NOTE: The HP ESO application files are installed into the %ProgramFiles%\McPerfOpt folder, where %ProgramFiles% is typically: C:\Program Files.
Figure 4 Installation warning message Uninstalling the software To uninstall HP Enterprise SQL Optimizer, follow these steps: 1. Login as Administrator on the target system. 2. Navigate to the Add/Remove panel (or Programs and Features in the Control Panel). 3. Locate “HP Enterprise SQL Optimizer for Windows Server x64 Edition” in the resulting list of programs. Right-click it and click Uninstall. 4. A confirmation popup displays, asking you to confirm this action. Click Yes to continue. 5.
Figure 5 Upgrade window Downgrades are not supported. For example, if HP ESO 3.0.0.0 is currently installed, and you try to install HP ESO 1.0.0.0 or 2.0.0.0, you will see a warning screen as shown in Figure 6 (page 12). If you attempt to continue, you will see an error screen. Figure 6 Downgrade error window Silent installation HP ESO can be installed in silent (non-interactive) mode by adding the /s or /silent switch to the installer package's executable file, such as cp018233.exe /s when executing.
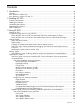
3 Using HP ESO HP ESO allows you to connect to SQL Server and Analysis Services instances to perform a variety of operations to help with system configuration and tuning to optimize SQL performance. Table 1 (page 13) lists the main tasks you can perform using HP ESO. Table 1 Tasks to perform Task to perform... For more information...
Table 1 Tasks to perform (continued) Task to perform... For more information...
3. The SMH Sign In page displays as shown in Figure 8 (page 15). Enter a valid user name and password and click Sign In. Figure 8 SMH Sign in page Your user name and password must be a valid account in the Administrator group (see Figure 9 (page 16)) configured in the SMH users groups. The Sign In button validates the values in the User Name and Password fields. If both values are valid, the HP SMH Homepage displays. The Clear button clears the User Name and Password fields.
Figure 9 How to configure user name and group in SMH 4. In the SMH Homepage (see Figure 10 (page 16)), click the HP ESO link in the Enterprise SQL Optimizer box. Figure 10 SMH Homepage 5. 16 The Enterprise SQL Optimizer Introduction page displays. An example of this page and instructions for getting started with HP ESO are included in “Getting Started” (page 20).
Configuration steps prior to using HP ESO Prior to using HP ESO, you might need to perform the following: • To ensure that user accounts can access SQL Server instances, set the appropriate server roles for these accounts, as described in “Ensure HP ESO user accounts have Microsoft SQL Server administrator privileges” (page 17).
Figure 11 SQL Server Management Studio Login Properties window Ensure HP ESO user accounts have Microsoft Analysis Services administrator privileges To use HP ESO to access an Analysis Services instance to set parameters and optimize resources based on the instance’s particular workloads, the user account you intend to use must be a member of the Microsoft Analysis Server Administrators group. To ensure that an account is in the Administrators group, follow these steps: 1.
Figure 12 Selecting Analysis Services properties 4. In the Analysis Server Properties popup, select Security from the Select a page panel on the left, as shown in Figure 13 (page 20).
Figure 13 Analysis Server Properties page 5. 6. 7. 8. If the account to be used to connect to the Analysis Services instance is not listed, click Add…. Enter the account to be added then click OK. Close the Analysis Server Properties window. Repeat steps 2 through 7 for all Analysis Services instances so that HP ESO can optimize the resources based individual workloads. Getting Started When first run, HP ESO displays the Introduction page as shown in Figure 14 (page 21).
Figure 14 HP ESO Introduction page IMPORTANT: After starting an HP ESO software Admin Session, HP highly recommends that you first go to the Data Collection page to configure and start data collection, as directed in “Quick start: basic session” (page 21). Data collection enables HP ESO to capture and analyze real SQL Server workload patterns in the system and to give the best optimization recommendations, based on the observed workload patterns.
1. Start an exclusive HP ESO Administrator Session (Admin Session) by clicking Enter Admin Session in the upper left corner of the left pane of the HP ESO Introduction page (see Figure 15 (page 22)). Figure 15 Enter Admin Session on HP ESO Introduction page NOTE: Before you can use HP ESO pages and functionality, you must perform this step. For more information about Admin Session, see “Creating an authenticated Administrator Session (Admin Session)” (page 25).
Figure 17 Left pane page selection links 4. 5. Configure and perform data collection. To do so, access the Data Collection page by selecting the Data Collection link (the Data Collection link is the first link below the SQL Server Login link). The data collection process generates recommendations. Before performing data collection, make sure all the SQL instances are under the workload stress expected in real world conditions.
7. Whenever the HP ESO Admin Session is about to expire (in Figure 18 (page 24), the Time left field indicates two minutes are left before session expiration), click Extend Session to reset the timeout value. When less than one minute remains, some pages might not be accessible. Clicking Extend Session makes those pages accessible again. Figure 18 Session timer and Extend Session button The default Admin Session timeout is 30 minutes.
You can also access HP ESO online help by accessing the Online Help page, as described in “Online help” (page 54). Creating an authenticated Administrator Session (Admin Session) An Administrator session is created to ensure that only one authenticated user can use and change the different parameters in the system and the SQL Server. When an Admin Session is started by a user, other users will be blocked from accessing the ESO pages.
authentication type for each instance. From this page, you can then log in to the SQL Server and Analysis Services instances. HP ESO validates the credentials. Figure 22 SQL Server Login page For SQL Server instances, the type of login (Windows Authentication or SQL Authentication) can be selected under the Authentication Type column. For Analysis Services, Windows Authentication is the only selectable option.
Figure 23 Login credentials status Modifying the Admin Session timeout value The default session timeout of 30 minutes may be changed by entering the new timeout value in the New Value field under the ESO Session Configuration section of the SQL Server Login page. The maximum timeout value is approximately 35791 minutes. The ESO Session Configuration section is near the bottom of the page; you might have to scroll down to that section.
Figure 25 CSV data files These CSV files are used by HP ESO for analysis, and form the basis of its optimization recommendations and its performance and workload history reports. IMPORTANT: To ensure suitability of HP ESO’s optimization recommendations, perform data collection during typical business workloads. Click Data Collection in the HP ESO navigation pane to display the Data Collection page. Figure 26 (page 28) shows a Data Collection page.
User input fields in the Data Collection Settings section include the following: • START ON ⇒ Lets you select the date and time that data collection starts. NOW is the default value and immediately starts data collection when you click Start. To specify a future date and time for starting data collection, click the calendar icon ( ). • STOP ON ⇒ Lets you select the date and time when data collection stops. NON-STOP is the default value and keeps data collection running until you stop it manually.
IMPORTANT: HP highly recommends that you run data collection and complete the process before visiting or modifying the Optimization pages. To ensure suitability of HP ESO’s optimization recommendations, perform data collection during typical business workloads. HP ESO optimization pages typically display the following values or controls (see Figure 28 (page 30)): • N/A ⇒ No recommendation can be provided for the parameter at the current state and environment.
Figure 29 Critical error page SQL Server page: Viewing and enabling SQL Server and Analysis Services optimization recommendations The SQL Server page contains recommendations for setting parameters for SQL Server and Analysis Services instances.
Figure 30 SQL Server page The following subsections describe the parameters affecting SQL Server optimization. NOTE: For information about affinity settings, see “CPU page: Viewing and enabling CPU assignment optimization recommendations” (page 41). SQL Server database instance parameters NOTE: Cluster-related parameters (Cluster Network Name, Computer Name, Status, and Computer Role) are described in “Clustered SQL Server instance” (page 40).
Minimum Server Memory (in MB) Use the Minimum Server Memory option to specify whether SQL Server should start with at least the minimum amount of allocated memory and not release memory below this value. Set this value based on the size and activity of your SQL Server instance. Always set the option to a reasonable value to ensure the operating system does not request too much memory from SQL Server and inhibit Windows performance.
Figure 31 Setting the Xp_CmdShell option Analysis Services instance parameters Flight Recorder SQL Server Analysis Services Flight Recorder provides a mechanism to record server activity into a short-term log. Information captured by Flight Recorder can be helpful for troubleshooting specific issues; however the load placed on the server when capturing the snapshots and trace events can have a small impact on overall performance.
new and older algorithms are not always identical. Transact-SQL counting can vary for NULL values and different collations. If you want to use the optimization, set the OLAP\ProcessPlan\EnableRolapDistinctCountOnDataSource property to 1. Database page: Viewing and enabling database optimization recommendations The Database page contains parameters related to database files in each SQL Server and Analysis Services instance.
SQL Server Database Engine properties File Growth The File Growth option specifies the method of incremental allocation applied when an operating system file is extended. Possible values are OFF, MB, or % (Percent). SQL Server files can grow automatically from their originally specified size. When you define a file, you can specify a specific growth increment. Every time the file is filled, it increases its size by the growth increment.
Measure Group A Measure Group (MeasureGroup object) is composed of basic information, measures, dimensions, and partitions. • Basic information includes the name of the measure group, the type of measures, the storage mode, the processing mode, and others. • Measures are the actual set of measures that compose the measure group. For each measure there is a definition for the aggregate function, the formatting attribute, the data item source, and others.
availability. More importantly, the Availability Group feature includes support of active secondary replicas, which dramatically improves resource utilization. Active secondary replicas perform log backups and copy-only backups of a full database, file, or filegroup. If a database is a member of an Availability Group, additional parameters will be displayed, including Availability Group Name, Synchronization Status, and Replica Role.
Figure 34 Mirrored database Table 4 Possible database status values Value Description Normal The database is available. Restoring The database is going through the restore process. RecoveryPending The database is waiting to go through the recovery process. Recovering The database is going through the recovery process. Suspect The database is has been marked as suspect. You should check your data, and the database might have to be restored from a backup.
Clustered SQL Server instance If an SQL Server is clustered, cluster status information will be displayed, including Cluster Network Name, Status, Computer Role, and Computer Name, as shown in Figure 35 (page 40). (This example shows a portion of the page; in full view, the Computer Name would be seen to the right of the Computer Role.) Information about these status parameters is included in the subsections that follow.
CPU page: Viewing and enabling CPU assignment optimization recommendations The CPU page (see Figure 36 (page 41)) displays SQL Server affinity settings and recommendations for each SQL instance in the system. To carry out multitasking, Microsoft Windows sometimes moves process threads among different processors. Although this is efficient from an OS point of view, this activity can reduce SQL Server performance under heavy system loads, as each processor cache is repeatedly reloaded with data.
NOTE: Do not set SQL Server Affinity and IO Affinity to the same CPUs because it can degrade system performance (HP ESO displays a warning if the system is configured this way). As a general rule, HP ESO recommends affinity on only a few specific processors for SQL instances that are comparatively lightly utilized, so they do not use all of the available system processors.
User Write Cache Setting This setting enables write caching to improve disk performance, but a power outage or equipment failure might result in data loss or corruption. User Cache Power Protection Some storage controllers provide an option to enable cache power protection. Using a backup battery, a storage controller can keep data in volatile memory intact, even during power interruptions. This protects cached data even during power failures.
Interrupt affinity Network interface interrupt affinity settings include All Close CPUs, One Close CPU, or All CPUs. HP ESO recommends All Close CPUs in most cases. Port affinity SQL Server uses an application port (usually Port 1433) whose affinity can be set to one or more CPU NUMA Nodes. As with SQL CPU Affinity, this improves performance by directing network traffic bound to a CPU or group of CPUs used by SQL Server. Additional ports can also be added and removed.
Figure 39 RSS settings in Network Affinity page SQL Startup Option page: Viewing and enabling startup options A set of default startup options is written to the registry during SQL Server installation. Trace flags are one form of these startup options. Use trace flags to temporarily set specific server characteristics, or to switch particular SQL Server behaviors on or off. Trace flags can be used for a variety of purposes.
To change the status of an individual trace flag, select a new value from the drop down box and click SET. CAUTION: Each trace flag covers a very specific field and requires certain conditions to work. Caution should be used when turning a trace flag on or off. Trace flag 8048 Enable trace flag 8048 (TF-8048) to use memory allocation at the CPU level in order to reduce costs when you have too many CPUs per NUMA node.
Trace flag 2562 By default, the DBCC CHECKDB command tries to minimize the amount of tempdb resources required to check the entire database. The command does this by breaking up the database into batches. This reduces the number of indexes or "facts" that it generates. Trace flag 2562 implements the following changes: • Forces the DBCC CHECKDB command to run all processing in a single batch regardless of the number of indexes in the database.
Software Discovery This section allows you to specify the source (Reference Catalog Location) for Software Discovery and to run Software Discovery. The Reference Catalog is a file that lists details about system software and firmware components, including information about the latest available versions of the components. For more information, see “Configuring and initiating Software Discovery” (page 48).
NOTE: Software Discovery executes every time the server restarts. In the System page’s Software Discovery section, when C:\ is entered in Proliant Support Pack Catalog Location, the message “The last discovery on MMDDYY-Time” will be displayed even if there is no valid catalog file in the C:\ location. When specifying C:\ as the location of a catalog file, make sure the file does exist in that location.
1. 2. In the first field in the Specify Data Report file section, click the drop-down menu ( ) button on the right to list the available CSV data collection log files, and select the file you want to view. To view a report based on the most recently-collected data, select the most recent log file, as denoted by the file name. If you want to export this file, select the desired export file format (XML or CSV) and click Generate File.
4. Optionally, counters within each file to be compared can be filtered using the Select/Unselect All check box on the right side of the graph, or by selecting individual counters to be included in the comparison. NOTE: The longer the data collection process is running, the more data will be stored in the CSV (Comma Separated Values) files. When the amount of data collected is very large (exceeding 10MB, roughly), the ESO Workload and Performance History page may not be able to show the entire graph.
Figure 46 Restoring selected settings To delete saved restoration point settings, select the restoration point settings files and click Delete to delete the selected files; you can select the Select All check box to delete all of the saved settings files.
NOTE: With the current version of ESO, the Save/Rollback SQL Configuration feature only covers the following parameters in the SQL Server page and the Network page: SQL Server page • MaxWorkerThreads • Maximum Degree of Parallelism • Lightweight Pooling • Priority Boost • Minimum Server Memory (MB) • Maximum Server Memory (MB) • CheckPoint • Lock Pages in Memory • Flight Recorder • ResourceMonitoringEnabled • Random File Access • LowMemoryLimit • TotalMemoryLimit • CoordinatorQue
Help pages The Help pages display the HP ESO Online Help system. Available topics are identical in structure and content to the HP ESO User Guide document. Use this page to find the information and help you need to use HP ESO effectively. Online help Use this page as your entry point into HP ESO online help. Click the links in the table of contents to find the desired information about using HP ESO. Figure 47 (page 54) shows the initial Online Help page.
4 Support and other resources Contacting HP Before you contact HP Be sure to have the following information available before you call or contact HP: • Technical support registration number (if applicable) • Product serial number • Product model name and number • Product identification number • Applicable error message • Add-on boards or hardware • Third-party hardware or software • Operating system type and revision level HP contact information For the name of the nearest HP authorized resel
Related information The HP ESO release notes are available on the HP Business Support Center website from where the HP ESO software is obtained. The latest release of the HP ESO User Guide and other HP ProLiant DL980 documentation can be found at the following HP Business Support Center webpage: http://hp.com/go/proliant-DL980-docs For information about HP ProLiant servers, see the following HP webpage: http://www.hp.
5 Documentation feedback HP is committed to providing documentation that meets your needs. To help us improve the documentation, send any errors, suggestions, or comments to Documentation Feedback (docsfeedback@hp.com). Include the document title and part number, version number, or the URL when submitting your feedback.