Technical white paper Best Practices When Deploying VMware vSphere on the HP ProLiant DL980 Table of contents Executive summary 3 Solution overview HP ProLiant DL980 vSphere 4.1 vSphere 5.0 vSphere 5.1 VMware features matrix 3 3 4 4 5 5 HP value-add software and drivers 6 Configuring vSphere 4.1 Enabling 2 GB memory mapped I/O Balancing server performance and power Increasing network bandwidth Installing HP NMI driver for VMware ESX/ESXi 4.
Summary 19 For more information 20 Documentation feedback 20
Executive summary The purpose of this white paper is to facilitate the successful deployment and configuration of VMware® vSphere® 4.1 or vSphere 5.0 and 5.1 virtualization software on HP ProLiant DL980 servers. It includes descriptions of additional recommended HP software components for the DL980, as well as best practices and guidelines to use when deploying vSphere.
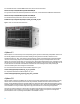
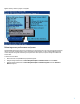
For a detailed discussion of the HP PREMA architecture, see the technical overview at h20195.www2.hp.com/V2/GetPDF.aspx/4AA3-0643ENW.pdf. For a general overview of the technical specifications for this server, see the HP ProLiant DL980 Server Data Sheet at h20195.www2.hp.com/V2/GetPDF.aspx/4AA1-5671ENW.pdf. For detailed technical specifications, see the server QuickSpecs at h18000.www1.hp.com/products/quickspecs/13708_div/13708_div.pdf. Figure 1: Front view of the HP ProLiant DL980 server vSphere 4.
Use Profile-Driven Storage to identify the right storage resource to use for any given VM based on its service level. With SDRS you can aggregate storage into pools, greatly simplifying scale management and ensuring optimum VM load balancing while avoiding storage bottlenecks. And with Auto Deploy, the new deployment model for vSphere hosts running the ESXi hypervisor, you can now install new vSphere hosts in minutes and update them more efficiently than ever before.
For more information on vSphere 5.1 configuration maximums, go to vmware.com/pdf/vsphere5/r51/vsphere-51-configuration-maximums.pdf. HP value-add software and drivers For media containing the appropriate HP software and drivers for your virtualization solution, go to h20392.www2.hp.com/portal/swdepot/displayProductsList.do?category=SVIRTUAL. Additionally, for more DL980-specific virtualization updates, go to hp.com/support/DL980G7.
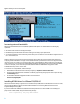
Figure 2: Enabling 2 GB Memory Mapped I/O using RBSU Balancing server performance and power The default BIOS power policy favors power consumption over server performance. For scale-up workloads in particular, this policy may have an adverse effect on server throughput and performance. In order to allow the VMware kernel to control CPU power saving while maximizing server performance when required, set power management in BIOS to OS Control Mode. To enable OS Control Mode: 1. 2. 3.
Figure 3: Enabling OS Control Mode Using RBSU Increasing network bandwidth VMware introduced Network I/O Control (NetIOC) capabilities with vSphere 4.1. NetIOC delivers the following key capabilities: All network traffic shares the same physical adapter. Bandwidth is apportioned between the various traffic types according to your specifications. You can take advantage of 10 Gb connectivity, which allows you to increase the concurrent vMotion migrations from 4 (for a 1 Gb network) to 8.
If the driver is not installed, however, ESX/ESXi logs the event and may allow the system to continue operating even after a hardware error is reported. Therefore, HP highly recommends you install this driver. To install the driver on VMware ESX/ESXi 4.1 using the esxupdate utility, follow these steps: 1. 2. 3. 4. 5. Power off any VMs running on the DL980 server and place the server into maintenance mode. Log into the ESX service console. Download the HP NMI Sourcing Driver for VMware ESX/ESXi 4.
Using two adapters provides protection from certain bus and card failures.
Figure 5: Enabling Memory Mirroring Using RBSU However, with vSphere 4.1, unless ESX is aware that memory mirroring has been enabled, you will see the following error message when you attempt to install or boot ESX: The system has found a problem on your machine and cannot continue. The BIOS reports that NUMA node 1 has no memory. This problem is either caused by a bad BIOS or a very unbalanced distribution of memory modules. Solutions for this error are described in the following two sub-sections.
Enabling memory mirroring after installation If you enabled memory mirroring after installing ESX, follow these steps: 1. 2. 3. Connect to the newly-installed ESX Server using vSphere Client. Go to Configuration Panel > Software Advanced Settings > VMkernel. Uncheck the VMkernel.Boot.useNUMAInfo setting to disable Non-Uniform Memory Access (NUMA). 4. 5. Reboot the server. Enable Memory Mirroring again using the BIOS, as described above.
Figure 6: Enabling 2 GB Memory Mapped I/O Using RBSU Balancing server performance and power The default BIOS power policy favors power consumption over server performance. For scale-up workloads in particular, this policy may have an adverse effect on server throughput and performance. In order to allow the VMware kernel to control CPU power saving while maximizing server performance when required, set power management in BIOS to OS Control Mode. To enable OS Control Mode: 1. 2. 3.
to 10 Gb. For example, install the optional HP NC524SFP Dual Port 10GbE Module to upgrade two of the four embedded network ports from 1 Gb to 10 Gb. To use vCenter to configure NetIOC, follow these steps: 1. Enable NetIOC on the desired network switch by navigating to Properties > Resource Allocation. 2. Set the desired bandwidth shares once NetIOC is enabled by right-clicking the appropriate resource pool and using the Edit Settings menu. 3.
Figure 8: Collaborative Power Control Disabled Second method To disable the usePCC boot flag after installation of VMware, use the vSphere client to follow these steps: 1. 2. 3. 4. 5. 6. From the vSphere Client, connect to the vCenter Server and select the host in the inventory. Click the Configuration tab. In the Software section, click Advanced Settings. In the right pane, expand the VMkernel listing and select Boot. Uncheck the box next to VMkernel.Boot.usePCC (see Figure 9). Click OK to exit.
Figure 9: Disabling the usePCC Boot Flag Installing HP NMI driver for VMware ESXi 5.0 VMware introduced the ability to register for non-maskable interrupt (NMI) events in the ESX/ESXi 4.1 kernel. As a result, HP is providing an NMI driver (hpnmi) that works with the ESXi 5.0 kernel to log NMI information to the HP Integrated Management Log (IML).
To install the driver, follow these steps: 1. 2. 3. 4. Power off all virtual machines running on the host and put the host in maintenance mode. Download the HP NMI Sourcing Driver for VMware ESXi 5.0 bundle from the HP support website (hp.com/support/dl980G7) to a directory on the server’s hard drive, extract it to an online depot, and navigate to that directory. Transfer the offline bundle to the ESXi host local path, or extract it to an online depot.
Figure 10: Enabling 44-bit Address Mode using RBSU Additional considerations When implementing VMware solutions on the HP ProLiant DL980, you should also consider the following general guidelines: Disks containing the operating system and applications should be local and configured with RAID 1. You can expect optimal performance using the highest-speed, highest-wattage processors.
Configuration of the DL980 server is limited by maximums specified by VMware. For more information, see the white paper “Configuration Maximums, VMware vSphere 4.1”: vmware.com/pdf/vsphere4/r41/vsp_41_config_max.pdf All VMware configurations must conform to the specific devices listed in the VMware Compatibility Guide. This guide is updated frequently to reflect devices currently certified for support by VMware and HP, and is published on the VMware website: vmware.com/resources/compatibility/search.
For more information How vSphere 4.1 performance ranks among its competitors in the marketplace: vmware.com/files/pdf/vmware-maximize-workload-density-tg.pdf VMware Compatibility Guide with the latest VMware hardware certifications: vmware.com/go/hcl Latest HP hardware certifications for VMware: h18004.www1.hp.com/products/servers/vmware/supportmatrix/hpvmware.html Best practices on configuring HP EVA storage solutions with VMware: h20195.www2.hp.com/V2/GetPDF.aspx/4AA1-2185ENW.