HP Enterprise SQL Optimizer (HP ESO) 2.1 User Guide HP Part Number: AM426-9013C Published: August 2012 Edition: 4.
© Copyright 2011–2012 Hewlett-Packard Development Company, L.P. Legal Notices Confidential computer software. Valid license from HP required for possession, use or copying. Consistent with FAR 12.211 and 12.212, Commercial Computer Software, Computer Software Documentation, and Technical Data for Commercial Items are licensed to the U.S. Government under vendor's standard commercial license. The information contained herein is subject to change without notice.
Contents About This Document.....................................................................................5 Publishing History.....................................................................................................................5 Organization...........................................................................................................................5 1 Introduction...............................................................................................6 Features...
NUMA Node Affinity....................................................................................................29 Interrupt Affinity............................................................................................................29 Port Affinity..................................................................................................................29 Receive-Side Scaling..........................................................................................................
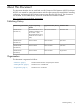
About This Document This document describes how to install and use HP's Enterprise SQL Optimizer (HP ESO) software. HP ESO was created for system administrators and HP support personnel responsible for installing, configuring, and managing HP ProLiant servers running Microsoft SQL Server. This document is not a tutorial. For the latest version, see the HP Technical Documentation website: http://www.hp.
1 Introduction HP Enterprise SQL Optimizer (HP ESO) is a software tool that greatly simplifies and consolidates the process of tuning HP ProLiant DL980 G7 servers running Microsoft Windows Server and SQL Server 2008, SQL Server 2008 R2, or SQL Server 2012.
HP ESO 2.1 additionally provides: • A fix for more efficient CPU and memory resources usage. Previous resources usage caused SQL Server, Database, CPU, and Network optimization pages to hang for certain storage settings. New Features In Release 2.0 and 2.
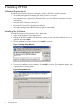
2 Installing HP ESO Software Requirements The following prerequisite software is required in order for HP ESO to function properly: • HP System Management Homepage (HP SMH), Version 6.0 or later • Any Internet browser supported by HP SMH (refer to your HP SMH documentation for more information) • Microsoft .NET Framework, Version 3.
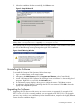
5. When the installation finishes successfully, click Close to exit. Figure 3 Setup Window #2 NOTE: The HP ESO application files are installed into the %ProgramFiles%\McPerfOpt folder, where %ProgramFiles% is typically: C:\Program Files.
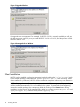
Figure 5 Upgrade Window Downgrades are not supported. For example, if HP ESO 2.1.0.0 is currently installed you will see the following error screen if you try to install HP ESO 1.0.0.0 or 2.0.0.0, and the process will fail. Note the “Red X” icon. Figure 6 Downgrade Error Window Silent Installation HP ESO can be installed in silent (non-interactive) mode by adding the “/s” or “/silent” switch to the installer package's executable file, such as “cp016281.exe /s” when executing.
3 Using HP ESO To use HP ESO, you must first launch the HP System Management Homepage (SMH) software, which is also the starting point for many other HP server management tools. Starting System Management Homepage To run the HP System Management Homepage (SMH), follow these steps: 1. From the target system Desktop, click Start → All Programs → HP Management Agents → HP System Management Homepage. 2. When the security certificate warning displays, click Continue to this website.
Figure 8 SMH Sign In Page Your user name and password must be a valid account under the Administrator group (see figure below) configured in the SMH users groups. The Sign In button validates the values in the User Name and Password fields. If both values are valid, the HP SMH Home page displays. The Clear button clears the User Name and Password fields. The Question Mark icon (?) displays or hides a floating tooltip box containing information about the authentication mechanism and sign in process.
Figure 10 SMH Home Page 5. The Enterprise SQL Optimizer Main page displays. Refer to the next section for instructions on using HP ESO. Microsoft SQL Server Security Settings To access the SQL instances and set parameters through HP ESO, the specified user account must have serveradmin and/or sysadmin SQL server role. If you want to set these properties, follow these steps: 1. Open the Microsoft SQL Server Management Studio (see figure below). 2.
Getting Started Pages When first run, HP ESO displays the Introduction page in the Getting Started section. The left navigation pane displays links to all of the various HP ESO pages. IMPORTANT: Before using the HP ESO software, it is highly recommended that you go to the Configuration page to configure a few initial parameters that are recommended for best optimization of SQL Server. Quick Start Guide Because of the new session-based usage model in place for ESO 2.
learning about the many settings that HP ESO provides. This feature is shown in the following examples. Figure 13 Floating Help Text Administrator Session (Admin Session) Administrator session is created to ensure that only one authenticated user can use and change the different parameters in the system and the SQL server. When an Admin Session is started by a user, other users will be blocked from accessing the ESO pages.
Figure 14 Steps to Enter an Admin Session NOTE: The default session timeout of 30 minutes is configurable and may be overridden by typing the new timeout value in the New Value field under “ESO Session Configuration” section as shown in the SQL Server Login page, see below. SQL Server Login Upon starting an Admin Session, all SQL server instances will be shown along with input boxes for entering login credentials.
Figure 15 SQL Server Login Figure 16 Login Status, Type, and Name; and the Connect Button NOTE: When there is only less than one minute remaining in the current Admin Session, some of the pages may not be accessible. To resolve the issue, click on the Extend Session button ( ). Settings Pages Use the Settings pages to configure some of your settings prior to discovery and optimization of the HP server, the Windows Operating System (OS), and SQL Server.
Figure 17 CSV Data Files These CSV files are used by HP ESO for analysis, and form the basis of its optimization recommendations. Click on Configuration in the HP ESO navigation pane to display the Configuration page, which contains two sections: Data Collection Settings and Software Discovery. Figure 18 Configuration Page User input fields in the Data Collection Settings section include the following: 18 • START ON ⇒ Lets you select the date and time that Data Collection starts.
NOTE: The lower the sampling rate value, the finer the resolution of the data samples, and the more accurate the internal data analysis will be. However, setting the sampling rate too low makes the resulting data collection files larger. The higher the sampling rate value, the coarser the resolution of data samples, and the less accurate the internal data analysis will be. However, setting the sampling rate higher will make the resulting data collection files smaller.
The Software Discovery RUN button ( ) runs the system software discovery and updates. Results are shown in the Optimization section’s System Software page. Status of the latest discovery also displays below this button. NOTE: Software Discovery executes every time the server restarts.
In all of the optimization pages, HP ESO displays the following values or controls: • N/A ⇒ No recommendation can be provided for the parameter at the current state and environment. • Current Value ⇒ The current parameter value discovered in the system. • Recommended Value ⇒ The parameter value recommended by HP ESO. • New Value ⇒ This field contains the new parameter value to be applied to the system. By default, this field contains the recommended value.
SQL Server The SQL Server page contains recommendations for setting SQL Server parameters. Figure 22 SQL Server Page Maximum Degree of Parallelism When SQL Server runs on a system with more than one microprocessor or CPU, it detects the best degree of parallelism. Specifically, it recognizes the number of processors employed to run a single statement, for each parallel plan execution. Use the Max Degree of Parallelism option to limit the number of processors to use in parallel plan execution.
Maximum Server Memory (in MB) The Maximum Server Memory option specifies the maximum amount of memory SQL Server can allocate when it starts and while it runs. Set this option to a specific value if you know there are multiple applications running at the same time as SQL Server and you want to guarantee these applications have sufficient memory to run.
Database File on System Drive HP ESO recommends that you store the database file in a different location than the system or OS drive. If a database file is found on the system drive, HP ESO's recommendation to relocate the file displays on this page. Multiple Database File on a Drive HP ESO also recommends that the database files are located on a dedicated drive. If multiple database files are found on a drive, HP ESO's recommendation for relocating them on separate drives displays on this page.
Table 3 Possible Mirror Status Values Value Description None The principal database is not mirrored. Suspended Mirroring of the principal database is supended. Disconnected The principal database and the mirror database are disconnected. Synchronizing The principal database and the mirror database are in the process of synchronizing. PendingFailover The principal database is initiating a failover. Synchronized The principal database and the mirror database are synchronized.
Table 5 Possible Replica Roles Role Description Resolving The Role is Resolving. Primary The Role is Primary. Secondary The Role is Secondary. Unknown The Role is Unknown. Clustered SQL Server Instance If a SQL server is clustered, additional parameters will be displayed for Cluster Network Name, Cluster Status and Computer Role, as shown in the figure below.
can reduce SQL Server performance under heavy system loads, as each processor cache is repeatedly reloaded with data. Assigning processors to specific threads can improve performance under these conditions by eliminating processor reloads and reducing thread migration across processors (thereby reducing context switching). Such an association between a thread and a processor is called processor affinity.
Storage The Storage page displays recommendations for different storage parameters. Figure 28 Storage Page Database RAID Level It is highly recommended that TempDB files and Log files for user databases be on physical disks with RAID 1 + 0 or RAID 1. Drive Free Space When drive free space reaches less than 20%, a Warning message displays, with a recommendation to either move the file to a larger drive or free up more space on the current drive.
Figure 29 Network Page NUMA Node Affinity NUMA (Non Uniform Memory Access) Node is a logical grouping of processors that share common, directly-linked physical memory. HP ESO recommends CPU NUMA Nodes closest to the network interface I/O. Interrupt Affinity Network interface interrupt affinity settings include All Close CPUs, One Close CPU, or All CPUs. HP ESO recommends All Close CPUs in most cases.
Received-side scaling is enabled by default in Windows Server 2008 and Windows Server 2008 R2. To take advantage of RSS, network drivers must be written with RSS capabilities. Currently, RSS cannot make use of more than 64 processors with Windows 2008 R2, even with Service Pack 1, released in February 2011. Modern network drivers are configured to use RSS through settings found in the Windows Device Manager, in the Advanced Properties of the network interface.
Figure 31 System Page Power Plan The settings in this section resemble the Windows Power Option settings. The default HP ESO setting here is High Performance. System Update Advisory Information This section uses the Web catalog file to enumerate any system software components that are out-of-date and should be upgraded to their latest versions. PCI Controller Information This table enumerates all of the system's add-on PCI cards.
Figure 32 Workload and Performance History Page To view and/or export a performance report, follow these steps: 1. Select the CSV file you want to view in the Select the report from the list field. 2. On the right side of the page, select the counters you want included in the graph (use the Select/Unselect All check box for convenience). 3. Select the desired export file format (XML or CSV). 4. Click the Generate File button to create the report. To compare log files, follow these steps: 1.
Figure 33 Save/Rollback SQL Configuration Page The Save/Rollback SQL Configuration page displays the following values or controls: • Save Current Settings button ( ) ⇒ Saves the current settings to an XML file. You can enter comments and a description to make it easier to identify the saved settings in the future. • Restore Settings section ⇒ To retrieve, apply, or delete previously saved settings, follow these steps: 1.
Figure 34 Online Help Page 34 Using HP ESO
4 Support and Other Resources Contacting HP Before You Contact HP Be sure to have the following information available before you call or contact HP: • Technical support registration number (if applicable) • Product serial number • Product model name and number • Product identification number • Applicable error message • Add-on boards or hardware • Third-party hardware or software • Operating system type and revision level HP Contact Information For the name of the nearest HP authorized resel
New and Changed Information in This Edition The initial release of this document covers HP ESO 1.0, published in November 2011. A second edition for an update to the HP ESO 1.0 was published in March 2012. The June 2012 edition provides documentation for HP ESO 2.0. The new features for HP ESO 2.0 are summarized in “New Features In Release 2.0 and 2.1” (page 6). This current August 2012 edition covers updates for the HP ESO 2.1 release, providing new ESO 2.