Intel® Matrix Storage Manager Enables Intel® Matrix Storage Technology User’s Manual Revision 2.
INFORMATION IN THIS DOCUMENT IS PROVIDED IN CONNECTION WITH INTEL® PRODUCTS. NO LICENSE, EXPRESS OR IMPLIED, BY ESTOPPEL OR OTHERWISE, TO ANY INTELLECTUAL PROPERTY RIGHTS IS GRANTED BY THIS DOCUMENT.
R Contents 1 Document Scope................................................................................................................. 7 2 Intel® Matrix Storage Manager Feature Overview ............................................................. 8 2.1 2.2 2.3 2.4 2.5 2.6 2.7 3 Configuring the BIOS for RAID ......................................................................................... 13 3.1 4 F6 Floppy Diskette Creation..............................................................
R 6.4 6.5 7 “RAID Ready”.................................................................................................................... 39 7.1 7.2 7.3 8 Confirming Installation of Intel® Matrix Storage Manager ................................... 36 Identifying Version of Intel® Matrix Storage Manager Installed ........................... 37 6.5.1 Using the Intel® Matrix Storage Console: ............................................ 37 6.5.2 RAID Driver File Properties: .............................
R Figures Table 1. RAID 0................................................................................................................... 8 Table 2: RAID 1................................................................................................................... 9 Table 3. RAID 5................................................................................................................... 9 Table 4. RAID 10......................................................................................
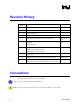
R Revision History Revision Number Description Revision Date 1.0 Initial Release March 20, 2003 1.1 Added RAID 1 information June 6, 2003 2.0 Added Intel® Matrix RAID Technology, AHCI/Native Command Queuing information June 15, 2004 2.1 Updated screen captures June 21, 2004 2.2 Updated ICH6R requirements and Option ROM updates November 16, 2004 2.3 Updated Unattended Installation instructions to add AHCI instructions. December 7, 2004 Updated for ICH6M 2.
Document Scope R 1 Document Scope This document discusses how to properly configure your system when using the Intel® Matrix Storage Manager. The information in this document is only relevant on systems implementing an AHCI or RAID solution using a supported Intel chipset and a supported operating system. x Supported Intel chipsets http://support.intel.com/support/chipsets/imsm/sb/CS-020644.htm x Supported operating system http://support.intel.com/support/chipsets/imsm/sb/CS-020648.
Intel® Matrix Storage Manager Feature Overview R 2 Intel® Matrix Storage Manager Feature Overview The Intel® Matrix Storage Manager software package provides high-performance Serial ATA and Serial ATA RAID capabilities in Windows* XP, Windows 2000, Windows Server 2003, Windows XP x64 Edition, and Windows Server 2003 x64 Edition. It was previously known by the names “Intel® Application Accelerator RAID Edition” and “Intel® Application Accelerator 4.x”.
Intel® Matrix Storage Manager Feature Overview R Refer to the following web site for more information on RAID 0: http://support.intel.com/support/chipsets/iaa_raid/sb/CS-009337.htm 2.2 RAID 1 (Mirroring) A RAID 1 array contains two hard drives where the data between the two is mirrored in real time to provide good data reliability in the case of a single disk failure; when one disk drive fails, all data is immediately available on the other without any impact to the integrity of the data.
Intel® Matrix Storage Manager Feature Overview R 2.4 RAID 10 (RAID 1+0) A RAID 10 array uses four hard drives to create a combination of RAID levels 0 and 1. It is a striped set whose members are each a mirrored set. Table 4 provides an overview of the advantages, the level of fault-tolerance provided, and the typical usage of RAID 10. Hard Drives Required: 4 Advantage: Combines the read performance of RAID 0 with the fault-tolerance of RAID 1.
Intel® Matrix Storage Manager Feature Overview R 2.6 RAID Migration The RAID migration feature enables a properly configured PC, known as a “RAID Ready” system, to be converted into a high-performance RAID 0, RAID 1, RAID 5, or RAID 10 configuration by adding one or more Serial ATA hard drives to the system and invoking the RAID migration process from within Windows*.
Intel® Matrix Storage Manager Feature Overview R 2.7.1 Native Command Queuing Native Command Queuing (NCQ) is a feature supported by AHCI that allows Serial ATA hard drives to accept more than one command at a time. NCQ, when used in conjunction with one or more hard drives that support NCQ, increases storage performance on random workloads by allowing the drive to internally optimize the order of commands.
Configuring the BIOS for RAID R 3 Configuring the BIOS for RAID To install the Intel® Matrix Storage Manager, the system BIOS must include the Intel® Matrix Storage Manager option ROM. The Intel® Matrix Storage Manager option ROM is tied to the controller hub: x Platforms based on the Intel® 82801GHM I/O controller hub (ICH7MDH) should use version 5.7 of the option ROM x Platforms based on the Intel® 82801GR/GH I/O controller hub (ICH7R/ICH7DH) should use version 5.
Intel® Matrix Storage Manager Option ROM R 4 Intel® Matrix Storage Manager Option ROM The Intel® Matrix Storage Manager option ROM is a PnP option ROM that provides a preoperating system user interface for RAID configurations. It also provides BIOS and DOS disk services (Int13h). 4.
Intel® Matrix Storage Manager Option ROM R 4.3 4.3.1 RAID Volume Actions RAID Volume Creation 1. Select option 1 Create RAID Volume and press the key. 2. Type in a volume name and press the key, or simply press the key to accept the default name. 3. Select the RAID level by scrolling through the available values (RAID 0, RAID 1, RAID 5, RAID 10) by using the <Ç> or <È> keys. 4. Press the key after you have selected the desired RAID level. 5.
Intel® Matrix Storage Manager Option ROM R 16 1. Press the and keys simultaneously, and the following window will appear: 2.
Intel® Matrix Storage Manager Option ROM R User's Manual 3. Specify a RAID volume name and then press the or key to advance to the next field: 4.
Intel® Matrix Storage Manager Option ROM R 18 5. Press the key to select the physical disks to use and the following prompt will appear: 6. Select a minimum of two hard drives to use for creating the volume by using the [SPACE] bar to select.
Intel® Matrix Storage Manager Option ROM R 7. Press the key after your selection is complete. The window will be returned to the main menu: 8. Select the strip size value for the RAID 0 array by scrolling through the available values by using the <Ĺ> or <Ļ> keys and pressing the key to select and advance to the next field. The available values range from 4KB to 128 KB in power of 2 increments. The strip value should be chosen based on the planned drive usage.
Intel® Matrix Storage Manager Option ROM R 10. Scroll down to ‘Create Volume’ and press the key to create the specified volume. The following prompt will appear: 11. Confirm this selection by pressing the key after the prompt. The window will be returned to the main menu with an updated status similar to the following: Note: The disk/volume information listed for your system can differ from the following example.
Intel® Matrix Storage Manager Option ROM R 12. Scroll to option 4 ‘Exit’ and press the key to exit the Intel® Matrix Storage Manager option ROM. The following prompt will appear: 13. Confirm the exit by pressing key.
Intel® Matrix Storage Manager Option ROM R 4.3.3 RAID Volume Deletion Caution: All data on the RAID drives will be lost unless the volume that is selected is a RAID 1 volume. 1. Select option 2 Delete RAID Volume and press the key to delete the RAID volume. 2. Use the up and down arrow keys to select the volume you would like to delete. 3. Press the key to delete the RAID volume. Confirm the volume deletion by pressing the key. 4.3.
Intel® Matrix Storage Manager Option ROM R 3. Confirm the volume deletion by pressing the key. 4.3.5 Reset Disks to Non-RAID Note: Possible reasons to ‘Reset Disks to Non-RAID’ could include issues such as incompatible RAID configurations, a failed volume or a failed member of a RAID 0 volume. Caution: All data on the RAID drives and any internal RAID structures will be lost unless the drives are members of a RAID 1 volume.
Intel® Matrix Storage Manager Option ROM R 4.3.6 Reset Disks to Non-RAID Example Note: Possible reasons to ‘Reset Disks to Non-RAID’ could include issues such as configurations, a failed volume or a failed member of a RAID 0 volume. Caution: By performing this operation, any internal RAID structures will be lost and all data on the RAID member hard drives unless they are members of a RAID 1 volume. 1.
Intel® Matrix Storage Manager Option ROM R 3. Press the key to complete the selection. 4. Confirm the selection by pressing the key.
Loading the Intel® Matrix Storage Manager Driver During Operating System Installation R 5 Loading the Intel® Matrix Storage Manager Driver During Operating System Installation In order to install an operating system onto a RAID volume or onto a Serial ATA hard drive when in AHCI mode, the Intel® Matrix Storage Manager driver must be installed during operating system installation using the F6 installation method. 5.
Loading the Intel® Matrix Storage Manager Driver During Operating S R 5.2 Installation Using F6 Installation Method To install the Intel® Matrix Storage Manager driver using the F6 installation method, complete the following steps: 1. Press F6 at the beginning of Windows XP setup (during text-mode phase) when prompted in the status line with the ‘Press F6 if you need to install a third party SCSI or RAID driver’ message.
Intel® Matrix Storage Manager Installation R 6 Intel® Matrix Storage Manager Installation After installing an operating system onto a RAID volume or on a Serial ATA hard drive when in RAID or AHCI mode, the Intel® Matrix Storage Manager can be loaded from within Windows. This installs the user interface (i.e. Intel® Matrix Storage Console), the tray icon service, and the monitor service onto the system, allowing you to monitor the health of your RAID volume and/or hard drives.
Intel® Matrix Storage Manager Installation R 6.3 Installation Once the Intel® Matrix Storage Manager has been obtained, identify the location of the file on your hard drive. Then, run the file(e.g. iata5x_enu.exe or iata5x_cd.exe) by double-clicking on the file name; this will launch the installation program. Note: The instructions below assume that the Intel® Matrix Storage Manager option ROM and BIOS have been configured correctly and the RAID driver has been installed using the F6 installation method.
Intel® Matrix Storage Manager Installation R 6.3.
Intel® Matrix Storage Manager Installation R 6.3.
Intel® Matrix Storage Manager Installation R 6.3.
Intel® Matrix Storage Manager Installation R 6.3.
Intel® Matrix Storage Manager Installation R 6.3.
Intel® Matrix Storage Manager Installation R 6.3.
Intel® Matrix Storage Manager Installation R 6.3.8 Installation: InstallShield* Wizard Complete After installation is complete, the following window will appear. Select ‘Finish’: 6.
Intel® Matrix Storage Manager Installation R x Double-click on the ‘System’ icon x Select the 'Hardware' tab x Select 'Device Manager' button x Expand the 'SCSI and RAID Controllers' entry x Right-click on the ‘Intel(R) 82801GR/GH SATA RAID Controller’ x Select the 'Driver' tab x Select the 'Driver Details' button x The iaStor.sys file should be listed, as in the following example 6.
Intel® Matrix Storage Manager Installation R x Note: the specific Intel SATA RAID Controller depends on your system, but will be in the format “82801xR” x Look for a parameter in the Parameters list box titled ‘Driver Version’. The version number should be listed in the following format: 5.x.x.xxxx 6.5.2 38 RAID Driver File Properties: x Locate the file “iaStor.sys” in the following path: \Windows\System32\Drivers x Single right-mouse click on “iaStor.
“RAID Ready” R 7 “RAID Ready” A "RAID Ready" system is a specific system configuration that enables a seamless migration from a single non-RAID disk drive to a RAID 0, RAID 1, RAID 5, or RAID 10 array. The Intel® Matrix Storage Manager offers the flexibility to upgrade from a single Serial ATA (SATA) hard drive to a RAID 0, RAID 1, RAID 5, or RAID 10 configuration when one or more SATA hard drives are added to the system. This process will create a new RAID volume from an existing disk. 7.
“RAID Ready” R Caution: This operation will delete all existing data from the additional hard drive or drives and the data cannot be recovered. It is critical to backup all important data on the additional drives before proceeding. The data on the source hard drive, however, will be preserved. To turn a RAID Ready system into a RAID 0 or RAID 1 system using two hard drives, complete the following steps: 1. Physically add an additional Serial ATA hard drive to the system 2.
“RAID Ready” R User's Manual 7. Click ‘yes’ to confirm. 8. The tray icon will indicate that the migration is in progress.
“RAID Ready” R 9. While the migration is in progress, the status of the user interface will appear as follows: 10. A progress dialog will display the status of the migration as a percentage complete, as shown in the following dialog: 11. When the migration is complete, reboot the system. 12. Optional: Use 3rd party application or Windows* to create and format a new data partition on unused space, if any (see Note below) 7.3.
“RAID Ready” R 3. Open the Intel® Matrix Storage Console (Start/All Programs/Intel® Matrix Storage Manager/Intel® Matrix Storage Console) 4. Switch to the Advanced mode (View menu, Advanced Mode) as demonstrated in the following dialog: Note: The user interface should look similar to the following example: 5. User's Manual Perform a ‘Create RAID Volume from Existing Hard Drive’ migration (right-mouse click on ‘RAID Volumes’ entry in the device tree or select option under ‘Actions’ file menu).
“RAID Ready” R 6.
“RAID Ready” R 7. User's Manual A desired RAID volume name should be typed in where the ‘Volume_0000’ text currently appears below. The RAID volume name must also be in English alphanumeric ASCII characters and has a maximum limit of 16 characters.
“RAID Ready” R 8. 46 Select a RAID level. If there are not enough hard drives in the system to create the selected RAID level, an error dialog will appear when the ‘Next’ button is selected and a new RAID level will need to be selected (or additional hard drives will need to be added to the system). In the following example, RAID 10 was selected.
“RAID Ready” R 9. Select the desired strip size setting. As indicated, the default setting for RAID 10 is 128KB. The default setting for RAID 0 is also 128KB. The default setting for RAID 5 is 64KB. Even though the default setting is the recommended setting for most users, you should choose the strip size value that is best suited to your specific RAID usage model. Additional details on the most typical strip size settings are listed in Section 17.3.4 titled ‘Strip Size Descriptions’. 10.
“RAID Ready” R 12. Select the member hard drives from the hard drives listed in the left-hand ‘Available’ window and then click ‘Next’. If fewer hard drives are selected than are required for the RAID level, an error dialog will appear when the ‘Next’ button is clicked. Once the new RAID volume is created, it will span the source hard drive as well as any member hard drive(s): Caution: CRITICAL WARNING: Existing data on the selected hard drive(s) will be permanently deleted.
“RAID Ready” R User's Manual 49
“RAID Ready” R 13. Use the fields or the slider bar to specify the amount of available array space to be used by the new RAID volume and then click ‘Next’: Note: The migration process may take up to several hours to complete depending on the size of the disks being used and the strip size selected. While you can still continue using your computer during the migration process, after the migration process starts, it cannot be stopped.
“RAID Ready” R 14. Select ‘Finish’ to begin migrating data to the new volume: 15. After the migration is complete, reboot the system 16. Optional: Use 3rd party application or Windows* to create and format a new data partition on unused space, if any (see Note below) Note: To ensure that non-Windows* partitions are kept intact, the migration to a RAID volume does not utilize the extra space made available by adding the additional hard drive(s).
“RAID Ready” R 1. Complete one of the following tasks, then proceed with the remaining steps: a) Right-mouse click 'My Computer', select 'Manage'. In the Computer Management program window, left-mouse click 'Disk Management' in the program tree on the left (located under ‘Storage’ subsection). or b) Within the Control Panel (Start/Control Panel), double-click 'Administrative Tools'. In the window that appears, double-click 'Computer Management'.
“RAID Ready” R User's Manual 53
Uninstalling the Intel® Matrix Storage Manager R 8 Uninstalling the Intel® Matrix Storage Manager 8.1 Uninstall Warning Caution: CRITICAL WARNING: Removing the Intel® Matrix Storage Manager from a system that has been configured as RAID will DELETE ALL EXISTING DATA from the RAID-controlled hard drive(s) and the data cannot be recovered. It is critical that you backup all important data before proceeding.
Uninstalling the Intel® Matrix Storage Manager R 3. Delete any partitions on the hard drives that were previously connected to the AHCI controller 4. Reinstall the operating system Note: If you experience any difficulties making these changes to the system BIOS, please contact the motherboard manufacturer or your place of purchase for assistance.
Unattended Installation Under Windows* XP R 9 Unattended Installation Under Windows* XP To install the Intel® Matrix Storage Manager as outlined in the Microsoft* document "Deployment Guide Automating Windows NT Setup," use the supplied TXTSETUP.OEM file included in the application package and insert the lines below into the UNATTEND.TXT file. This method is available for Windows* XP. First, determine if your system contains a 32-bit or 64-bit processor. Then, extract the IAAHCI.CAT, IAACHI.INF, IASTOR.
Unattended Installation Under Windows* XP R iaStor.cat Txtsetup.oem Systems Configured for AHCI Mode: // Insert the lines below into the UNATTEND.TXT file [MassStorageDrivers] "Intel(R) 82801GR/GH SATA AHCI Controller" = OEM [OEMBootFiles] iaAhci.inf iaStor.sys iaAhci.cat Txtsetup.oem Place iaAhci.cat, iaAhci.inf, iaStor.cat, iaStor.inf, iaStor.sys, and Txtsetup.
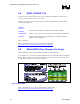
Intel® Matrix Storage Console R 10 Intel® Matrix Storage Console 10.1 Description The Intel® Matrix Storage Console is a Windows*-based application that provides management capabilities and detailed status information for storage devices and RAID arrays. 10.2 User Interface Modes The Intel® Matrix Storage Console provides device information using one of two views: Basic and Advanced. Basic mode displays the status of the hard drives and an illustration of the current RAID volume.
Intel® Matrix Storage Console R Note: The ‘Actions’ menu will only be present in Advanced mode. If the ‘Actions’ menu is not present, switch to Advanced mode using the View menu, or click on the ‘Switch to Advanced mode view’ button if it is present. The following image provides an example: 10.3.
Intel® Matrix Storage Console R existing data on a hard drive, use the ‘Create RAID Volume from Existing Hard Drive’ action instead. 10.3.2 Configure Volume Select the RAID volume name, RAID level, and strip size and then click ‘Next’: RAID Volume Name: A desired RAID volume name needs to be typed in where the ‘RAID 5’ text currently appears above. The RAID volume name has a maximum limit of 16 characters. The RAID volume name must also be in English alphanumeric ASCII characters.
Intel® Matrix Storage Console R User's Manual 61
Intel® Matrix Storage Console R RAID Level: Select the desired RAID level. In this example, RAID 5 was selected. Strip Sizes: Select the desired strip size setting. As indicated, the default setting for RAID 5 is 64KB. The default setting for RAID 0 and RAID 10 is 128KB. Even though the default setting is the recommended setting for most users, you should choose the strip size value which is best suited to your specific RAID usage model.
Intel® Matrix Storage Console R 10.3.3 Select Volume Location In the left-hand ‘Available’ window, specify the location for the new RAID volume by selecting 2, 3, or 4 hard drives or an array and then click ‘Next’: Caution: CRITICAL WARNING: Selecting hard drives will permanently delete the data on the hard drives. Back up all important data before continuing. Selecting an existing array will preserve any volume(s) on the array.
Intel® Matrix Storage Console R 10.3.
Intel® Matrix Storage Console R 10.4 Completing Create RAID Volume Wizard Select ‘Finish’ to create the new RAID volume: Caution: CRITICAL WARNING: Completing this action will permanently delete existing data on the selected hard drive(s). Back up all important data before continuing.
Intel® Matrix Storage Console R 66 User's Manual
Error Messages R Appendix A Error Messages A.1 Incompatible Hardware Error Message Issue: The following error message appears during installation: Resolution: This issue is resolved by installing the Intel® Matrix Storage Manager on a system with a supported Intel chipset. (see http://support.intel.com/support/chipsets/imst/sb/CS-020644.htm). A.
Error Messages R Resolution: The hard drive(s) added to the system must be equal to or greater in size than the hard drive members of the RAID 0 or RAID 1 volume. A.4 Error: Source Hard Drive Cannot Be Larger Issue: When attempting to migrate from a single hard drive (or RAID Ready configuration) to a RAID configuration, the following error message appears and the migration process will not begin: Resolution: Follow the steps listed in the error message to correct the problem. A.
Error Messages R Resolution: Select a new hard drive.
Glossary R Appendix B Glossary 70 AHCI Advanced Host Controller Interface: an interface specification that allows the storage driver to enable advanced Serial ATA features such as Native Command Queuing, native hot plug, and power management. Intel® Matrix Storage Manager Option ROM The option ROM is a code module built into the system BIOS that provides boot support for RAID volumes as well as a user interface for configuring and managing RAID volumes.
Glossary R User's Manual RAID Level A defined set of characteristics applied to a RAID volume, which determines how data is stored and managed to improve read/write performance or to increase fault tolerance. RAID Level Migration The process of converting a system's data storage configuration from one RAID level to another. See Table 3 for the supported level migrations.