
HP ProLiant ML350p Gen8 Server User Guide


Hardware options installation 45
Hardware options installation
Introduction
If more than one option is being installed, read the installation instructions for all the hardware options and
identify similar steps to streamline the installation process.
WARNING: To reduce the risk of personal injury from hot surfaces, allow the drives and the
internal system components to cool before touching them.
CAUTION: To prevent damage to electrical components, properly ground the server before
beginning any installation procedure. Improper grounding can cause electrostatic discharge.
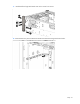
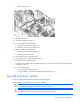
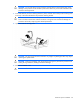
Mini-SAS cable option
To install the component:
1. Do one of the following:
o For tower models, open and remove the bezel ("Remove the tower bezel" on page 21).
o For rack models, if installed, remove the security bezel (on page 21).
2. Power down the server (on page 20).
3. Remove all power:
a. Disconnect each power cord from the power source.
b. Disconnect each power cord from the server.
4. Do one of the following:
o For tower models, place the server on a flat, level surface with the access panel facing up.
o For rack models, extend the server from the rack (on page 24).
5. Remove the access panel.
6. Remove the air baffle.
7. Remove the fan cage.
8. Install the Smart Array controller.
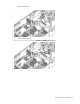
9. Connect the common end of the Mini-SAS Y-cable to the controller option.
10. Route the two ends of the Mini-SAS Y-cable through the cable management clips, and then connect them
to the drive backplane.