
HP ProLiant ML350p Gen8 Server User Guide


Hardware options installation 82
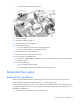
Installing a storage controller
IMPORTANT: For additional installation and configuration information, see the documentation
that ships with the option.
IMPORTANT:
The P822 controller card is only supported in PCIe slots 3 and 4. If the controller
card is configured in PCIe slot 3, slot 4 must remain empty.
IMPORTANT: The P420 controller card is not supported in PCIe slots 3 and 4.
IMPORTANT: The P222 controller card is only supported in two processor configuration. HP
recommends installing the controller card in slot 5 only. Ensure that slot 6 is empty to allow
adequate airflow for proper cooling.
1. Do one of the following:
o For tower models, open and remove the bezel ("Remove the tower bezel" on page 21).
o For rack models, if installed, remove the security bezel (on page 21).
2. Power down the server (on page 20).
3. Remove all power:
a. Disconnect each power cord from the power source.
b. Disconnect each power cord from the server.
4. Do one of the following:
o For tower models, place the server on a flat, level surface with the access panel facing up.
o For rack models, extend the server from the rack (on page 24).
5. Remove the access panel (on page 23).
6. Remove the air baffle (on page 25).
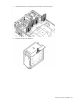
7. Remove the fan cage.
8. Remove the mini-SAS cable connected to the system board, if installed.
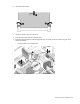
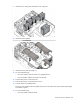
9. Install the storage controller.
For more information, see the documentation that ships with the option.
10. Connect the mini-SAS cable from the drive backplane to the controller card.
For controller-specific instructions, see the controller documentation provided with the storage
controller.
11. Install the fan cage.
12. Install the air baffle (on page 26).
13. Install the access panel (on page 24).
14. Do one of the following:
o For tower models, return the server to an upright position.
o For rack models, slide the server back into the rack.
15. Connect each power cord to the server.
16. Connect each power cord to the power source.
17. Press the Power On/Standby button.