White Paper January 2002 Compaq ProLiant ML370 G2 Prepared by Customer Service Training and Development Compaq Computer Corporation Contents Product Description ....................3 Features.....................................3 System and Mechanical Spare Parts List ...........................4 Servicing Procedures................10 Processor.................................10 System Board ..........................15 Service Considerations.............17 References .................................
Compaq ProLiant ML370 G2 Service Update 2 Compaq ProLiant ML370 G2 Service Update© 2002 Compaq Computer Corporation Compaq and the Compaq logo are registered in the U.S. Patent and Trademark Office. Microsoft and Windows are trademarks of Microsoft Corporation in the United States and other countries. All other product names mentioned herein may be trademarks of their respective companies. Compaq shall not be liable for technical or editorial errors or omissions contained herein.
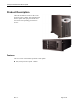
Compaq ProLiant ML370 G2 Service Update 3 Product Description The ProLiant ML370 G2 Server has a new processor speed, 1.4Ghz. This document lists the new option and spare part number and reviews the corresponding procedures to service. Features This is a review of the features pertinent to this update. ■ New, faster processor speed: 1.4GHz Rev. 1.
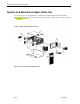
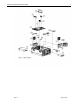
Compaq ProLiant ML370 G2 Service Update 4 System and Mechanical Spare Parts List As a review, Figure 1 and 2 illustrate an exploded views of the mechanical and system spare component parts. Table 1 lists the option and spare part numbers. Part numbers for new processor are highlighted in yellow. Figure 1. Mechanical parts exploded view Figure 2. System components exploded view Rev. 1.
Compaq ProLiant ML370 G2 Service Update Rev. 1.
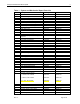
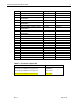
Compaq ProLiant ML370 G2 Service Update 6 Table 1: System and Mechanical Spare Parts List Item Description Assembly Number Spare Part Number Mechanical Components 1 Access panel (top cover) 224969-001 230985-001 2 Front bezel (tower model only) 224991-001 230996-001 3 Rack bezel (rack model only) 224992-001 230997-001 4 Tower hood cover 224954-001 233410-001 5 Feet (tower model only) (part of kit #23) 228148-001 230979-001 6 6 x 1-inch hot-plug SCSI drive cage, with backplane 2249
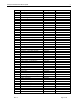
Compaq ProLiant ML370 G2 Service Update 7 Item Description Assembly Number Spare Part Number 19 Power supply backplane 011080-001 230982-001 Mass Storage Devices 20 Diskette drive, 3-mode, 1.
Compaq ProLiant ML370 G2 Service Update Item 8 Description Assembly Number Spare Part Number b) Bracket, floppy tray* 224953-001 c) Bracket, floppy retainer* 228189-001 d) Cover, slot, PCI expansion* 306348-001 e) Bracket, blank, option board, new PCI latch* 228072-001 24 Wall, center 224949-001 230999-001 25 Rack-mounting kit * 228715-001 230994-001 26 Country kit * 195316-001 230992-001 27 Maintenance and service guide * 203511-003 230989-001 28 Return kit, packing box and cu
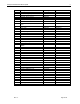
Compaq ProLiant ML370 G2 Service Update Item Description 9 Assembly Number Spare Part Number Memory 31 256-MB (2 x 128-MB), 133-MHz, registered 201692-B21 SDRAM DIMM kit 164278-001 32 512-MB (2 x 256-MB), 133-MHz, registered 201693-B21 SDRAM DIMM kit * 157377-001 33 1-GB (2 x 512-MB), 133-MHz, registered SDRAM DIMM kit * 201694-B21 177628-001 34 2-GB (2 x 1-GB), 133-MHz, registered SDRAM DIMM kit * 201695-B21 163902-001 Options 35 Rear fan cage 224956-001 230984-001 36 Tower-to-rack
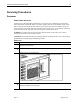
Compaq ProLiant ML370 G2 Service Update 10 Servicing Procedures Processor Power down the server System power in ProLiant ML370 Generation 2 servers does not completely shut off with the front panel Power On/Standby button. The button toggles between on and standby modes, rather than on and off. The standby position removes power from most electronics and the drives, but portions of the power supply and some internal circuitry remain active.
Compaq ProLiant ML370 G2 Service Update 11 Tower Server Step Action 1. Back up your server data. 2. Shut down the operating system as directed in your operating system instructions. 3. Open the front bezel. 4. Press the Power On/Standby button. The system power LED turns amber when the server is powered off in this manner. WARNING: Setting the server Power On/Standby button to the off position removes power from most areas of the server; this process may take 30 seconds.
Compaq ProLiant ML370 G2 Service Update 12 Remove and replace the access panel WARNING: To reduce the risk of personal injury from hot surfaces, allow internal system components to cool before touching them. Step 1. 2. 3. Action Unlock the front bezel (tower server only). IMPORTANT: You must unlock the tower bezel before removing the access panel. Push the release latch securing the access panel to the chassis . While holding the release latch down, slide the large access panel back about 1.5 cm (0.
Compaq ProLiant ML370 G2 Service Update 13 Remove and replace the processor CAUTION: Ensure that you have the current version of the system ROM. Failure to flash your ROM with the correct version before installing or replacing the processor causes system failure. For the most current version of the ROM, visit the Compaq website: http://www.compaq.com/support/files/server/us/ Remove Step Action 1. Power down the server. 2. Unlock the front bezel (tower server only). 3. Remove the access panel. 4.
Compaq ProLiant ML370 G2 Service Update 14 Replace Step 1. 2. Action Raise the processor socket lever to open the socket. Place the processor into the socket. Use the processor socket guide posts to align the processor. NOTE: The processor and socket are keyed to fit in one direction only. Use the holes to align with guiding pins. 3. 4. Lower the socket latch to secure the assembly in the socket. Lift the heatsink retaining clip over the rear edge of the socket and hook underneath the socket tabs. 5.
Compaq ProLiant ML370 G2 Service Update 15 System Board Step Action 1. 2. 3. 4. 5. 6. 7. 8. 9. Power down the server. Unlock the front bezel (tower server only). Remove the access panel. Remove the redundant fan cage, if installed. Remove all expansion boards. Remove the dividers. Remove the center wall. Remove all cable connections. Loosen the two thumbscrews securing the system board to the chassis . 10.
Compaq ProLiant ML370 G2 Service Update Step 12. 16 Action Remove Smart Array 5i controller, if equipped, at this time. Follow these steps to do this: a. Rotate the tops of the four anchor pins so that they align with the anchor bases . b. Grasp the controller from the front and back and gently pull away from the connectors on the system board . 13. To replace the system board, reverse steps 8 through 11 and reinstall all hardware.
Compaq ProLiant ML370 G2 Service Update 17 Service Considerations There are no new service considerations for this upgrade. However, here is a review of the service considerations that pertain to this new module. The ProLiant ML370 G2 supports three processors: a 1.13-GHz , 1.26GHz, and (now) a 1.4GHz Pentium III Flip Chip - Pin Grid Array (FC-PGA) . Each processor requires its own Processor Power Module (PPM). The processor and PPM are located on the server's System Board .
Compaq ProLiant ML370 G2 Service Update 18 References For information on servicing and troubleshooting the Compaq ProLiant ML370 G2 Server refer to the: Compaq ProLiant ML370 Generation 2 Server Maintenance and Service Guide This maintenance and service guide is a document that can be used for reference when servicing the Compaq ProLiant ML370 Generation 2 server. 203511-003 (PDF,BM) 11558 KB ARCHIVE Internal Link http://www3.compaq.com/support/reference_library/selectproduct.