
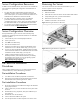
HP ProLiant SL390s G7 1U Half-width Server Installation Sheet


Installing the Hard Disk Drive
Each chassis can accommodate eight 1U server trays. Each server
tray can accommodate two LFF or four SFF hard disk drives for a
maximum of 16 LFF or 32 SFF hard disk drives per chassis. This
server supports both SAS and SATA hard disk drives and SSDs.
CAUTION: Drives can be damaged by static electricity. Before
handling drives, touch an unpainted metal surface to
discharge static electricity.
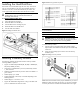
To install an LFF hard disk drive:
1. Unlock the HDD carrier latches.
2. Rotate the HDD carrier handle up.
3. Insert the HDD carrier and align the pins.
4. Rotate the HDD carrier handle down.
5. Lock the HDD carrier latches.
Figure 5 Installing a hard disk drive
Installing a Memory Module
The following guidelines must be followed when memory modules
are being added or replaced:
• Support 12 DDR3 240-pin RDIMM (SR, DR, QR) or UDIMM (SR,
DR) slots (6 DIMMs per CPU)
• Channel 0 is located furthest to processor, followed by channel
1, then channel 2.
• DIMM 0 is the furthest from the processor of the two DIMMs in a
given channel.
• DIMM capacity up to 16GB.
• Speed is 800 MHz, 1067 MHz, 1333 MHz depending on the
DIMM population.
• DIMM voltage is 1.5V and LV 1.35V.
• Support all valid DIMM configurations as long as the total node
power is rated below the maximum value.
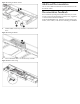
Figure 6 DIMM slot population sequence
NOTE: The DIMM should be installed from the furthest A
channel DIMM slot.
NOTE: HP recommends installing memory modules in pairs.
CAUTION: DIMMs can be damaged by improper handling.
Always use an anti-static wrist strap and grounding mat, and
discharge static electricity before touching DIMMs.
To install a memory module:
1. Align the notch on the bottom edge of the module with the
keyed surface of the DIMM slot and then press the module fully
into the slot.
2. Firmly press the holding clips inward to secure the memory
module in place.
Figure 7 Installing a memory module
DIMM slots are structured to ensure proper installation. If you insert a
DIMM but it does not fit easily into the slot, you may have inserted it
incorrectly. Reverse the orientation of the DIMM and insert it again.