
HP ProLiant SL390s G7 1U Half-width Server Maintenance and Service Guide

Removal and replacement procedures 38
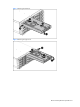
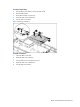
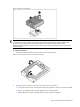
Figure 11 Processor locations
Item Description
1 Processor 1
2 Processor 2
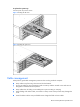
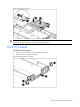
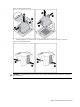
WARNING: To reduce the risk of personal injury from hot surfaces, allow the heatsink and the
processor to cool before touching them.
To remove the heatsink:
CAUTION: Heatsink screws should be tightened and loosened in opposite sequence. Do not
overtighten the screws as this can damage the system board, connectors, or screws. A maximum
torque of 6-8 in-lb is set for the system.
CAUTION: Place the heatsink down in an upright position with the thermal patch facing upward. Do
not let the thermal patch touch the work surface.
1. Loosen the first screw about three quarters out, then loosen the second screw completely.
2. Completely loosen the first screw.
3. Lift the heatsink away from the system board.