
HP ProLiant SL390s G7 1U Half-width Server Maintenance and Service Guide


Removal and replacement procedures 44
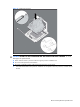
1. Use the alcohol pad provided in the spare part kits or a clean cloth dipped in rubbing alcohol to clean the
contact surface on the heatsink and on the new processor. Wipe the contact surfaces several times to make
sure that no particles or dust contaminants are evident.
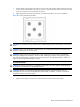
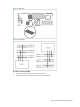
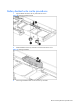
2. Apply all the grease to the top of the processor in the following pattern to ensure even distribution.
Figure 20 Processor thermal grease pattern
CAUTION: HP recommends using Shin-Etsu X-23-7783D thermal grease compound for your ProLiant
server.
CAUTION: Never touch the bottom of the processor; any contaminant could prevent the mounting
pads from making contact with the socket.
CAUTION: Applying too much grease creates a gap between the contact surfaces, significantly
reducing the ability of the heatsink to draw out heat. Installing the heatsink with excessive grease
can also cause the grease to spread over the processor pins or the system board base, which can
cause electrical shorts that damage the system.
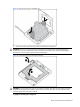
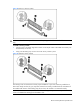
To install the heatsink:
CAUTION: To prevent overheating or a possible system crash, use only a heatsink model specified
for the HP ProLiant SL390s G7 1U Half-width Server.
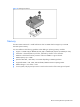
CAUTION: Heatsink screws should be tightened and loosened in opposite sequence. Do not
overtighten the screws as this can damage the system board, connectors, or screws. A maximum
torque of 6-8 in-lb is set for the system.
1. Properly align the heatsink mounting pins to the system board mounting holes.
2. Tighten the mounting pins clockwise to secure the heatsink connection to the system board.