
HP ProLiant SL390s G7 2U Half-width Server Maintenance and Service Guide


Removal and replacement procedures 62
Item
Description
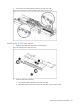
1 GPU 2 on left/right tray (top-front)
2 GPU 1 on left/right tray (top-tear)
3 GPU 3 on left/right tray (bottom-rear)
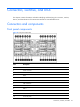
GPU power capping
Table 2 GPU power capping information
GPU installation Max inlet
temperature
L2 power board Node power Chassis DC power
1@250W 35°C 250W 658W 2989W
2@250W 35°C 447W 908W 3989W
3@225W 30°C 641W 1158W 4989W
NOTE:
•
3 GPU power was calculated at 250W. Even though the GPU is power cap at 225W, power still increased
to 250W level for duration of less than ~150msec. This is due to GPU power cap respond time.
•
Node power configuration: 2x95W CPU, 12xDIMM, no HBA, 4SFF HDD.
•
Chassis DC power was calculated with 8 non-redundant fans at 100% with four 2U per chassis.
•
Only the M2090 GPU can power capped at 250W and is limited to only two M2090 GPUs per node.
To set the power capping values with the NVIDIA iromfoem tool:
1. To download the NVIDIA iromfoem tool with the following internal URL:
http://tappet.cce.hp.com/~accteam/kits/nvidia/iromflash/iromfoem
2. List the available power cap values:
Iromfoem - - listpwrcap
3. Set the power cap value:
iromfoem - - wrpwrcap <value>
4. Read current power cap value:
iromfoem - - rdpwrcap
NOTE: To target a specific GPU, use the index flag. If the flag is not set, you will be prompted to
select which GPU to change.
Example: set GPU1 to 250W
Iromfoem –i1 - - wrpwrcap250
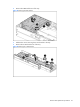
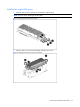
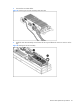
GPU installation
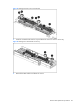
Removing the 2 GPU bracket
1. Unfasten the screws securing the HDD module to the tray.