HP UPS R5000 Installation Instructions Part Number 637911-001
Traducción de estas instrucciones Existen versiones traducidas de estas instrucciones disponibles en la documentación proporcionada en la página de soporte del producto específico del sitio web de HP (http://www.hp.com/support/UPSR5000_Manuals). (http://www.hp.com/support/UPSR5000_Manuals) Overview The HP UPS R5000 features a 3U rack-mount design and offers power protection for loads up to 5000 VA/4500 W (NA/JPN) or 5000 VA/4500 W (INTL).
UPS kit contents • This document • Documentation CD • HP Infrastructure Management Pack CD To download the latest software version, see the HP website (http://www.hp.com/go/rackandpower). IMPORTANT: Do not install the existing HP Management Module software. Only install the HP Power Protector software required for this unit. equipment nameplate ratings should be used when addressing this concern. • Reliable earthing—Reliable earthing of rack-mounted equipment should be maintained.
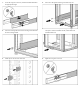
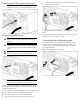
1. Loosen the wing nuts or hex nuts, and then extend the brackets to the appropriate length. 2. Insert screws through the rack into the mounting rail and the front of each mounting bracket. 3. Install clip nuts into the rear of the rack. 4. Insert screws through the mounting rail into the clip nuts. 5. Install the rail reinforcement plates and tighten using hex nuts with captive washers included in the kit, instead of the nuts included with the rail. 6. Tighten the wing nuts or hex nuts.
7. Install the rear mounting brackets using hex nuts. Wait until the unit is installed and the brackets are adjusted before tightening the nuts. Attaching the UPS front bezel Installing the UPS Before installing the UPS, review and observe all warnings in "Precautions (on page 2)." WARNING: A risk of personal injury or damage to the equipment exists. Uneven loading of equipment in the rack might cause the rack to become unstable.
Configuring a USB to serial converter NOTE: This procedure was tested on the Windows® XP Professional, Windows Server® 2003, and Windows® Vista Enterprise operating systems using the HP USB to serial converter (part number 304098-001). Depending on your system configuration, a driver download might be required to successfully install the converter. The driver can be downloaded from the USB-Drivers website (http://www.usb-drivers.com/drivers/123/123294.htm).
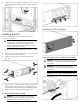
Connecting the USB communications port NOTE: This port is only used for firmware upgrades. For additional information, see the HP UPS R5000 User Guide. • Use tie wraps and tie wrap blocks to secure the wires tightly to the rack and the rear of the UPS. For more information about the REPO port, see "REPO port" in the user guide. Connecting the REPO port WARNING: The pins on the REPO port are polarity sensitive. Be sure to verify polarity while connecting the REPO port.
Connecting the network cable Connect a standard Ethernet cable between the network connector on the UPS Network Module and a network jack. 2. Connect the device power cords to the appropriate output receptacles on the rear panel of the UPS. To provide additional receptacles, plug a PDU or other device into the high current, large output receptacle. The large output receptacle is part of load segment 1 and can be turned off and on using power management software.
2. Connect the RJ-45 connector on the DB-9 to RJ-45 cable to the Settings/AUX connector on the UPS Network Module. Use the HP UPS Network Module Configuration Menu to configure the minimum settings required to access the UPS Network Module remotely. IMPORTANT: The IP address assigned to the UPS Network Module must be fixed. If the IP address changes: • • 3. The HP Power Protector — Client loses communication with the UPS Network Module. You can lose track of the UPS Network Module URL.
5. Click Sign In. The HP UPS Network Module web interface appears. Configuring the UPS Network Module settings Use the Settings screens of the HP UPS Network Module web interface to configure the UPS Network Module. For more information, see the HP UPS Network Module User Guide on the HP website (http://www.hp.com/support/HPNM_Manuals).
© Copyright 2011 Hewlett-Packard Development Company, L.P. The information contained herein is subject to change without notice. The only warranties for HP products and services are set forth in the express warranty statements accompanying such products and services. Nothing herein should be construed as constituting an additional warranty. HP shall not be liable for technical or editorial errors or omissions contained herein. Microsoft®, Windows®, and Windows Server® are U.S.