
HP UPS R7000 Installation Instructions

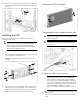
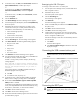

Connecting and securing the power cords
Configuring the UPS Network
Module
NOTE: For more information about the UPS Network
Module, see the HP Infrastructure Management Pack
software CD and documentation for complete details.
Before configuring the UPS Network Module, be sure that the network
cable is connected.
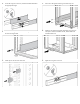
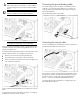
Connecting the configuration cable
1. Connect the DB-9 connector on the DB-9 to RJ-45 cable to a serial
connector on the host computer.
2. Connect the RJ-45 connector on the DB-9 to RJ-45 cable to the
Settings/AUX connector on the UPS Network Module.
This connection is used to access and configure the UPS Network
Module network settings locally through a terminal emulation program.
Launching a terminal emulation program
NOTE: HyperTerminal is the serial communication
program provided with Microsoft® Windows® and is
used in this section as an example for setting up a terminal
emulation session. If you are using another utility, the steps
might be different.
1. Be sure that the UPS is powered on.
2. On the host computer, click Start, and select
Programs>Accessories>Communications>HyperTerminal.
The Connection Description window appears.
3. Enter a description, select an icon for the connection, and then
click OK. The Connect To window appears.
4. Select the serial connector on the host computer to which the
DB-9 to RJ-45 adapter is attached, and then click OK. The COM
Properties window appears.
5. Select the following parameter values, and then click OK.
o Bits per second—9600
o Data bits—8
o Parity—None
o Stop bits—1
o Flow control—None
Configuring the UPS Network Module
network settings
On the terminal emulation session screen running on the host
computer:
1. Press any key. The initialization process completes, and you are
prompted enter the password.
2. At the prompt, enter admin. The HP UPS Network Module
Configuration Menu appears.
Use the HP UPS Network Module Configuration Menu to
configure the minimum settings required to access the UPS
Network Module remotely.