
UPS R1500 XR ERM Installation Instructions

Checking the Battery
Recharge Date
Before unpacking the ERM, check the battery recharge date
specified on the battery recharge date label that is affixed to the
shipping carton.
IMPORTANT: Do not use the battery if the recharge date has passed. If the
date on the battery recharge date label has passed without the battery being
recharged, contact an HP authorized service representative for directions.
NOTE: The following label is only an example date. The date on your carton
may be different.
THIS PRODUCT CONTAINS
A NONSPILLABLE BATTERY
Next Recharge Date:
14-DEC-04
Please refer to Maintenance Section
of Owner's Manual enclosed inside
Kit Contents
Documentation
• Important Safety Information guide
• International Regulatory Compliance guide
• This document
Rails
• Rails, with mounting hardware
• Rack template tool 2U (295523-023)
ERM
• ERM chassis
• Battery packs (2)
• Front bezel
• Rear stabilization brackets (2)
• Ears and four mounting screws
Additional Hardware
The following items are supplied for shipping a rack with a UPS
installed:
• M6 nuts (4)
• M6 flat washers (4)
• M6 split washers (4)
Cables
• ERM power cable (attached to unit)
Tools and Materials Required
The following tools are required:
• #2 Phillips screwdriver
The following items are supplied with the rack:
• Screws
• Cage nuts
• Cage nut-fitting tool
Preparing for Installation
Powering Down the UPS
To power down the UPS:
1. Shut down all load devices.
2. Press the Standby button to take the UPS out of Operate mode.
Power to the load receptacles ceases.
3. Disconnect the UPS from utility power.
4. Wait at least 60 seconds while the UPS internal circuitry
discharges.
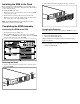
Unpacking the ERM
Transport the packaged ERM to its installation location. Unpack
the ERM near the rack where it will be assembled. Follow the
unpacking instructions on the carton.
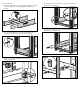
Mounting the Rails
The ERM must be mounted on the fixed rails supplied with the
ERM. Before beginning this installation process, review and
adhere to the following precautions.
WARNING: To prevent personal injury, verify that the rack
containing the ERM is stable. The following conditions must be
met:
• The leveling feet are extended to the floor.
• The full weight of the rack rests on the leveling feet.
• The stabilizing feet are attached to the rack if it is a
single-rack installation.
• The racks are coupled together if it is a multi-rack
installation.
• Only one component should be extended at a time. A rack
may become unstable if more than one component is
extended for any reason.