
UPS R6000 ERM Installation Instructions

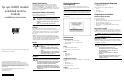


Completing the ERM Assembly
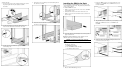
Installing and Connecting the
Battery Packs
1. Slide the battery packs into the chassis.
IMPORTANT: Leave the battery circuit breaker in the off position.
2. For each battery pack:
a. Take out the connector cover screw (1).
b. Remove the connector cover (2) and discard.
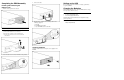
c. Replace the connector cover screw to secure the
sheet metal.
3. Secure the batteries to the chassis with the screws provided.
4. Connect the cables.
5. Flip the battery circuit breaker to the On position on the
following equipment:
a. The UPS
b. The ERM being installed
c. Any other ERM attached to the UPS
Attaching the Bezel
Attach the bottom front bezel using the screws supplied in the
ERM kit.
Setting up the UPS
Refer to the user guide for information on setting up the UPS to
recognize the ERM.
Charging the Batteries
With the UPS in Standby mode, allow the ERM batteries to charge
before placing the UPS into service.
IMPORTANT: The battery packs charge to:
• 90% of their capacity within 4 hours
• 100% of their capacity within 24 hours
Charge the batteries for at least 24 hours before using them to supply
power to your devices.
For more information, refer to the HP website at
www.hp.com/products/ups