
HP RDX USB 3.0 Removable Disk Backup System user guide (484933-014, August 2012)


Other server or workstations
Attach the appropriate mounting hardware. Refer to the manufacturer's documentation for
instructions.
• If you are installing on a server or workstation that requires a tray, place the RDX Removable
Disk Backup System in the tray.
• If you are installing in a server or workstation that requires mounting rails, fasten the rails to
the RDX Removable Disk Backup System.
• Some server or workstations have snap-on mounting rails attached to the filler panel. These
can be removed and attached to the RDX Removable Disk Backup System with screws.
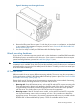
Install drive
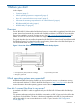
Slide the HP RDX Removable Disk Backup System into the open bay, aligning the tray or rails with
the slots in the bay, as shown in the figure below.
Figure 4 Installing RDX Removable Disk Backup System
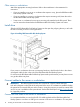
If your server or workstation does not use mounting hardware, check that the holes in the chassis
are aligned with the holes in the side of the RDX Removable Disk Backup System.
Do not secure the RDX Removable Disk Backup System at this point because you may have to move
it to get the cables into place.
Connect cables to the server or workstation
IMPORTANT: The cable supplied with the drive connects to a Type A internal USB port.
Look at the diagram on the inside of the side panel of the server or workstation to establish whether
the system has an internal USB port and its location. It may be necessary to install an internal USB
card, if no port is available on the system board. See the RDX QuickSpecs on http://www.hp.com
for supported products.
Connect the USB cable to the server or workstation
It is recommended that you use the A-B USB 3.0 cable supplied with the RDX Removable Disk
Backup System to connect to a USB Type A connector in the server or workstation. This may be a
10 Installing an HP RDX USB 3.0 Internal Removable Disk Backup System