
HP RDX Continuous Data Protection Software quick start instructions (5697-2007, August 2012)
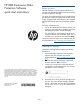

5. Click on OK. The first backup starts.
• The RDX software protects all system data on
all hard disks.
• The initial backup may take several hours to
complete and will create a base restore
point. Additional restore points are then
created at regular intervals.
• When you subsequently create or edit files
they are protected automatically; existing
data is never overwritten.
6. Your system is now fully protected.
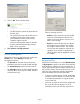
HP RDX management
Right click on the icon in the system tray or select the
HP RDX menu. Select Manage to display the
Management Console.
• The General tab provides status and capacity
information about the currently loaded cartridge.
• The System Recovery tab lists all restore points.
• The Cartridges tab lists all known RDX cartridges
and their status, which may be loaded, offline or
archived (read only).
Select a cartridge and click:
◦ Archive to make it read only for the HP RDX
Continuous Data Protection software. The
software will not be able to write any more
data to that cartridge.
◦ Recycle to remove all data that the software
has created on the cartridge. This includes
knowledge of offline versions. The software
will now treat the cartridge as a brand new
cartridge. (If you recycle a cartridge that is
offline, the action will be applied the next time
it is loaded.)
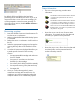
Recovering files
Double-click on the RDX icon or select RDX Protection
in My Computer to display a list of the drives that have
been backed up. Select a drive and navigate as in a
normal Windows® Explorer window. The location of
files in RDX Protection mirrors the file structure on the
hard disk and includes files that may subsequently
have been deleted from the hard disk folder.
• To recover the latest version of a file, simply drag
and drop it onto the desktop or a folder. The file
is automatically restored to its original location
on your hard disk.
• To recover an earlier version of a file, double-click
first on the file name to display a list of all
available versions and select the required one.
Page 2