
Installation Guide, First Edition: HP Lights Out Advanced / KVM Card


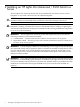
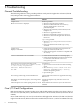

Figure 2-1 PCI-X or PCI-X/PCIe Cardcage (Common to all Supported Servers)
PCI-X/PCIe Cards(1)
PCI-X or PCI-X/PCIe Backplane(2)
IMPORTANT: You must connect the LAN port on the HP Lights-Out Advanced / KVM card to
the same network as the management processor LAN port on the server.
To install the HP Lights-Out Advanced / KVM card, perform the following steps:
1. Shut down the nPartition and power-off the appropriate PCI power domain.
2. Locate an empty mode-1 PCI-X slot where the card will be installed. See Figure 2-1 (page 7)
for the location of the PCI-X or PCI-X/PCIe cardcage or see Table 3-1 (page 9) for supported
mode-1 slots for your server.
3. Position the card over the empty slot, ensuring that the edge connector keyways match on
the PCI-X or PCI-X/PCIe backplane connector.
4. Using slow, firm pressure, seat the card in the slot.
5. Connect the management LAN cable to the LAN port on the card.
NOTE: If you do not wish to use the on-card KVM features, ignore steps 6 and 7, and
proceed to step 8.
6. Connect the monitor cable to the VGA port on the card, and connect the mouse and keyboard
cables to the USB ports on the card.
7. Connect the monitor power cable, and then turn on the monitor.
8. Power on the PCI power domain, and then boot the nPartition.
By default, the HP Lights-Out Advanced / KVM card uses Dynamic Host Control Protocol
(DHCP) to obtain an IP address. If the HP Lights-Out Advanced / KVM card needs to be assigned
a static IP, see the iLO2 Management Processor Operations Guide available at http://docs.hp.com
for details.
NOTE: To remove the HP Lights-Out Advanced / KVM card, reverse these steps.
7