Managing VMFS and RDM LUNs through ESX VSphere and HP RSM Introduction .......................................................................................................................................2 Target Audience .............................................................................................................................2 Problem statement ...........................................................................................................................2 Solution.........
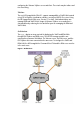
Introduction Virtualization is one of the most crucial elements in the overall growth of an IT industry. In the past few years, the IT scenario has changed. The IT organizations are strategically investing in virtualization technologies. The VMware server virtualization technology transforms data centers into a shared pool of resources, which can be dynamically combined, tiered, provisioned, and accessed through an intelligent network.
configuring the VMware VSphere server and client. These tasks may be tedious and time consuming. Solution The new HP StorageWorks RSM 5.1 supports manageability of VMFS LUN created using ESX 4 VSphere virtualization software, running on VMFS3 file system. Using the HP StorageWorks RSM server Version 5.1 or later, SAN administrators can manage RDM and VMFS LUNs. Usage of VMware VSphere server and client is eliminated thereby reducing the time and effort spent on managing the RDM and VMFS LUNs.
Configuring VMFS and RDM LUN through ESX VSphere and RSM Server This chapter provides the prerequisites for configuring VMFS and RDM LUNs through ESX 4 VSphere and RSM server.
http://bizsupport1.austin.hp.com/bizsupport/TechSupport/Product.jsp?la ng=en&cc=us&taskId=101&contentType=SupportManual&docIndexId=642 55&prodTypeId=18964&prodCatId=304619 • Ensure that the virtual machine that is installed has either the Microsoft Windows 2003 or Microsoft Windows 2008 edition of the operating system. For more information, see Configuration best practices for HP StorageWorks Enterprise Virtual Array (EVA) family and VMware VSphere 4 White Paper: http://bizsupport1.austin.hp.
Figure 2 WWN ID For detailed information about how to configure HBA ports, see Configuration best practices for HP StorageWorks Enterprise Virtual Array (EVA) family and VMware vSphere 4: http://bizsupport1.austin.hp.com/bizsupport/TechSupport/Product.jsp?lang=en&c c=us&taskId=101&contentType=SupportManual&docIndexId=64255&prodTypeId=1 8964&prodCatId=304619 Adding ESX host using StorageWorks CV EVA and RSM server You can add ESX host using the HP StorageWorks Command View EVA and the RSM server.
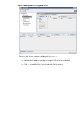
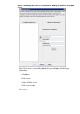
Figure 3 Adding ESX host using StorageWorks CV EVA To add the ESX host using RSM server: 1. Log in to the RSM server as an administrator. 2. Click Enabled Hosts on the left pane of the screen. 3. Click VM Server -> New VM Server.
Figure 4 Adding ESX host using RSM server The New VM Server window is displayed. See Figure 4. 4. Validate the IP address and log in using the ESX 4 server credentials. 5. Click <- to add the ESX 4 server and click OK to confirm.
Figure 5 Validating ESX 4 Server Credentials for Adding the ESX host using RSM server If the ESX 4 server is successfully added, the system dispalys the following information: • IP address • ESX version • State of ESX 4 server • ESX 4 server name See Figure 5.
Figure 6 ESX 4 server information Adding RSM Host Agent using the RSM server Before adding the RSM Host Agent (HA), you must install the RSM HA. For instructions on how to install RSM HA, see the HP StorageWorks Replication Solutions Manager administrator guide at: http://bizsupport1.austin.hp.com/bc/docs/support/SupportManual/c01680873/c 01680873.pdf To add RSM HA using the RSM server: 1. Log in to RSM as root user. 2.
• OS type • State of RSM HA server • VMware guest OS Figure 7 New enabled port
Figure 8 Summary information 4. To verify that the VM guest OS is added successfully, click VM server, right click ESX 4 server, and click Properties. If the VM guest OS is a part of any ESX 4 server, it will be listed under VM Guest OSs.
Figure 9 Verification Creating and presenting virtual disk To configure the VMFS LUN, you must create a virtual disk and present it to the ESX 4 server from the RSM server: 1. Log in to the RSM server as a root user. 2. Click Virtual Disks -> Actions -> New Virtual Disk. The New Virtual Disk window is displayed. 3. Enter a name for the virtual disk, size of the disk, and select RAID type and click Finish.
Figure 10 Creating virtual disk Presenting LUN to ESX 4 server through RSM To present the LUN to ESX 4 server through RSM: 1. After creating the Virtual Disk (VD), right click VD, and select Add Presentation. The Add Presentation window is displayed. 2. Select the ESX host from the given list, and click OK.
Figure 11 Presentation LUN to the ESX 4 server Presenting LUN to virtual machine through VSphere To present a LUN to a virtual machine: 1. Scan the ESX 4 server. For details see, Figure 8. 2. The virtual disk that is presented to the ESX 4 server is detected. Also, the LUN ID is discovered. 3. If the LUN ID is not discovered, rescan the ESX 4 server two or three times.
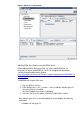
Configuring the VMFS LUN To configure the VMFS LUN: 1. Log in to the VSphere client as a root user. 2. Slect Storage in VSphere Client. Figure 13 Configuring VMFS LUN using VSphere client 3. Click Add Storage on the right pane of the configuration window. The Add Storage window is displayed.
Figure 14 Adding storage type 4. Select the Disk/LUN option to create the datastore (VMFS LUN), and click Next.
5. Select LUN to create a datastore from the list of available LUN and click Next. Figure 16 Specifying storage property 6. Provide Datastore name or the VMFS volume disk name and click Next.
Figure 17 Formatting the VMFS disk 7. Select the block size to format the VMFS disk based on your requirement. For example, in Figure 13, an 8 MB block size is selected. Here the LUN can be extended up to 2048 GB. If a maximum size of total LUN is selected, the Virtual Disk (VD) size would be 150 GB. The LUN is formatted to MAX capacity with 8 MB block size and can be extended to 2 TB size. The Figure 14 depicts the summary information of the new VMFS LUN /DataStore.
Figure 18 Summary information of VMFSLUN/DataStore The Figure 15 displays the VMFS LUN summary assigned to the virtual machine. Figure 19 VMFS LUN summary assigned to the virtual disk 8. After the data store is created, right click on the Virtual Machine in VSphere 4 and select Edit Settings.
9. In the pop up window, click Add. 10. Select hard disk option from the drop-down menu and click Next. Figure 20 Adding Hardware 11. To add the VMFS LUN created in previous steps, select Create a new virtual disk and click Next.
Figure 21 Selecting a disk 12. Specify the disk size and data store. 13. Click Browse to select the disk that has to be added to the VM guest OS.
14. Specify the disk size in the capacity tab and select New_VMFS_Lun that is created using the Browse option in step 11. For example, 50 GB disk size out of the 150 GB LUN created earlier. Figure 23 Specifying virtual disk size 15. Select persistent as the mode of disk and click Next.
Figure 24 Advanced options The Figure 21 displays the summary information of the VMFS LUN. Figure 25 Summary information of VMFS LUN 16. To view the summary information, select VM Guest OS in the left pane of the screen and click Summary.
The VMFS LUN is presented to the VMware guest OS. Hence, you can log in to the VM server and scan or mount the disks using the disk management utility. You can verify the Virtual Volume type presented to the VMware guest OS from the RSM Dashboard -> Host Volume. In this case, the size of the VMFS LUN is 50 GB and is mounted on the G: drive. Figure 26 RSM dashboard RSM enables you to perform various replication tasks on the VMFS LUN.
Figure 27 Virtual machine properties 5. Select Hard Disk from the menu and click Next.
Figure 28 Adding hardware 6. To present the RDM LUN to the VMware guest OS, select Raw Device -> Mapper and click Next.
7. Select the target LUN by slecting the vdisk from the list of available vdisks from the storage system. Click Next. Figure 30 Selecting target LUN 8. Select the data store on which the RDM LUN mapping information is stored and click Next.
Figure 31 Adding a datastore 9. Select Virtual compatibility mode for the Virtual Disk, and click Next. The Physical compatibility mode enables VMware guest OS to access the physical disk. If you select the Physical compatibility mode, skip to step 11.
10. Place a check mark beside Independent and select persistent as the mode of disk. 11. Select the available SCSI ID for the RSM LUN, and click Next. Figure 33 Selecting a mode The figure displays the summary information of adding the RDM LUN to the VMware guest OS. The VMFS LUN is presented to the VMware guest OS. Hence, you can log in to the VM server and scan or mount the disks using the disk management utility.
Figure 34 Summary information of adding RDM LUN to VMware guest OS
For more information For additional information and related documentation, see: http://www.hp.com/support/manuals In the Storage section, click Disk Storage Systems or Storage Software, and then select your product. For HP StorageWorks Command View EVA documentation, see: http://h20000.www2.hp.com/bizsupport/TechSupport/DocumentIndex.
List of figures Figure Figure Figure Figure Figure Figure Figure Figure Figure Figure Figure Figure Figure Figure Figure Figure Figure Figure Figure Figure Figure Figure Figure Figure Figure Figure Figure Figure Figure Figure Figure Figure Figure Figure 1 Architecture ......................................................................................................... 3 2 WWN ID ............................................................................................................
Glossary BC Operations DC-Management ESX VSphere EVA LUN RDM SAN VMFS WWN Business Copy Operations; local replication like snapshot, snapclone, mirrorclone. Dynamic Capacity Management enables you to extend (increase) or shrink (decrease) the size of a host volume based on storage requirements, without disrupting the host I/O. A software suite designed to centralize and optimize desktop management and data center resources through virtualization.