
HP RIP Software - HP RIP Software User Guide


1-10 Installation
The installer displays informational messages if it detects any miss-
ing software components:
The VideoNet protocol must be installed.
The Microsoft Internet Information Services (IIS) must be
installed and configured. For automatic configuration, install
IIS before running the RIP installer.
If you are following the procedure “Installation” on page 1-5, these
components have already been installed.
5. Follow the prompts to complete the installation of the software.
6. Restart (reboot) the computer.
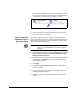
The installer places its system tray icon in the Windows Startup
group. An “X” will appear over the icon until you start the RIP. After
the “X” over the icon disappears, it will take a few moments for the
user interface to initialize and fully reflect each of the components
in the RIP. The initialization speed will depend on any other activity
on the computer or pending in the RIP.
Note Leave page filing (swap file) on. This is an advanced vir-
tual memory setting that is enabled by default. Turning off
page filing will significantly slow the performance of the
RIP.
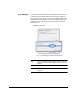
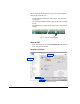
7. Verify that the web server was configured properly by the RIP
installer.
Open the Internet Information Services console under Administra-
tion Tools in the Windows Control Panel (under Performance and
Maintenance if you do not have the Control Panel in Classic View),
and verify that “hp-ripsw” appears under the Default Web Site in the
tree view, and that “hp-ripsw” appears on the right side as shown in
Fig. 1-4 below.
Fig. 1-3. Tray icon
Windows XPWindows Vista