
HP StorageWorks B-Series Multi-protocol Router Blade Installation Guide (A7990-90002, June 2006)

Installing and configuring the B-Series MP Router blade18
Optional items
Purchase the following items separately.
• 16 Small-form-Factor Pluggable SFP transceivers
• 2 SFP transceivers for the GbE ports
Installing and configuring the B-Series MP Router blade
To configure the B-Series MP Router blade, complete the following tasks:
1. ”Verify 4/256 SAN Director prerequisites” on page 18
2. ”Insert the B-Series MP Router blade into the 4/256 SAN Director” on page 18
3. ”Configure FCIP and Fibre Channel Routing Services and enable the ports” on page 19
4. ”Cable the B-Series MP Router blade” on page 19
Verify 4/256 SAN Director prerequisites
To verify the 4/256 SAN Director prerequisites:
1. Log into the 4/256 SAN Director as the admin user.
2. Enter the chassisConfig command, and verify that it is in mode 5. If the chassisConfig
mode is 5, this step is complete. If not, enter the chassisConfig 5 command. Changing the
chassisConfig mode requires a reboot, and is disruptive to switch operation.
3. Enter the firmwareShow command, and verify that the firmware level on both CPs are at
Fabric OS 5.1.x or higher. If not, use the firmwareDownload command to install the proper
Fabric OS level.
4. Verify that the 4/256 SAN Director has 4 power supplies installed prior to installing the B-Series
MP Router blade.
Insert the B-Series MP Router blade into the 4/256 SAN Director
To install the B-Series MP Router blade:
1. Select an empty slot in the 4/256 SAN Director.
2. Make sure the latches on the B-Series MP Router blade are unscrewed and open.
3. Slide the B-Series MP Router blade into the open slot.
4. Close and screw the latches and power on the blade using the power switch at the top of the
blade. The B-Series MP Router blade begins POST. After the POST is complete, the firmware
version on the blade will autolevel with the firmware version on the active CP. You must have
Fabric OS 5.1.x or higher or the B-Series MP Router blade will be faulted.
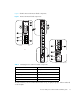
5. Verify that the blade power and blade status LEDs are green after the blade has completed
booting up (see Figure 1 for the location of these LEDs).