HP StorageWorks SVSP Plug-in for Oracle Enterprise Manager User Guide Abstract This document describes the installation and usage of the SAN Virtualization Services Platform (SVSP) plug-in for the Oracle Enterprise Manager (OEM) Grid Control. The installation procedure is described in detail, along with troubleshooting tips for problems that might be faced during or after the installation of the plug-in.
Legal and notice information © Copyright 2010 Hewlett-Packard Development Company, L.P. Confidential computer software. Valid license from HP required for possession, use or copying. Consistent with FAR 12.211 and 12.212, Commercial Computer Software, Computer Software Documentation, and Technical Data for Commercial Items are licensed to the U.S. Government under vendor's standard commercial license. The information contained herein is subject to change without notice.
Contents 1 Oracle Enterprise Manager plug-in installation and configuration ............. 5 Oracle Enterprise Manager plug-in installation and configuration ...................................................... 5 Prerequisites for plug-in installation ......................................................................................... 5 HP-UX .......................................................................................................................... 5 Red Hat ............................
Tables 1 Document conventions .............................................................................................
1 Oracle Enterprise Manager plug-in installation and configuration Oracle Enterprise Manager plug-in installation and configuration Prerequisites for plug-in installation HP-UX NOTE: • The user login to be used for the installation and access of the plug-in must not be root. • Installation was tested on HP-UX B.11.31 U(64).
For example: oracle ALL=(ALL) NOPASSWD: /u01/app/oracle/OracleHomes/ agent10g/sysman/admin/scripts/emx/HPSVSPSystemStorage/SVSPDevices Red Hat NOTE: • The user login to be used for the installation and access of the plug-in must not be root. • Installation was tested on Red Hat Enterprise Linux Server release 5.2 (Tikanga) 2.6.18.92.el5 (64-bit).
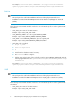
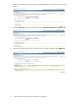
• SVSP_ORACLE_HOME—set to the original ORACLE_HOME Example: export SVSP_ORACLE_HOME=$ORACLE_HOME • SVSP_PATH—set to $ORACLE_HOME/bin, plus the original path Example: export SVSP_PATH=$ORACLE_HOME/bin:$PATH • Verify that sudo is installed: 1. # rpm -q sudo 2. sudo-1.6.8p12-18.14 3. # 4. Install from the distribution CD if necessary. 5. Run visudo to edit the config file. 6.
Prerequisites for Oracle The following are prerequisites for installing Oracle Enterprise Manager (OEM): • An OEM host agent running on a host attached to the HP StorageWorks SAN Virtualization Services Platform (SVSP). • The host user name and host password for the agent must be set in Preferences > Preferred Credentials > Set Credentials in OEM. • OEM 10g release 3 10.2.0.3.0 or above.
2. After a successful login, click on the Setup link at the top right corner of the OEM home page. 3. On the Setup page, click on the Management Plug-ins link at the bottom left. 4. On the Management Plug-ins page, click on the Import button.
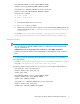
5. On the Import Management Plug-ins page, use the Browse button to select the path of the plug-in JAR file. 6. Click the List Archive button to list the plug-in under the Management Plug-ins for Archive section. 7. Select the plug-in by clicking on the check box next to its name, and then click the OK button.
8. You will be directed to the Management Plug-ins page where you should see a message from OEM indicating a successful import of the plug-in. You should also see your plug-in listed in the Plug-ins table. Select the plug-in, then click the Deploy icon corresponding to the plug-in to start the deployment process. 9. On the Deployment page, click the Add Agents button.
10. A pop-up window opens to allow for searching and selecting agents for deploying the plug-in. Click the Go button to list all the available agents. 11. Select the required agent by clicking on the corresponding check box and then click the Select button.
12. The selected agents are listed on the Deployment page under Deployment Agents. Click the Next button to move on to the next step. 13. Click the Finish button to complete the deployment process. 14. A confirmation message regarding the result of the deployment process is displayed by the OEM. The value, corresponding to the plug-in, under Deployed Agents in the Plug-in table, represents the number of agents deployed successfully for the plug-in. Plug-in configuration—creating an instance 1.
2. Select the agent deployed for the plug-in (using agent name:port number, for example, agent name:3872) for which you want to create the SVSP plug-in instance. 3. On the agent's home page, open the Add drop-down list and select the SVSP plug-in.
4. The plug-in name for the SVSP will populate the selection box. Click the Go button to navigate to the Properties page for the plug-in instance.
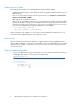
5. On the Properties page, there are text fields that accept user input (all fields are mandatory). • • • • • • Name: Enter a name for the SVSP plug-in instance here. Agent Host Name: Accepts the agent host name that is attached to the SVSP. Active VSM Server: The IP address of the active VSM server. Passive VSM Server: The IP address of the passive VSM server. VSM Username: The user name credential for the VSM server. VSM Password: The password credential for the VSM server.
7. A confirmation message is displayed on the agent’s home page for the newly created plug-in instance. The instance will be listed under the Monitored Targets list, sorted in ascending order by name. 8. To view the metrics and reports capabilities of this plug-in, click the plug-in instance name to select the plug-in.
9. On the plug-in home page there are two tabs named Home and Reports. The Reports tab can be used to view the plug-in reports. The All Metrics link on the home page can be used to view the plug-in metrics. Plug-in configuration—Modifying the target SVSP IP addresses 1. Click the Monitoring Configuration link on the plug-in home page. 2. The Monitoring Configuration page is the same page used previously for creating the plug-in instance, except that it no longer has a Name field.
Plug-in configuration—Modifying the metric and policy settings 1. Click the Metric and Policy Settings link on the plug-in home page. The default view on the Metric and Policy Settings page displays a list of metric fields. Some threshold values are preset under the heading Metrics with thresholds.
2. Select All metrics from the View drop-down list to see all the metric fields belonging to metrics. Use these fields to modify the collection schedules and threshold values, regardless of whether they have been preset. The metrics in the All metrics view on the Metric and Policy Settings page contain None or Not Applicable in the Thresholds column. • All: A default threshold value has been set for this metric, but you can modify this threshold on the Metric and Policy Settings page.
3. To modify the collection schedule of any metrics that have a field listed here, click the link corresponding to that metric field showing the current collection schedule. 4. Modify the collection schedule using the Frequency Type drop-down list and the Repeat Every text box. After the modification, click the Continue button. 5. The next screen displays the Metric and Policy Settings page again with a notification for the modified settings. Click the OK button to save the settings to the repository.
6. To modify the threshold values of any metric fields listed, click the Edit link corresponding to that metric field. 7. Supply the threshold values in the Warning Threshold and Critical Threshold text boxes as desired, and click the Continue button. 8. A confirmation of the update is displayed. Click the OK button to complete the operation. 9. A confirmation of the update is displayed. Click the OK button to complete the operation.
Plug-in uninstallation procedure 1. Navigate to the All Targets page from the plug-in home page using Targets > All Targets. Click on the name of the plug-in in the list of All Targets, and then click Remove. 2. Click the Yes confirmation button to delete the plug-in instance from this agent. A confirmation page regarding this transaction is displayed next. 3. Click the Setup link at the top of the home page.
4. On the Setup page, click on the Management Plug-ins link. 5. Click the plug-in you want to undeploy, and then click the Undeploy link icon. 6. On the Undeploy page, select the agent that was deployed for the plug-in, and click the OK button to proceed.
7. Confirmation of a successful plug-in undeployment is displayed on the Management Plug-ins page. You can choose to leave the undeployed plug-in in the OEM for later use, or you can select it, and click on the Delete button to remove it completely. 8. Click the Yes button to complete the deletion process. A confirmation message acknowledges the successful deletion of the plug-in.
Oracle Enterprise Manager plug-in installation and configuration
2 Using the plug-in to monitor SVSP After the SVSP plug-in is deployed, the plug-in appears in the agent’s monitored target list. Click on the SVSP instance target to view the plug-in home page, which shows the status and allows you to look at all of the metrics and reports that the plug-in provides. Viewing the SVSP plug-in metrics To view all of the metrics that are provided by the plug-in, click the All Metrics link on the plug-in home page.
Each of the metric pages provide all of the information associated with this metric. Metric data is gathered in real-time from the SVSP. When viewing metric information, you can view more data by clicking on an underlined value. Also, a graph is generated that trends the data over a period of time that you have selected. For example: Clicking on the Storage Pools metric displays information about storage pools.
Description of the SVSP plug-in metrics This section describes each of the metrics that are presented in the SVSP plug-in as well as what information is displayed within each metric. The information displayed by these metrics is gathered real-time from the SVSP. • Async Mirror Groups—Displays important asynchronous mirror group information. • Back-End LU—Displays important back-end LU information defined to this domain. • DPM—Displays Data Path Module information.
• Snapshots PiT—Displays snapshot PiT information. • Storage Pools—The storage pools metric displays all storage pools defined in the local domain. • Stripe Sets—The stripe sets metric displays all stripe sets defined in the local domain. • Sync Mirror Groups—The sync mirror groups metric displays all sync mirror groups defined in the local domain. • User Management—The user management metric displays user information that has been defined to the SVSP.
• Method 1—Click the Report link on the SVSP plug-in home page to view all of the reports for this plug-in. • Method 2—Click the Report menu link on the top right of any OEM page to view all of the reports that are provided by OEM along with the plug-in reports. This method also provides a Print icon that will present the report in a format best for printing. Method 1 example Click the Report link from the SVSP plug-in home page as shown. Method 2 example Click the Reports tab.
There are a few reports that filter the data presented in the graph. For example, some of the reports can show tens to hundreds of objects. If a graph shows all of this data, it would be unreadable. When processing a large number of objects, the data points are limited to 10 in the graphs, but all of the data points are shown in tabular format at the bottom of the page.
Description of the SVSP plug-in reports This section describes each of the reports that are presented in the SVSP plug-in, as well as what information is displayed within each report. The information displayed by these reports is from the OEM repository tables that contain data for the last 31 days. This data can be useful for trending purposes. • HP ASM Database File Storage Devices—Displays two individual reports on one screen: ASM Tablespace Report and the ASM Database File Storage Device Report.
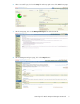
• HP Storage Pool Information—This report displays two graphs showing capacity by storage pool and free capacity by storage pool over the last 31 days. Information on all the storage pools is displayed at the bottom of the report which shows: storage pool name, status, capacity, free capacity, free capacity alert threshold, and comments. • HP Stripe Sets Information—This report displays a graph on capacity by stripe set over the last 31 days.
3 Troubleshooting tips Troubleshooting tips Checking the OEM status There are separate procedures for checking the OEM status, depending on the operating system used. Windows 1. Log in to the OEM on the OEM server. 2. Navigate to the All Targets page using the Targets > All Targets link. 3. Check the status of the agent in the list of All Targets. 4.
HP_UX/Linux 1. Set the AGENT_HOME variable to the Oracle Management Agent home directory (typically by the command export AGENT_HOME=$HOME/OracleHomes/agent10g). 2. Run the following commands from the HOME directory: a. $AGENT_HOME/bin/emctl status agent (to check the status of the OEM agent). b. $AGENT_HOME/bin/emctl stop agent (to stop the OEM agent service). c. $AGENT_HOME/bin/emctl start agent (to start the OEM agent service). Setting the OEM agent host user name and password 1.
3. Set the host user name and password, under Target Credentials or Default Credentials or both, for the agent, as one of the user accounts registered in the system (typically the login account used to install OEM). Click the Apply button to save the credentials. Registering the user account in Windows 1. Navigate to Control Panel > Administrative Tools > Local Security Policy. 2. Go to Local Policies > User Rights Assignment and double-click on Log on as a batch job in the right pane of the window.
3. Add the user account using the Add User or Group button. Save the settings and exit. Cannot see the plug-in instance Log out of the OEM and log in again. Now check the list of All Targets and you will find your plug-in instance listed there. If it is still not present, check whether it has been properly added to the OEM agent (follow the steps listed in “Plug-in installation procedure” on page 8).
4 Support and other resources Contacting HP For worldwide technical support information, see the HP support website: http://www.hp.
HP websites For additional information, see the following HP websites: • • • • • • http://www.hp.com http://www.hp.com/go/storage http://www.hp.com/go/svsp http://www.hp.com/support/manuals http://www.hp.com/go/sandesignguide http://www.hp.com/support/downloads Typographic conventions Table 1 Document conventions Convention Element Blue text: Table 1 Cross-reference links and e-mail addresses Blue, underlined text: http://www.hp.
IMPORTANT: Provides clarifying information or specific instructions. NOTE: Provides additional information. TIP: Provides helpful hints and shortcuts. HP product documentation survey Are you the person who installs, maintains, or uses this HP storage product? If so, we would like to know more about your experience using the product documentation. If not, please pass this notice to the person who is responsible for these activities.
Support and other resources