
HP StorageWorks SAN Virtualization Services Platform Manager User Guide (5697-0454, May 2010)

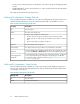


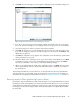

5. Click Next. The Select Storage Pool screen appears. displaying the list of available storage pools.
Figure 7 Import-in-Place wizard—Select Storage Pool screen
.
6. If you like to select a storage pool from a folder, navigate to the folder in the tree on the left of
the screen. The Select Storage Pool screen displays the list of storage pools in the selected folder.
7. Select the storage pool to which you want to import the back-end LU.
8. Click Add. The storage pool you selected appears in the list in the lower right area of the screen.
If you want to change your selection, select the storage pool in the lower list, click Remove, and
add another storage pool.
9. Click Next. A confirmation screen appears. The confirmation screen describes the operation that
will be performed if you proceed.
10. Check the details on the confirmation screen. If you want to make any modifications, click Back
to navigate to previous screens in the wizard and make any changes necessary. Click Next to
return to the confirmation screen, when you have finished making changes.
11. When you are satisfied with the details on the confirmation screen, click Finish. The new virtual
disk is created with the name you specified and the back-end LU is configured as a member of
the specified pool.
The resulting virtual disk has no host permissions. To ensure that the host can access the data that
was imported to the new virtual disk, assign the host permission to access the new virtual disk. For
information about assigning virtual disk permissions to hosts, see “Adding host permission” on page 113.
Reversing Import-in-Place (performing Export-in-Place)
Reversing the import of LUN data to a VSM virtual disk requires restoring the data that was saved to
backup space when a VSM signature was written to the back-end LU. The process is not reversed by
simply deleting the virtual disk created by the mapping process and removing the back-end LU from
the storage pool. Use the following procedure to restore all the data to the original LUN and delete
the virtual disk.
SAN Virtualization Services Platform Manager User Guide 59