
HP 8 Internal Port SAS Controller and HP Multi-Port Internal SAS Controller Support Guide, September 2009

The drvcfg Utility
This section describes in detail all of the available commands and options in the drvcfg utility.
For step-by-step examples of common configuration procedures using drvcfg, see:
• “Determining the Driver ID and Ctrl ID” (page 32).
• “Adding An Integrated Mirror Volume” (page 33).
• “Viewing the Properties of an Array” (page 37).
• “Deleting an Integrated Mirror Volume” (page 38).
Starting the drvcfg Utility
To start the drvcfg utility, follow these steps:
1. Power on or reboot the server.
2. Choose EFI shell from the console menu.
3. At the Shell> prompt, enter drvcfg -s and press Enter.
Using the drvcfg Utility With a Terminal Emulation Program
The drvcfg utility uses input keys (F1, F2, Home, End, etc.) that may not be supported by all
terminal emulation programs. Review the terminal emulation program documentation to
determine which input keys are supported. If you have problems using any of the Function keys
or navigation keys, use the alternate keys that are shown at the bottom of each drvcfg screen.
The following Function and navigation keys apply on all drvcfg screens:
F1 Help Context sensitive help for the field in which the cursor is located.
Arrow Keys Select Item - Up, down, left, right movement to position the cursor.
Home/End Select Item - Up, down, left, right movement to position the cursor.
+/- Change Item - Items with values in [brackets] are modifiable. Numeric keypad
+ and numeric keypad - (minus) update a modifiable field to its next relative
value.
Esc Abort/Exit - Aborts the current context operation, or exits the current screen. If
you have changed settings, you will be asked to confirm the exit. If you are
using a serial console, pressing the Esc key causes a delay of several seconds
before the takes effect. This is normal system behavior and is not an error.
Enter Execute <item> - Executable items are indicated by highlighted text and a
different background color. Press Enter to perform the field's function.
Configuration Utility Screens
SAS BIOS configuration utility screens contain the following areas, starting at the top of the
screen:
• Header area: Identifies the utility and version number.
• Menu area: Gives the title of the current screen, and on screens other than the Adapter List
screen also identifies the adapter.
• Main area: The main area for presenting data. This area has a cursor for item selection, and
horizontal and vertical scroll bars if necessary.
• Footer area: Provides general help text, and lists the available key commands.
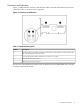
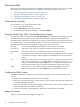
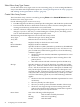
Adapter List Screen
When you start drvcfg, the Adapter List appears:
16 Configuring the Controller Offline