
HP SC40Ge Host Bus Adapter Reference Guide


Configuration and operation 7
9. (Optional) To set this RAID 1 volume as the boot volume, select the SAS Topology option on the
Adapter Properties screen and then, on the SAS Topology screen, set the boot volume. For more
information, see "Selecting a boot disk (on page 9)."
Viewing RAID volume properties
1. On the Adapter List screen, select an adapter.
2. On the Adapter Properties screen, select RAID Properties. The View Array screen is displayed,
showing the properties of the first volume on the adapter.
3. If the adapter has more than one volume configured, view the properties of the next array by
pressing Alt+N.
Managing an array
1. On the Adapter List screen, select an adapter.
2. On the Adapter Properties screen, select RAID Properties.
3. On the View Array screen, select Manage Array.
The Manage Array screen appears, displaying the following options:
o Manage Hot Spare ("Managing hot spares" on page 7)
o Synchronize Array ("Synchronizing an array" on page 8)
o Activate Array ("Activating an array" on page 8)
o Delete Array ("Deleting an array" on page 8)
4. Select an option from the list, and follow the prompts that are presented for that option on the screen
that appears.
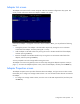
Managing hot spares
The Manage Hot Spare screen enables you to add hot spares to RAID 1 volumes and to remove hot
spares. An adapter can have only one hot spare, which generally acts as a global hot spare for all RAID
1 volumes on the adapter. However, if you configure an adapter with one SAS RAID 1 volume, one SATA
RAID 1 volume, and a SAS drive as the hot spare, the hot spare is available only for the SAS volume.
To add or remove a hot spare:
1. On the Manage Array screen, select Manage Hot Spare.
2. Perform one of the following actions:
o To remove a hot spare, move the cursor to the hot spare and then press the + key, – key, or
spacebar.
o To add a hot spare, move the cursor to a suitable disk in the list and then press the + key, - key,
or space bar. (A drive can be used as a hot spare only if it is a valid RAID drive. For information
about the limitations, see "Creating a RAID 1 volume (on page 6)".)
3. Press the C key.
4. Select Save changes.
5. Exit the Manage Hot Spare screen to enable the changes.
The configuration utility pauses while the hot-spare configuration is changed.