HP Scanjet 4070 Photosmart scanner User‘s Manual
HP Scanjet 4070 Photosmart scanner User's Manual
Legal information Copyright And License © 2004 Copyright Hewlett-Packard Development Company, L.P. Reproduction, adaptation or translation without prior written permission is prohibited, except as allowed under the copyright laws. The information contained herein is subject to change without notice. The only warranties for HP products and services are set forth in the express warranty statements accompanying such products and services.
Contents 1 2 3 4 User's Manual How to use the scanner...............................................................................2 Scanner parts and accessories......................................................................2 Overview of the HP software..........................................................................3 Front panel and accessories overview...........................................................3 Scanning overview.......................................................
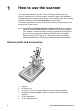
1 How to use the scanner This manual describes the operation of the HP Scanjet 4070 Photosmart scanner, including how to use the scanner, customer support, and installation troubleshooting. For installation procedures, see the Setup Poster. For scanning software procedures, see the HP Image Zone on-screen help. This section presents an overview of the scanner and information about how to use and care for the scanner.
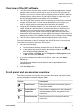
How to use the scanner Overview of the HP software ● ● ● ● The HP Director provides easy access to the software applications, default settings, status, and on-screen help for your HP device. By using the HP Director, you can scan various types of originals (pictures, slides, negatives, and documents), make copies, view and print images or video clips, go to the HP Shopping website, and update your HP software.
Chapter 1 (continued) Copy Scans from the glass directly to the default printer to make copies. 4 x 6 inch (10 x 15 cm) photo holder The HP Scanjet 4070 scanner features the photo holder, which enables you to insert, scan, and remove multiple 4 x 6 (10 x 15 cm) pictures quickly and easily. For more information about the photo holder, see Scan from the 4 x 6 inch (10 x 15 cm) photo holder.
How to use the scanner To start the HP Director software, double-click the HP Director icon ( ) on the desktop. The HP Director window appears. From this window you can scan, view, or print images, use on-screen help, and more. If the HP Director icon ( ) is not on the desktop, on the Start menu, point to Programs or All Programs, point to HP, and then click HP Director.
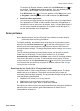
Chapter 1 Tip Before placing photos in the photo holder, separate the photos to make sure that they do not stick together, and then restack them. 1 2 3 4 5 Place a stack (up to 24) of 4 x 6 (10 x 15 cm) pictures in the photo holder. The pictures should face toward you with the tops of the pictures pointing down. Close the HP Photo Door. Press the Scan Picture button ( ) on the front of the scanner. If necessary, follow the instructions on the screen to finish scanning.
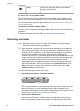
How to use the scanner Scan multiple pictures with one scan You can scan multiple pictures at the same time from the scanner glass. Note The Preview setting for the Scan Picture button ( ) must be set to off to scan multiple pictures with one scan. Normally the Preview setting is set to off already. To change the Preview setting for the Scan Picture button ( ), see Change settings 1 Place the original pictures in each corner of the scanner glass with at least 1/4 inch (6.35 mm) space between the pictures.
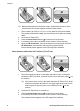
Chapter 1 1 2 3 Open the HP Photo Door and remove the negative strip holder, if present, from the slide holder. Place up to two 35 mm slides in either side of the slide holder behind the photo holder and close the HP Photo Door. The top of each slide should point down with the front of the slide facing you. Press the Scan Slides or Negatives button ( ) on the front of the scanner. The scan is displayed in the HP Image Zone software.
How to use the scanner 4 Press the Scan Slides or Negatives button ( ) on the front of the scanner. The scan is displayed in the HP Image Zone software. If multiple selection areas were detected, the selections are displayed as separate scanned images. Note The Preview setting for the Scan Slides or Negatives button ( ) must be set to off to scan multiple pictures with one scan. Normally the Preview setting is set to off already.
Chapter 1 Print copies Use the Copy button ( make copies. 1 2 3 ) to scan an original and send it directly to a printer to Place the original face down in the upper right hand corner on the scanner glass as shown by the reference marks on the scanner, and close the lid. Press the Copy button ( ) on the scanner. A message appears that shows the copy progress.
How to use the scanner 2 3 scanner glass as shown by the corner reference mark ( ) on the scanner. Close the HP Photo Door or the scanner lid. Press the Scan Picture button ( ). The scan is displayed in the HP Image Zone software. If multiple selection areas were detected, the selections are displayed as separate scanned images. 4 5 Select one or more pictures in the HP Image Zone software. Click To E-mail and follow the on-screen directions.
Chapter 1 Change settings You can customize some features of your HP Scanjet scanner, including the front panel button settings, previewing of images, and other preferences. ● Change settings from the HP Director software. When you use the scanner buttons on the front of the scanner or the HP Director software, the scanner uses settings optimized for the scanned original type, such as a picture.
How to use the scanner Do not spray the glass cleaner directly on the glass. If too much glass cleaner is applied, the cleaner could run to the edges and damage the scanner. When finished, reconnect the USB cable and power cable to the scanner. Note For instructions on how to clean the underside of the scanner glass, visit www.hp.com/support. ● Clean the transparent materials adapter (TMA) Clean the TMA with a dry, soft cloth. If necessary, lightly spray the cloth with glass cleaner and wipe the TMA.
2 Troubleshooting This section contains solutions for potential issues with the scanner and the transparent materials adapter (TMA). Frequently asked questions This section provides information on some common questions, and provides answers to those questions as well. How do I test my scanner hardware if I think there may be a problem? 1 2 3 Disconnect the USB cable and power cable from the scanner. Ensure that the scanner power cable is still connected to the power source.
Troubleshooting How do I resolve issues with scanning documents or text? The scanner uses Optical Character Recognition (OCR) to convert text on a page to text that you can edit on your computer. ● If you scan text but cannot edit it, make sure you make the following selections during scanning: – – ● ● What are you scanning? Select Document. Scan for editable text? Select Yes. Scanned text may not appear on your computer exactly as it appeared on the page.
Chapter 2 Check the cables Cable type Action Power cable The power cable is connected between the scanner and an AC outlet. ● ● ● Ensure that the power cable is securely connected between the scanner and a live electrical outlet or surge protector. If the power cable is connected to a surge protector, ensure that the surge protector is plugged into an outlet and turned on. Disconnect the power cable from the scanner and turn off the computer.
Troubleshooting – feel slightly loose. When connected incorrectly, the USB plug will feel overly tight. Try connecting the USB cable to a different USB port on your computer. Test scanner hardware If you think the scanner has a hardware problem, verify that the cables are firmly connected to the scanner, the computer, and the power source. If the cables are correctly connected, test the scanner using this procedure. 1 2 Disconnect the USB cable and power cable from the scanner.
Chapter 2 No light or only dim light is visible in the transparent materials adapter After each step, start a scan to see if the scanner is working. If not, proceed with the next step. ● ● ● Make sure that the transparent materals adapter (TMA) is connected to the scanner. The bulb in the adapter might not be working. Press the Scan Slides or Negatives button ( ) and look for illumination in the TMA. If the bulb is broken, service is required, See Customer support. The adapter has a short warm-up mode.
Troubleshooting Dots or streaks appear in the scanned image ● ● ● Check the original slide or negative for damage or debris. Clean the scanner glass. Clean the adapter windows using a slightly damp, soft cloth. The scanned images are dark ● ● Check to see if the adapter light is on before you click New Scan or Accept. The bulb in the adapter might be broken or not working. If the bulb is broken, service is required.
3 Customer support This section contains support information, including phone numbers and website information. Accessibility website options Customers with disabilities can get help by visiting www.hp.com/accessibility. HP website Visit www.hp.com to: ● ● ● ● ● Learn tips for scanning more effectively and creatively. Access HP Scanjet driver updates and software. Register your product. Subscribe to newsletters, driver and software updates, and support alerts. Purchase accessories.
Customer support using the above options, call HP while you are in front of your computer and scanner.
Chapter 3 (continued) Austria +43 1 86332 1000 0810 –00 1000 (in-country) Bahrain 800 171 (in-country toll-free) Belgium 070 300 005 (Dutch) 070 300 004 (French) Czech Republic +420 261307310 Denmark +45 70202845 Egypt +20 2 532 5222 Finland +358 (0)203 66 767 France +33 (0) 8 92 69 60 22 (Euro 0.34/min) Germany +49 (0) 180 5652 180 (Euro 0.
Customer support (continued) Saudi Arabia 800 897 1444 (in-country toll-free) Slovakia +421 2 50222444 South Africa 086 000 1030 (RSA) +27-11 258 9301 (Outside RSA) Spain 902 010 059 Sweden +46 (0) 77-120 4765 Switzerland 0848 672 672 (German, French, Italian – Peak time 0.08 CHF/Outside peak 0.
Chapter 3 (continued) Dominican Republic 1 800 7112884 Guatemala 1800 999 5105 Hong Kong SAR +852 2802 4098 India 1 600 447737 Indonesia +62 (21) 350 3408 Jamaica 0-800-7112884 Japan 0570 000 511 (inside Japan) +81 3 3335 9800 (outside Japan) Korea, Republic of +82 1588-3003 (Seoul) Malaysia 1 800 805 405 Mexico 01-800-4726684) (55) 5258 9922 24 New Zealand +64 (9) 356 6640 Nigeria +234 1 3204 999 Panama 001 800 711 2884 Peru 0 800 10111 Philippines + 63 (2) 867 3551 Puerto R
4 Product specifications and options This section contains the product specifications for the HP Scanjet 4070 scanner and accessories. Scanner specifications Name Description Scanner type Flatbed Weight with TMA lid HP Scanjet 4070 scanner (3.29 kg (7.24 pounds) Maximum scanner size with TMA lid HP Scanjet 4070 scanner (298 x 472 x 90 mm (11.73 x 18.58 x 3.54 inches) Scanning element Charged-coupled device Interface USB 2.
Chapter 4 (continued) 26 Negative media type 35 mm Slide media capacity 4 Negative media capacity 2 x negative strips with a maximum of 2 frames per strip Size 244 mm by 430 mm by 40 mm Weight 0.9 kg Power requirements 12.0 VDC, 575 mA, 6.
www.hp.com Printed in U.S.A.