HP Scanjet 7800 Setup and Support Guide
Copyright and license © 2006 Copyright Hewlett-Packard Development Company, L.P. Reproduction, adaptation or translation without prior written permission is prohibited, except as allowed under the copyright laws. The information contained herein is subject to change without notice. The only warranties for HP products and services are set forth in the express warranty statements accompanying such products and services. Nothing herein should be construed as constituting an additional warranty.
Contents 1 How to get started.................................................................................................2 Step 1. Check the box contents .............................................................................2 Step 2. Install the software .....................................................................................3 Step 3. Connect the power supply .........................................................................3 Step 4. Connect the USB cable ...................
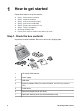
1 How to get started Follow these steps to set up the scanner: ● ● ● ● ● ● ● ● Step 1. Check the box contents Step 2. Install the software Step 3. Connect the power supply Step 4. Connect the USB cable Step 5. Prepare the scanner for use Step 6. Test the installation Scanning software CDs Power Save mode or Instant Lamp Warm-up mode Step 1. Check the box contents Unpack the scanner hardware. Be sure to remove any shipping tape.
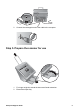
Step 2. Install the software Caution Do not connect the USB cable to the computer yet. Install the scanning software before connecting the USB cable. 1. 2. Insert the HP Smart Document Scan Solution CD that came with the scanner into the computer CD drive. Wait for the installation dialog box to display. If the installation dialog box does not display after a few moments, see Installation dialog box does not display. Click Install Software to install the scanning software.
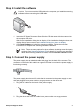
Chapter 1 3. 4. 5. Check that the green LED on the power supply cable connector is on. – If the green LED is not on, ensure that power is available to the power outlet or surge protector that the AC cable is plugged into. – If power is available to the power outlet or surge protector but the green LED is still not on, the power supply might be defective. Contact HP Support for assistance. If the green LED is on, plug the power supply into the back of the scanner.
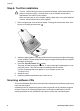
2. Connect the rectangular end of the cable to the computer. Step 5. Prepare the scanner for use 1. 2. For longer originals, extend the document feeder extension. Extend the output tray.
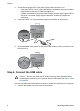
Chapter 1 Step 6. Test the installation Caution Before placing an item in the document feeder, make sure that the item does not contain wet glue, correction fluid, or other substances that can be transferred to the interior of the scanner. Make sure there are no curls, wrinkles, staples, paper clips, or any other attached material. Sheets should not be stuck together. 1. Place a single page in the document feeder. The page should be face down, with the top of the page pointing down ( ). 2.
HP Smart Document Scan Software CD Programs Software use Supported operating systems HP Smart Document Scan Software Use to create high-quality scans from multi-page documents and to automate scanning tasks you perform often. Microsoft® Windows® 98 SE, Me, 2000, and XP This program is not available in Asian languages for Windows 98 SE and Me.
Chapter 1 Power Save mode or Instant Lamp Warm-up mode The Power Save mode is the default for the scanner. In Power Save mode the scanner lamp will time out and turn off automatically after a period of inactivity (about 15 minutes). Instant Lamp Warm-up is also available. In this mode, although the scanner lamp will time out and turn off automatically after a period of inactivity (about 15 minutes), it will remain warm and ready to scan.
2 How to use the scanner buttons and card slot Scanner buttons Use the buttons on the scanner front panel to start a scan, select a profile for a scan, and configure some scanner settings. 4 1 5 2 3 Icon Button name Description 1 Scan Document To Start a scan (after selecting a profile). 2 Copy Start a copy (after selecting the number of copies). 3 Select Profile Number or Number of Copies Select a profile (before scanning) or the number of copies (before copying).
Chapter 2 Card slot Use the card slot on the back of the scanner to scan items such as business cards, drivers licenses, identification cards, insurance, and other cards. Caution Do not use cards with raised characters, such as credit cards. Place cards into the card slot face down with the top of the card pointing to the left ( ). Note 10 Be sure to scan only one card at a time.
3 Special features In addition to the standard scanning tools, these special features are available with the included software. Feature Description Profiles You can set up and use profiles that contain all settings necessary for scanning tasks such as: ● ● ● Document processing Saving in different file formats (i.e.
4 How to set up and use profiles An HP Smart Document Scan Software profile contains settings for scanning, processing, and saving or sending scanned documents. You can set up profiles for use with the Scan Document To button. The profiles provide a fast, efficient way to scan. You can configure each profile to perform specific scanning functions that you use often.
For more information, see the HP Smart Document Scan Software help. Double-click the HP Smart Document Scan Software icon on the computer desktop, and then click Help in the toolbar menu. Assign profile numbers with the Button Settings Utility Use the Button Settings Utility to assign each profile to a number. Profiles represented as numbers are easily selected from the LCD.
Chapter 4 For more information, see the HP Smart Document Scan Software help. Double-click the HP Smart Document Scan Software icon on the computer desktop, and then click Help in the toolbar menu.
Customizable profile labels Use the customizable profile labels included with the scanner to list up to twelve commonly used profile numbers and profiles associated with them. The label can be attached directly to the pull-down tray on the front of the scanner. Sample profile label For a template that you can print if you need additional customizable profile labels, use the label_template.doc file located on the scanner software CD. To customize and print a profile label, follow these steps: 1. 2. 3. 4.
5 Where to get additional information The scanner comes with several sources of information about using the scanner and the scanning software. ● ● ● HP Scanjet 7800 User Guide HP Smart Document Scan Software help Button Settings Utility help HP Scanjet 7800 User Guide The scanner user guide provides the information you need to know for using, maintaining, and troubleshooting the scanner. The scanner user guide is the primary source for scanner information.
Button Settings Utility help If HP Smart Document Scan Software is installed on the computer, you can use the Button Settings Utility help to learn what options are available for configuring the scanner profiles and how to find information about scanner status and maintenance. To open the Button Settings Utility help, click Help on the Button Settings Utility dialog box.
6 Care and maintenance Occasional cleaning of the scanner helps ensure higher-quality scans. The amount of care necessary depends upon several factors, including the amount of use and the environment. You should perform routine cleaning as necessary. For instructions about maintaining the scanner, see the scanner user guide. For information about the scanner user guide, see Where to get additional information.
7 Troubleshooting Installation dialog box does not display Follow these steps if the installation dialog box does not display: 1. 2. 3. Click Start, and then click Run. The Run dialog box is displayed. In the Open box, type d:\setup.exe (where d: is the letter of your computer's CD drive). Click OK. Scanner error codes The scanner displays a blinking number on the LCD panel when it encounters a problem, such as a paper jam. For more information, see Scanner error codes at the end of this book.
Chapter 7 The power supply also has an AC cable that is connected to the power supply on one end and plugged into a power outlet or surge protector on the other end. The power cable is connected between the scanner and a power outlet. 1. 2. 3. 4. Check that the power rocker switch is in the on position. Check that the green LED on the power supply cable connector is on. If the green LED is not on, ensure that power is available to the power outlet or surge protector that the AC cable is plugged into.
A list of currently installed programs is displayed. Select HP Scanjet 7800 Specialized Document Scanning, and then click Remove or Change/Remove. 5. Follow the onscreen instructions. If prompted to remove or repair the software, click Remove. If prompted to restart the computer, click No. 6. After the HP scanning software is removed, unplug the scanner from the electrical outlet. 7. Restart the computer. 8. Insert the HP Smart Document Scan Solution CD in the computer CD drive. 9.
8 Product support This section describes the options for product support. ● ● ● Accessibility HP Scanjet Web site Support process Accessibility The following accessibility options are available on this scanner: ● ● The LCD Reader displays the contents of the scanner’s LCD as it changes. It enables PC accessibility tools to help the user read what is being displayed on the LCD. To prevent buttons from being accidentally pushed, you can use the Button Disable Utility to disable the buttons.
4. 5. from an HP Product Support technician. E-mail support is available in the languages listed at that Web site. If you are a customer in the United States, go to step 5. Otherwise, contact your local HP dealer. If your scanner has a hardware failure, take it to your local HP dealer for a solution. Service is free during your scanner’s limited warranty period. After the warranty period, the dealer will quote a service charge. Contact the HP Product Support Center for support by phone.
9 Regulatory information and product specifications This section contains regulatory information and product specifications for the HP Scanjet 7800 scanner and accessories. ● ● ● ● ● Scanner specifications Environmental specifications Regulatory information Recycle and restricted material information Disposal of Waste Equipment by Users in Private Households in the European Union Scanner specifications Name Description Scanner type Duplex sheet-feed scanner Size Width: 320 mm (12.
(continued) Name Description Relative humidity Operating the scanner: 15 percent to 80 percent noncondensing 10° to 35° C (50° to 95° F) Storage: up to 90 percent at 0° to 60° C or (32° to 140° F) Regulatory information Regulatory Model Identification Number: For regulatory identification purposes your product is assigned a Regulatory Model Number. The Regulatory Model Number for your product is FCLSD-0601.
Chapter 9 This symbol on the product or on its packaging indicates that this product must not be disposed of with your other household waste. Instead, it is your responsibility to dispose of your waste equipment by handing it over to a designated collection point for the recycling of waste electrical and electronic equipment.
10 Hewlett-Packard limited warranty statement HP Scanjet 7800 scanner ● ● Duration of limited warranty Regions Duration of limited warranty 1. HP warrants to you, the end-user customer, that HP hardware, accessories, and supplies will be free from defects in materials and workmanship after the date of purchase, for one year. If HP receives notice of such defects during the warranty period, HP will, at its option, either replace or repair products which prove to be defective.
Chapter 10 AS INDICATED ABOVE, IN NO EVENT WILL HP OR ITS SUPPLIERS BE LIABLE FOR LOSS OF DATA OR FOR DIRECT, SPECIAL, INCIDENTAL, CONSEQUENTIAL (INCLUDING LOST PROFIT OR DATA), OR OTHER DAMAGE, WHETHER BASED IN CONTRACT, TORT, OR OTHERWISE. Some countries, states, or provinces do not allow the exclusion or limitation of incidental or consequential damages, so the above limitation or exclusion may not apply to you. 9.
Service and support HP Technical Support is your easy, fast, and direct Web resource for product assistance, diagnostics, and driver downloads. It is your source for all service and support needs. Receive award-winning assistance 24 hours per day, 7 days a week at www.hp.com/ support. Upgraded warranty option You can select the following upgraded warranty option (available in the U.S.
Chapter 10 You may also have statutory legal rights against the seller on the basis of the purchase agreement in addition to the manufacturer's warranty, which are not restricted by this manufacturer's warranty. Service and support HP Technical Support is your easy, fast, and direct Web resource for product assistance, diagnostics, and driver downloads. It is your source for all service and support needs.
Receive award-winning assistance 24 hours per day, 7 days a week at www.hp.com/ support. Upgraded warranty option You can upgrade your standard factory warranty to three years “Next business day” exchange with the HP Care Pack service. Service coverage begins on product purchase date and the pack must be purchased and registered by HP within the first year of product purchase. You will benefit from a dedicated access (phone number) to HP hardware technical support.
A Scanner error codes The scanner displays a blinking number on the LCD under certain error conditions. For help responding to an error code, see the appropriate topic below. Error 02 SDRAM Error Press the Power rocker switch to the off position to turn the scanner off. Wait 30 seconds, and then press the Power rocker switch to the on position to turn the scanner on. If the message is still displayed, contact HP Support. For more information, see Product support. Error 03 USB Error 1.