
Setup and Support Guide
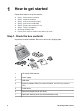
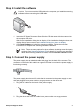


Step 2. Install the software
Caution Do not connect the USB cable to the computer yet. Install the scanning
software before connecting the USB cable.
1. Insert the HP Smart Document Scan Solution CD that came with the scanner into
the computer CD drive.
Wait for the installation dialog box to display. If the installation dialog box does not
display after a few moments, see Installation dialog box does not display.
2. Click Install Software to install the scanning software. Follow the onscreen
instructions to complete the scanning software installation.
Note There are many options for other software, including some third-party
solutions. See Scanning software CDs for details. If you have any questions
about what scanning software to install, click the How do I choose? button.
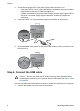
Step 3. Connect the power supply
The power supply has an attached cable that plugs into the back of the scanner. The
connector on the end of this cable has a green LED that is on when the power supply is
functioning correctly.
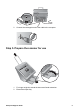
The power supply also has an AC cable that is connected to the power supply on one
end and plugged into a power outlet or surge protector on the other end.
1. Plug the AC cable into the back of the power supply.
2. Plug the other end of the AC cable into a power outlet or a surge protector.
Setup and Support Guide 3