HP Scanjet N6310 User Guide
Contents 1 Use the scanner HP scanning software overview.................................................................................................3 Scanner overview.......................................................................................................................4 Scanner control panel...........................................................................................................4 Automatic document feeder (ADF)..........................................................
Scanner installation troubleshooting.........................................................................................27 Check the cables................................................................................................................28 Uninstall and reinstall the software.....................................................................................28 Scanner initialization or hardware problems.............................................................................
1 Use the scanner The following topics describe the HP Scanjet scanner as well as how to scan or copy original documents. • • • • • • HP scanning software overview Scanner overview Scanner settings Load originals Start a scan Make copies HP scanning software overview When you install the HP scanning software, the following icons are added to your desktop. These icons open programs for scanning, copying, and editing your scans. HP Scanning is the program to use for scanning pictures and documents.
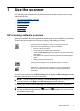
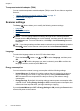
Chapter 1 See also • • • “Load originals” on page 7 “Use the HP scanning software” on page 14 “Make copies” on page 16 Scanner overview 1 Scanner control panel 2 Automatic document feeder (ADF) 3 ADF input tray 4 ADF output tray 5 Transparent materials adapter (TMA) See also • • • Scanner control panel Automatic document feeder (ADF) Transparent materials adapter (TMA) Scanner control panel Use the buttons on the scanner control panel to start a scan and to configure some scanner settings.
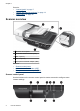
Icon Button name Description 1 Attention LED In combination with the Power LED, indicates scanner functions and error conditions. 2 LCD • • 3 OK/Select Displays available scan shortcuts that users can select. Shows menu options and status and error messages. Allows you to scroll through and select options in the LCD. • • Press and to scroll through the menu options. Press OK to select the option. 4 Cancel Cancels a scan or copy in progress. 5 Scan Starts a scan.
Chapter 1 Transparent materials adapter (TMA) You can use the transparent materials adapter (TMA) to scan 35 mm slides or negatives. See also • • “Use the transparent materials adapter (TMA)” on page 12 “Start a scan” on page 13 Scanner settings The Setup ( • • • ) button allows you to modify the following scanner settings: Language Energy consumption Tools NOTE: You can change additional settings through the HP scanning software.
To change energy consumption settings, follow these steps: 1. Press the Setup ( ) button, use and until the energy consumption setting you want is selected, and then press OK. 2. Use and until the setting you want (ON or OFF) is selected, press OK, and then press twice. NOTE: Setting Energy Savings to ON reduces power to all parts of the scanner, including the scanner lamp. As a result, setting Instant Warm-up to OFF when Energy Savings is set to ON has no effect.
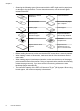
Chapter 1 • • • • • 8 Scanning the following types of documents with the ADF might result in paper jams or damage to the documents. To scan these documents, use the scanner glass instead of the ADF.
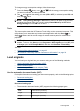
• • When loading small pages, such as A5 paper size (148 x 210 mm or 5.8 x 8.3 in), load a stack of at least five pages to ensure that the ADF properly detects and feeds the stack. When scanning fewer than five small pages, scan the pages by placing them on the scanner glass. When loading long documents that hang over the end of the input tray, pull out the input tray extender (1), and then load the documents (2). How to load documents 1. If the original pages are long, pull out the input tray extender.
Chapter 1 3. Align the edges of the documents by tapping the bottom of the stack against the table top. Rotate the stack 90 degrees and repeat. 4. Place the stack in the middle of the input tray. Load the stack face up. 5. Adjust the paper guides to the width of the documents. Take care not to overtighten the guides, which can restrict paper feeding, but make sure that the paper guides touch the edges of the documents. 6. Gently push the stack forward to activate the tray sensor.
Use the scanner glass Place items that do not meet the specifications for the automatic document feeder (ADF) directly onto the scanner glass. Minimum size: No minimum size Maximum size: 216 x 300 mm (8.5 x 11.8 in) NOTE: Not all the length of the scanner glass is in the active imaging area, so make sure to position your originals as indicated by the reference mark on the edge of the scanner glass. Place the original face down on the scanner glass, as indicated by the reference mark.
Chapter 1 Use the transparent materials adapter (TMA) This section contains information about using the transparent materials adapter (TMA) to scan slides, including 35 mm slides, and negatives. • • Load slides or negatives Tips for scanning transparent items NOTE: You must use the HP scanning software to scan slides and negative frames using the TMA. Load slides or negatives The transparent materials adapter (TMA) enables you to scan two 35 mm slides or three negative frames at one time.
c. If the negative strip has fewer than three frames, insert the negatives light-shield into the negative strip holder, making sure the edge of the light-shield touches the last frame. d. Insert the negative strip holder back into the slide holder. 4. Close the scanner lid.
Chapter 1 Tips on using the Scan button ) button for the first time, you must select the shortcuts • Before you use the Scan ( you want displayed in the scan shortcuts menu. • To cancel a scan, press the Cancel ( ) button. • You can associate the Scan ( ) and Copy ( ) buttons with any button-aware scanning software. For more information, see the printed Getting Started Guide.
3. In the HP Scanning shortcuts dialog box: a. Select the scan shortcut you want to use. b. If you want to change scan settings or show a preview before you scan, click Change Settings... and make the changes you want. For more information, see the scanner software help. c. Click Scan. 4. If you chose to show a preview, the HP Scanning preview window is displayed. Make the changes you want. When you are done, click Finish. For more information, see the scanner software help.
Chapter 1 Make copies Use the Copy ( ) button to scan an original and send it to a printer. To make copies, follow these steps: 1. Load the originals. 2. Press the Copy ( ) button. The copy is sent to the printer and the HP Copy dialog box displays on the connected computer. 3. If you want to change the settings, such as number of copies or output type, follow these steps: a. Click Cancel in the progress dialog box. b. Make the changes you want in the HP Copy dialog box. c. Click Start.
2 Useful scanning features Experienced document management professionals might be interested in the following scan features. Many of these features are also available from any ISIS- or TWAINcompliant document scanning software that allows you to modify the scan settings.
Chapter 2 Automatically remove blank pages To set your scan preferences to automatically remove blank pages from the automatic document feeder (ADF) output scan, follow these steps: 1. Double-click the HP Scanning icon on the desktop, select a document scan shortcut, click Change Settings..., select Document (Glass or Feeder) as the scan type under Scan Shortcut Settings, and then click Advanced Document Settings.... 2.
3. Finish the scan by clicking Finish in the HP Scanning preview window. 4. Wait for the scanning software to process the scanned document pages according to the profile settings. You can set up a scan shortcut that skips Steps 2 and 3 of the standard process. After you select this shortcut, press the Scan button on the scanner front panel or click Scan... in the HP Scanning shortcuts dialog box. The pages will be scanned and processed without further intervention.
3 Care and maintenance This section presents information about how to care for and maintain the scanner. • • • • • • Clean the scanner glass Clean the transparent materials adapter (TMA) Clean the automatic document feeder (ADF) HP Scanner Tools Utility scanner maintenance information Replace the feed roller and separation pad Order maintenance and scanner supplies Occasional cleaning of your scanner helps ensure higher-quality scans.
NOTE: If cleaning the top surface of the glass does not remove all dirt and smudges from the glass, you can also clean the underside of the glass. Cleaning the underside of the glass requires that you disassemble the scanner. For instructions on how to clean the underside of the scanner glass, see www.hp.com/support. Clean the transparent materials adapter (TMA) Clean the TMA with a dry, soft cloth. If necessary, lightly spray the cloth with glass cleaner and wipe the TMA.
Chapter 3 To clean the ADF, follow these steps: 1. Turn off the scanner and then disconnect the USB cable and power cable from the scanner. 2. Open the scanner lid.
3. Clean the white strip on the inside of the scanner cover and the clear scanning strip on the scanner bed. Wipe these items with a clean, damp, lint-free cloth. 4. Open the ADF access door (1) and the roller cover (2) inside the ADF.
Chapter 3 5. Wipe the ADF rollers with a clean, damp, lint-free cloth. 6. Wait several minutes for the rollers to dry, and then close the ADF roller cover and access door. 7. Reconnect the USB cable and power cable to the scanner. HP Scanner Tools Utility scanner maintenance information The Maintenance tab of the HP Scanner Tools Utility displays the scanner usage and maintenance history. You can use this tab to record ADF feed roller and separation pad replacement.
The feed roller replacement kit contains a feed roller, separation pad, and installation instructions. To order replacement kits, go to www.hp.com/support. To replace the feed roller and separation pad, follow these steps: 1. Turn off the scanner, and then disconnect the USB cable and power cable from the scanner. 2. Open the ADF access door and roller cover, and then replace the feed roller and separation pad as described in the installation instructions that were included with the replacement kit. 3.
4 Troubleshooting This section contains solutions for common problems with the scanner, automatic document feeder (ADF), and transparent materials adapter (TMA).
• • • “Check that the scanner has power” on page 30 “Check the cables” on page 28 “Check the USB connection” on page 29 Scanner LEDs The scanner has two LEDs on the front panel that indicate scanner functions and error conditions. The LED in the shape of an exclamation point (!) is the Attention LED, and the LED in the Power button is the Power LED. The table below explains how to interpret the indicator LEDs. The Attention LED quickly blinks amber. The Power LED is lit with a steady green light.
Chapter 4 Check the cables Cable type Action Power cable The power cable is connected between the scanner and a power outlet. • • • USB cable Ensure that the power cable is securely connected between the scanner and a live electrical outlet or surge protector. If the power cable is connected to a surge protector, ensure that the surge protector is plugged into an outlet and turned on. Turn off the scanner power switch and turn off the computer.
Scanner initialization or hardware problems If the scanner does not work after installation or if the scanner has stopped working correctly, you might see a message on the computer screen that is similar to one of the following: • • • • The scanner could not be initialized. The scanner could not be found. An internal error has occurred. The computer cannot communicate with the scanner.
Chapter 4 port, or another USB device. Leave the scanner directly connected to the computer through a USB port on the back of the computer. Try using the scanner after reconnecting each additional USB device, and disconnect any USB devices that prevent the scanner from working correctly. If the scanner does not work, uninstall and then reinstall the HP scanning software.
Test the scanner hardware If you think that the scanner has a hardware problem, verify that the cables are firmly connected to the scanner, the computer, and the power source. If the cables are correctly connected, verify that the scanner is turned on. To test the scanner hardware, follow these steps: 1. Disconnect the USB, power, and TMA/ADF cables from the scanner. 2. Reconnect the USB, power, and TMA/ADF cables to the scanner.
Chapter 4 software, and then click Help in the HP Scanning shortcuts dialog box menu. The help system provides information about the scanner hardware as well as information about the and HP scanning software. Also, see Scan troubleshooting in the general Troubleshooting and support section of the help.
Scanner is scanning items very slowly • If you are scanning to edit text, the optical character recognition (OCR) software requires more processing time than for non-OCR scans, which is normal. Wait for the item to scan. NOTE: For the best OCR results, scanner compression should be set to the minimum compression level or be disabled. • Scanning at a higher resolution than necessary increases scanning time and creates a larger file with no additional benefit.
Chapter 4 The bottom of the image is cut off when scanning from the scanner glass Not all the length of the scanner glass is in the active imaging area. When scanning from the scanner glass, make sure to position your originals as indicated by the reference mark on the edge of the scanner glass. Issues with scanning documents or text (OCR) The scanner uses optical character recognition (OCR) to convert text on a page to text that you can edit on your computer.
If the problem persists, the buttons might be disabled outside of the HP Scanner Tools Utility. Try the following procedure: 1. Open Control Panel, select Scanners and Cameras, and then select your scanner model from the list. 2. Display the scanner properties: • Windows 2000: Click Properties. • Windows XP and Vista: Right-click your scanner model, and then click Properties. 3. Examine the buttons setting for your scanner: • Windows 2000: Ensure that the Disable Device Events option is not selected.
Chapter 4 Automatic document feeder (ADF) problems Use this section to help resolve issues that might occur when scanning from the automatic document feeder (ADF). Paper jams usually result from inappropriate paper being fed into the ADF. Review the tips for using the ADF. If misfeeds occur frequently, perform ADF maintenance.
Scanned images contain streaks or scratches When scanning with the automatic document feeder (ADF), follow the steps below. After each step, try another scan to see if the streaks or scratches are still apparent. If so, try the next step. 1. Check that the originals are clean and unwrinkled. 2. Clean the ADF or the scanner glass. 3. Replace the separation pad and the feed roller.
Chapter 4 Scanned images are not straight When scanning with the automatic document feeder (ADF), make sure that the paper guides touch the edges of the original. Make sure that all documents are of the same width. When scanning from the scanner glass, the item might have shifted when you closed the lid. Straighten the original on the scanner glass, and then scan again.
4. Remove any jammed pages from the ADF output tray. 5. Close the ADF roller cover and access door. 6. At the scan destination, examine the scan output to determine which page was the last to be completely scanned. 7. Reload the unscanned pages in the ADF input tray. If any pages are damaged, do one of the following: • Scan the damaged page from the scanner glass. • Reprint the original document. Prepare the stack as follows: a.
Chapter 4 b. Align the edges of the documents by tapping the bottom of the stack against the table top. Rotate the stack 90 degrees and repeat. 8. Resume scanning. Automatic document feeder (ADF) does not feed paper • • The automatic document feeder (ADF) access door might not be securely latched. Open the ADF access door, and then close the door by pressing firmly. There might be a problem with the ADF hardware.
Incorrect colors print, or the image is too light or dark • • The software might be setting the exposure for the entire area instead of for one slide or negative. Select and drag the handles around the selection area until you see the image area you want to scan. Verify that you are using a scan shortcut appropriate for the transparent media type (slides or negatives). The scanned images are dark • • • Check to see if the TMA light is on before you click Scan or Finish.
5 Product support The following accessibility options are available on this scanner: • • Control of the scanner buttons Getting assistance NOTE: The scanner User Guide is available in a help format that is readable by most screen readers. To find this file, click Start, point to Programs or All Programs, point to HP, point to Scanjet, point to N6310, and then click User Guide.
3. HP support by phone • See the phone list in the printed Getting Started Guide for support numbers for your country or region. • Support options and fees vary by product, country/region, and language. • Fees and policies are subject to change without notice. Please see www.hp.com/ support for the latest information. 4. Post-warranty period After the limited warranty period, help is available online at www.hp.com/support. 5.
Index A E J ADF clean 21 clear jams 38 cut-off images 40 feeding, troubleshoot 40 load paper 7 maintenance 21 streaks, troubleshoot 37 Attention LED 27 automatic document feeder (ADF) 5 editable text troubleshoot 34 energy consumption, set 6 jams, ADF 38 B Back button 5 black scans, troubleshoot 37 blank pages 18 bottom of image missing 34 buttons scanner control panel 4 troubleshoot 34 C cables troubleshoot 28 Cancel button 5 Care Pack Services 43 clean ADF 21 scanner glass 20 TMA 21 clear jams, ADF
Index parts, order 24, 25 Power button 5 Power LED 27 power supply troubleshoot cable 28 power-on, troubleshoot 32 product support 42 R remove blank pages 18 remove software 28 replace feed roller 24 replace separation pad 24 reset scanner 30 rotate pages 17 S scan files too large 33 from the HP scanning software 14 from WIA or TWAIN software 15 start 13 with one button press 18 Scan button scan from 13 troubleshoot 35 scan shortcuts troubleshoot 35 scanner automatic document feeder 5 control panel 4 feat
46