HP Scanjet N6350 User Guide
Contents 1 Use the scanner HP scanning software overview.................................................................................................4 Scanner overview.......................................................................................................................5 Scanner control panel...........................................................................................................6 Automatic document feeder (ADF)..........................................................
Manage the network scanner...................................................................................................22 Management and administration tools................................................................................22 HP Scanner Tools Utility.....................................................................................................22 Network settings.................................................................................................................
Contents Scanner operation problems....................................................................................................42 Scanner will not turn on......................................................................................................43 Scanner lamp stays on.......................................................................................................43 Scanner does not start scan right away.............................................................................
1 Use the scanner The following topics describe the HP Scanjet scanner as well as how to scan or copy original documents. • • • • • • HP scanning software overview Scanner overview Scanner settings Load originals Start a scan Make copies HP scanning software overview When you install the HP scanning software, the following icons are added to your desktop. These icons open programs for scanning, copying, and editing your scans. HP Scanning is the program to use for scanning pictures and documents.
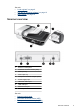
See also • • • “Load originals” on page 9 “Use the HP scanning software” on page 16 “Make copies” on page 18 Scanner overview 1 Scanner control panel 2 Automatic document feeder (ADF) 3 ADF input tray 4 ADF output tray 5 Transparent materials adapter (TMA) 6 Power supply input 7 TMA/ADF cable input 8 USB cable port 9 Ethernet reset port 10 Ethernet port See also • • • Scanner control panel Automatic document feeder (ADF) Transparent materials adapter (TMA) Scanner overview 5
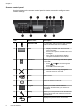
Chapter 1 Scanner control panel Use the buttons on the scanner control panel to start a scan and to configure some scanner settings. Icon Button name Description 1 Attention LED In combination with the Power LED, indicates scanner functions and error conditions. 2 LCD • • • 3 OK/Select Allows you to scroll through and select options in the LCD. • • 4 6 Cancel Displays available scan shortcuts that users can select. Shows menu options and status and error messages.
(continued) Icon Button name Description 10 Copy Starts a copy, displaying the HP Copy dialog box on the computer. See also • • • • • “Start a scan” on page 15 “Make copies” on page 18 “Scanner settings” on page 7 “Scanner LEDs” on page 37 “Configure and manage the scanner on a network” on page 19 Automatic document feeder (ADF) You can use the automatic document feeder (ADF) to scan single pages or multipage documents quickly and easily.
Chapter 1 Language To select the language shown on the LCD, follow these steps: 1. Press the Setup ( ) button, use and to select Language, and then press OK. and until the language you want is selected, press OK to confirm the 2. Use language selection, and then press OK to exit. Power Mode You can reduce the scanner's energy consumption with the following settings: • • Energy Savings: Reduces energy consumption but increases the time it takes to begin a scan or copy.
Load originals You can load your originals into your scanner using one of the following methods: • • • Use the automatic document feeder (ADF) Use the scanner glass Use the transparent materials adapter (TMA) Use the automatic document feeder (ADF) For helpful information on loading your documents properly, refer to the following topics. • • Document loading tips How to load documents Document loading tips • The automatic document feeder (ADF) supports the following paper types.
Chapter 1 • • • • • When loading a stack of documents, make sure that all of the documents are the same width. When loading pages in landscape orientation, make sure that the top of the pages point toward the back of the scanner. Doing so ensures that the scanner automatically rotates the page correctly, if you have set the HP scanning software to rotate landscape pages automatically. The maximum capacity of the ADF is 50 sheets of 75 g/m2 (20 lb) paper.
2. Fan the stack of document pages to ensure that the pages do not stick together. Fan the edge that will be pointing into the ADF in one direction, and then fan that same edge in the opposite direction. 3. Align the edges of the documents by tapping the bottom of the stack against the table top. Rotate the stack 90 degrees and repeat. 4. Place the stack in the middle of the input tray. Load the stack face up.
Chapter 1 5. Adjust the paper guides to the width of the documents. Take care not to overtighten the guides, which can restrict paper feeding, but make sure that the paper guides touch the edges of the documents. 6. Gently push the stack forward to activate the tray sensor.
TIP: To scan multiple pictures at the same time, arrange the pictures that you want to scan on the scanner glass with at least 6 mm (0.25 in) of space between items.
Chapter 1 Use the transparent materials adapter (TMA) This section contains information about using the transparent materials adapter (TMA) to scan slides, including 35 mm slides, and negatives. • • Load slides or negatives Tips for scanning transparent items NOTE: You must use the HP scanning software to scan slides and negative frames using the TMA. Load slides or negatives The transparent materials adapter (TMA) enables you to scan two 35 mm slides or three negative frames at one time.
c. If the negative strip has fewer than three frames, insert the negatives light-shield into the negative strip holder, making sure the edge of the light-shield touches the last frame. d. Insert the negative strip holder back into the slide holder. 4. Close the scanner lid.
Chapter 1 allowing you to transfer the scan shortcuts you want to use to the scanner control panel scan shortcuts list. a. In the Available Scan Shortcuts list, select a shortcut, and then click Add. b. Use the Move (up) and Move (down) arrows in the dialog box to arrange the shortcut sequence in the Front Panel List. The shortcuts will appear in this order as you scroll through the list on the control panel of your scanning device. c.
3. If your computer is networked to multiple HP N6350 scanners, select the scanner you want to use from the Device menu, and then click OK. 4. In the HP Scanning shortcuts dialog box: a. Select the scan shortcut you want to use. b. If you want to change scan settings or show a preview before you scan, click Change Settings... and make the changes you want. For more information, see the scanner software help. c. Click Scan. 5. If you chose to show a preview, the HP Scanning preview window is displayed.
Chapter 1 Make copies Use the Copy ( ) button to scan an original and send it to a printer. To make copies, follow these steps: 1. Load the originals. 2. If your scanner is networked: and on the scanner control panel to select your computer, and then a. Use press OK. b. If prompted, enter your PIN and then press OK. 3. Press the Copy ( ) button. The copy is sent to the printer and the HP Copy dialog box displays on the connected computer. 4.
2 Configure and manage the scanner on a network This section is intended for the administrator or individual responsible for managing the network scanner. You have the option to install the HP Scanjet N6350 on a network, where it can be shared by up to 20 computers. The following topics describe how to configure and manage your networked scanner.
Chapter 2 5. If there is more than one HP Scanjet N6350 scanner on the network, locate the serial number and IP address of the scanner to which you want to connect. a. Press the Setup ( ) button on the scanner control panel, use to select Network, and then press OK. b. Use to select View Settings, and then press OK. to scroll to the serial number and IP address settings, then press OK to c. Use view the information without scrolling. 6. Complete the network connection.
Connect to additional network scanners To connect to additional scanners on the network, complete these steps. 1. Start the HP Scanner Tools Utility. 2. Click the Network tab, click Connect Scanner, and then follow the onscreen instructions. NOTE: If you do not see the scanner to which you want to connect, make sure the scanner is not connected to a computer via the USB cable.
Chapter 2 Manage the network scanner This section is intended for the administrator or individual responsible for managing the network scanner. • • • • Management and administration tools HP Scanner Tools Utility Network settings Embedded Web Server Management and administration tools Use the following tools to manage and administer the device.
• • Check the status of the network or the connection to an individual scanner. Disconnect from a networked scanner and remove your computer from the scanner's list of computers. For information on completing these tasks, see the HP Scanner Tools Utility Help system. To start the HP Scanner Tools Utility and access the network functions, complete these steps. 1. Press the Setup ( ) button. until Tools is highlighted, press OK to start the HP Scanner Tools Utility 2.
Chapter 2 • • • • Gateway Link Speed: Automatic, 10–Full, 10–Half, 100–Full, 100–Half Type: DCHP or Static Hostname See also • • • “HP Scanner Tools Utility” on page 22 “Network settings” on page 23 “Embedded Web Server” on page 25 Change network setup type Use the Network Setup menu on the control panel LCD Network menu to change the network setup type for the scanner.
1. From the Network Setup menu, use to select IP Address, and then press OK. to select the way you want to change the IP address. 2. Use • Select Automatic if you want the system to automatically change the IP address. • Select Manual if you want to manually enter a new IP Address, subnet mask, or gateway. 3. Press OK. If you selected Automatic, press OK again to confirm the IP address change.
Chapter 2 Embedded Web Server requirements Your network environment must meet the following requirements to use the Embedded Web Server. • • • • • A TCP/IP-based network. Microsoft Internet Explorer 5.0 or higher or Mozilla Firefox 2.0 or higher installed on the host computer. An Ethernet connection. An Internet connection is required to access support from the Embedded Web Server.
(continued) Tabs Description • • Networking Power Options Device Services Shows network status and allows you to change the network settings that have been configured for the device. NOTE: Network pages only appear if the device is connected to a network. • Device Host Name • • • Wired (802.
3 Useful scanning features Experienced document management professionals might be interested in the following scan features. Many of these features are also available from any ISIS- or TWAINcompliant document scanning software that allows you to modify the scan settings.
Automatically remove blank pages To set your scan preferences to automatically remove blank pages from the automatic document feeder (ADF) output scan, follow these steps: 1. Double-click the HP Scanning icon on the desktop, select a document scan shortcut, click Change Settings..., select Document (Glass or Feeder) as the scan type under Scan Shortcut Settings, and then click Advanced Document Settings.... 2.
Chapter 3 If you are shown a scan preview when you scan from the Scan ( the following steps: ) button, complete 1. Double-click the HP Scanning icon on your desktop to start the HP Scanning software. 2. On the HP Scanning shortcuts dialog box, click the Options menu, and then click Button Settings. 3. Click the Front Panel Scan Button Settings tab, clear the Show preview scan check box, and then click OK.
4 Care and maintenance This section presents information about how to care for and maintain the scanner. • • • • • • Clean the scanner glass Clean the transparent materials adapter (TMA) Clean the automatic document feeder (ADF) HP Scanner Tools Utility scanner maintenance information Replace the feed roller and separation pad Order maintenance and scanner supplies Occasional cleaning of your scanner helps ensure higher-quality scans.
Chapter 4 NOTE: If cleaning the top surface of the glass does not remove all dirt and smudges from the glass, you can also clean the underside of the glass. Cleaning the underside of the glass requires that you disassemble the scanner. For instructions on how to clean the underside of the scanner glass, see www.hp.com/support. Clean the transparent materials adapter (TMA) Clean the TMA with a dry, soft cloth. If necessary, lightly spray the cloth with glass cleaner and wipe the TMA.
To clean the ADF, follow these steps: 1. Turn off the scanner and then disconnect the USB or Ethernet cable and power cable from the scanner. 2. Open the scanner lid. 3. Clean the white strip on the inside of the scanner cover and the clear scanning strip on the scanner bed. Wipe these items with a clean, damp, lint-free cloth.
Chapter 4 4. Open the ADF access door (1) and the roller cover (2) inside the ADF. 5. Wipe the ADF rollers with a clean, damp, lint-free cloth. 6. Wait several minutes for the rollers to dry, and then close the ADF roller cover and access door. 7. Reconnect the USB or Ethernet cable and power cable to the scanner. HP Scanner Tools Utility scanner maintenance information The Maintenance tab of the HP Scanner Tools Utility displays the scanner usage and maintenance history.
For detailed information on using the HP Scanner Tools Utility, see the HP Scanner Tools Utility help. Replace the feed roller and separation pad Replace the feed roller and separation pad under either of the following conditions: • • Streaks on scans or paper jams occur repeatedly and cleaning the automatic document feeder does not help. The HP Scanner Tools Utility Maintenance tab indicates that maintenance is due.
5 Troubleshooting This section contains solutions for common problems with the scanner, automatic document feeder (ADF), and transparent materials adapter (TMA).
See also • • • • • “Care and maintenance” on page 31 “Reset the scanner” on page 41 “Check that the scanner has power” on page 40 “Check the cables” on page 38 “Check the USB or Ethernet connection” on page 39 Scanner LEDs The scanner has two LEDs on the control panel that indicate scanner functions and error conditions. The LED in the shape of an exclamation point (!) is the Attention LED, and the LED in the Power button is the Power LED. The table below explains how to interpret the indicator LEDs.
Chapter 5 Check the cables Cable type Action Power cable The power cable is connected between the scanner and a power outlet. • • • USB cable Ensure that the power cable is securely connected between the scanner and a live electrical outlet or surge protector. If the power cable is connected to a surge protector, ensure that the surge protector is plugged into an outlet and turned on. Turn off the scanner power switch and turn off the computer.
3. Click Remove. 4. Disconnect the USB or Ethernet cable. 5. Reinstall the software using the HP Scanning Software CD that came with your scanner. When you insert the CD, an installation interface launches automatically. Choose the software to install. 6. Reconnect the USB or Ethernet cable when prompted to do so during the software installation.
Chapter 5 • • • Use the USB or Ethernet cable that was included with the scanner. Another USB or Ethernet cable might not be compatible with the scanner. USB connection: Ensure that the USB cable is securely connected between the scanner and the computer. Ethernet connection: Ensure that the Ethernet cable is securely connected between the scanner and a network router, Ethernet jack, or Ethernet switch. If the problem persists after verifying the above items, follow these steps: 1.
If the problem persists after verifying the above items, follow these steps: 1. Press the Power button to turn off the scanner, and then disconnect the power cable from the scanner. 2. Wait 30 seconds. 3. Reconnect the power cable to the scanner, then turn on the scanner. After 30 seconds, the Power LED is lit with a steady green light and the Attention LED is off.
Chapter 5 Scanner has stopped working properly If the scanner stops scanning, complete the following steps, in order. After each step, start a scan to see if the scanner is working. If the problem continues, proceed with the next step. 1. A cable might be loose. Ensure that the USB or Ethernet, power, and TMA/ADF cables are securely connected. 2. Turn off the scanner, wait 60 seconds, and then turn on the scanner. 3. Restart your computer. 4. A software conflict might exist on your computer.
Scanner will not turn on If the scanner will not turn on when you press the scanner buttons, verify the following: • • Verify that the power cable has not become disconnected from the scanner or unplugged from the power source. Ensure that the scanner is turned on. See also “Check the cables” on page 38 Scanner lamp stays on The scanner lamp should time out and turn off automatically after 14 minutes of inactivity.
Chapter 5 Vertical white stripes appear on the printed page The destination printer might be out of toner or ink. Print a non-scanned item such as a file, or scan the same original to a scan destination other than the printer. If you still see the problem, clean the automatic document feeder, scanner glass, or TMA (if scanning slides or negatives).
• • To change text scanning options, click Change Settings... in the HP Scanning shortcuts dialog box. The OCR software is installed by default when you install the HP scanning software during scanner setup. If you use the Custom option when installing the software, you can choose not to install the OCR software. Try reinstalling the software using the default install options.
Chapter 5 After each step, press a button to see if it is working correctly. If the problem persists, proceed with the next step. 1. On the Buttons tab of the HP Scanner Tools Utility, determine the associations for the Scanner Front Panel Buttons. If necessary, change the software that is assigned to a button. 2. Verify that the expected program is installed on the computer by looking at the Start menu. If necessary, install the program.
See also • • “How to load documents” on page 10 “Care and maintenance” on page 31 Scanned image is fuzzy When scanning with the automatic document feeder (ADF), follow these steps: 1. Verify that the document original is not fuzzy. 2. Check for any obstructions in the scanner paper path and make sure that the paper guides are positioned appropriately. Try another scan. 3. If the scanned image is still of poor quality, clean the ADF. When scanning from the scanner glass, follow these steps: 1.
Chapter 5 Scanned pages are out of order at the scan destination • • • Verify that the page order of the original document is correct before inserting into the automatic document feeder (ADF). Make sure that there are no staples, paper clips, or any other attached material (such as adhesive notes) that may cause the pages to feed incorrectly. Verify that pages are not stuck together.
Clear a jam from the automatic document feeder (ADF) To clear a jam from the ADF, follow these steps: 1. Remove any loose pages from the ADF input tray. 2. Open the ADF access door (1) and the roller cover (2) inside the ADF. 3. Remove any jammed pages from inside the ADF. 4. Remove any jammed pages from the ADF output tray. 5. Close the ADF roller cover and access door. 6. At the scan destination, examine the scan output to determine which page was the last to be completely scanned.
Chapter 5 7. Reload the unscanned pages in the ADF input tray. If any pages are damaged, do one of the following: • Scan the damaged page from the scanner glass. • Reprint the original document. Prepare the stack as follows: a. Fan the stack of document pages to ensure that the pages do not stick together. Fan the edge that will be pointing into the ADF in one direction, and then fan that same edge in the opposite direction. b.
Verify that you have specified an appropriate page size in the scanning software. Slides, negatives, and TMA issues Use this section to help resolve issues with 35 mm slides or 35 mm negatives that have been scanned by using the TMA.
Chapter 5 No light or only dim light is visible in the transparent materials adapter (TMA) after selecting a slides or negatives scanning shortcut After each step, start a scan to see if the scanner is working. If not, proceed with the next step. 1. Make sure that the TMA is connected to the scanner. 2. The bulb in the TMA might not be working. Press the Scan ( ) button and look for illumination. If the bulb is broken, service is required. 3. The TMA might need to warm up.
3. Click the Network tab. 4. Click the Check Status button. Problems connecting to a wired network • • If the Link light on the network connector does not turn on, make sure you have completed the items listed under Basic troubleshooting tips in this chapter. Though it is not recommended that you assign the device with a static IP address, you might resolve some installation problems (such as a conflict with a personal firewall) by doing so.
6 Product support In order to get the best results from your HP product, please consult the following HP support offerings: 1. See the product documentation that came with the product. • Review the troubleshooting section in this user guide. • Review the scanner software help (click Start, point to Programs or All Programs, point to HP, point to Scanjet, point to N6350, point to User Guide, and then select your preferred format). 2. See the HP online support website at www.hp.
Index A ADF clean 32 clear jams 49 cut-off images 50 feeding, troubleshoot 50 load paper 9 maintenance 32 streaks, troubleshoot 47 administer the scanner using Embedded Web Server 25 using HP Scanner Tools Utility 22 Attention LED 37 automatic document feeder (ADF) 7 B Back button 6 black scans, troubleshoot 48 blank pages 29 bottom of image missing 44 buttons scanner control panel 6 troubleshoot 45 C cables troubleshoot 38 Cancel button 6 Care Pack Services 54 CDs, software install 21 change IP address 2
N negatives load 14 scanning tips 15 troubleshoot 51 Network menu 8 network settings 23 networking problems connecting to a wired network 52 O OCR troubleshoot 44 OK/select button 6 order feed roller replacement 35 separation pad replacement 35 order maintenance supplies 35 P page orientation 28 pages out of order 48 troubleshoot 48 parts, order 35 Power button 6 Power LED 37 Power Mode, set 8 power supply troubleshoot cable 38 power-on, troubleshoot 43 product support 54 R remove blank pages 29 remove s
Index Scan button 45, 46 scan shortcut names 43 scanner 42 scanner glass 44 slides 51 speed 43 streaks 47 test scanner hardware 41 TMA 51 USB connection 39 white lines 44 white scans 48 troubleshooting 36 turn on, troubleshoot 43 TWAIN scan from 17 U uninstall software 38 USB cable troubleshoot 38 useful scanning features 28 V vertical white stripes troubleshoot 44 view network settings 23 W warranty extended 54 Web sites order maintenance supplies 35 replacement parts 35 white scans, troubleshoot 48 whi
58